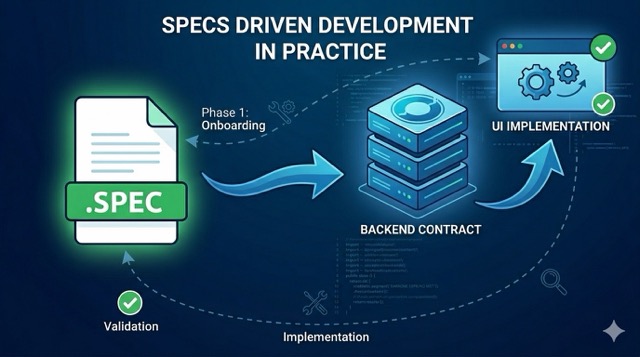
Specs-Driven Development in Practice: End-to-End Delivery with Spring Boot and Angular
Prompt-first AI work is great for exploration. It is not enough for delivery.
When the work starts to matter, the questions change. We need to know what the feature is supposed to do, what is out of scope, how the backend and frontend fit together, how we validate the flow, and how we keep the AI inside the boundaries we actually want. That is where specs-driven development helps.
One of the reasons I built this framework (and made it deliberately step by step) is that I see a real split on engineering teams right now. Senior engineers who already have strong fundamentals tend to do well with AI tools relatively quickly. Junior engineers, who are still building those fundamentals, often struggle to get consistent results. A vague workflow makes that gap wider. A structured one helps close it. My goal with SDD is to give teams with mixed experience levels a shared process they can all follow, so the quality of the output does not depend entirely on how long someone has been coding.
In this post, I want to show the full path I recommend using for a real feature: onboarding a repo into the workflow, writing the spec, reviewing it, designing the solution, implementing the backend in Spring Boot, adding the Angular slice, and closing the loop with end-to-end validation. The examples are based on the specs-driven-development framework I built, so this is not just theory: I use this to actually ship code to production in an enterprise environment.
To make the contrast easier to scan, here is the difference between prompt-first vibe coding and specs-driven development:
| Aspect | Prompt-First (Vibe) | Specs-Driven (SDD) |
|---|---|---|
| Source of truth | The conversation history | The .spec file in the repo |
| Scope control | “Best effort” by the AI | Explicitly defined non-goals |
| Multi-layer alignment | Hard to keep layers in sync | Contract-first alignment |
| Risk of drift | High: intent lives only in chat history | Low: intent persists in the repo |
| Outcome | Exploration / prototyping | Production-ready delivery |
In this post, we cover:
- How to onboard an existing repo into the specs-driven workflow
- How to write a spec before any design or code
- How to review the spec for ambiguity and missing decisions
- How to turn the spec into high-level and low-level design
- How to implement the backend in Spring Boot first
- How to add the Angular slice on top of the backend contract
- How to validate the whole flow end to end
This is not a post about prompting tricks. It is a post about building a workflow that makes AI-assisted delivery predictable.
0. Onboard the Repo and Install the Workflow
Before the first spec, the repo needs to speak the same language as the workflow. If the repository does not have the right artifacts, the AI has no shared operating model to follow. It can still generate code, but it will not be generating code inside a clear process.
That is why onboarding comes first.
At this stage, the goal is not to build a feature. The goal is to prepare the repository so the workflow is reproducible. That means:
- Identifying the stack and the current project shape
- Confirming whether the repo is greenfield or brownfield
- Adding the workflow folders and spec artifacts
- Copying the agents, skills, prompts, and templates into the target repo
- Making sure the repo is ready for the first
/specrun
If you are using the framework I built, this is where the repo gets the structure it needs to support the process instead of fighting it. In practice, that means the onboarding step should produce a minimal but explicit starting point: the stack classification, the baseline state, and the workflow files the AI will use from that point on.
A good way to think about this step is simple: before you ask the AI to write a spec, make sure the repo can hold a spec-driven workflow without guessing.
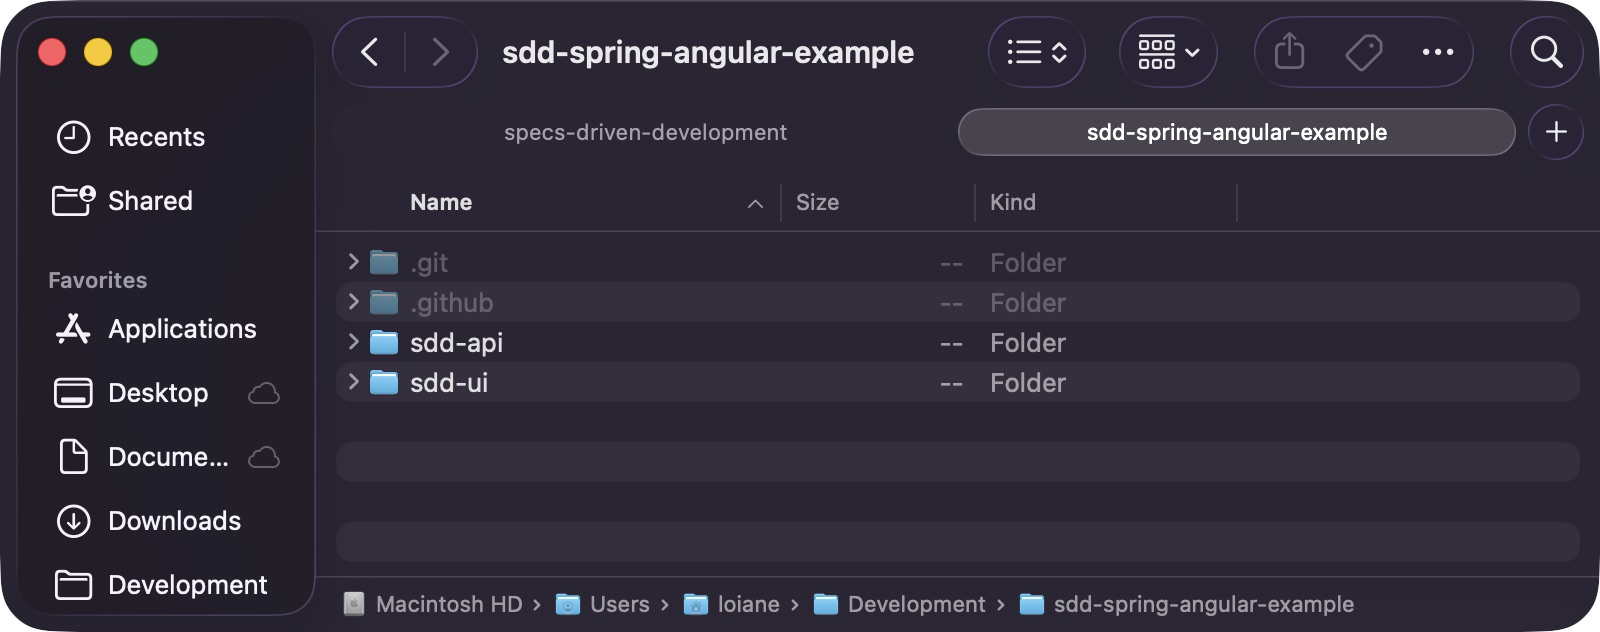
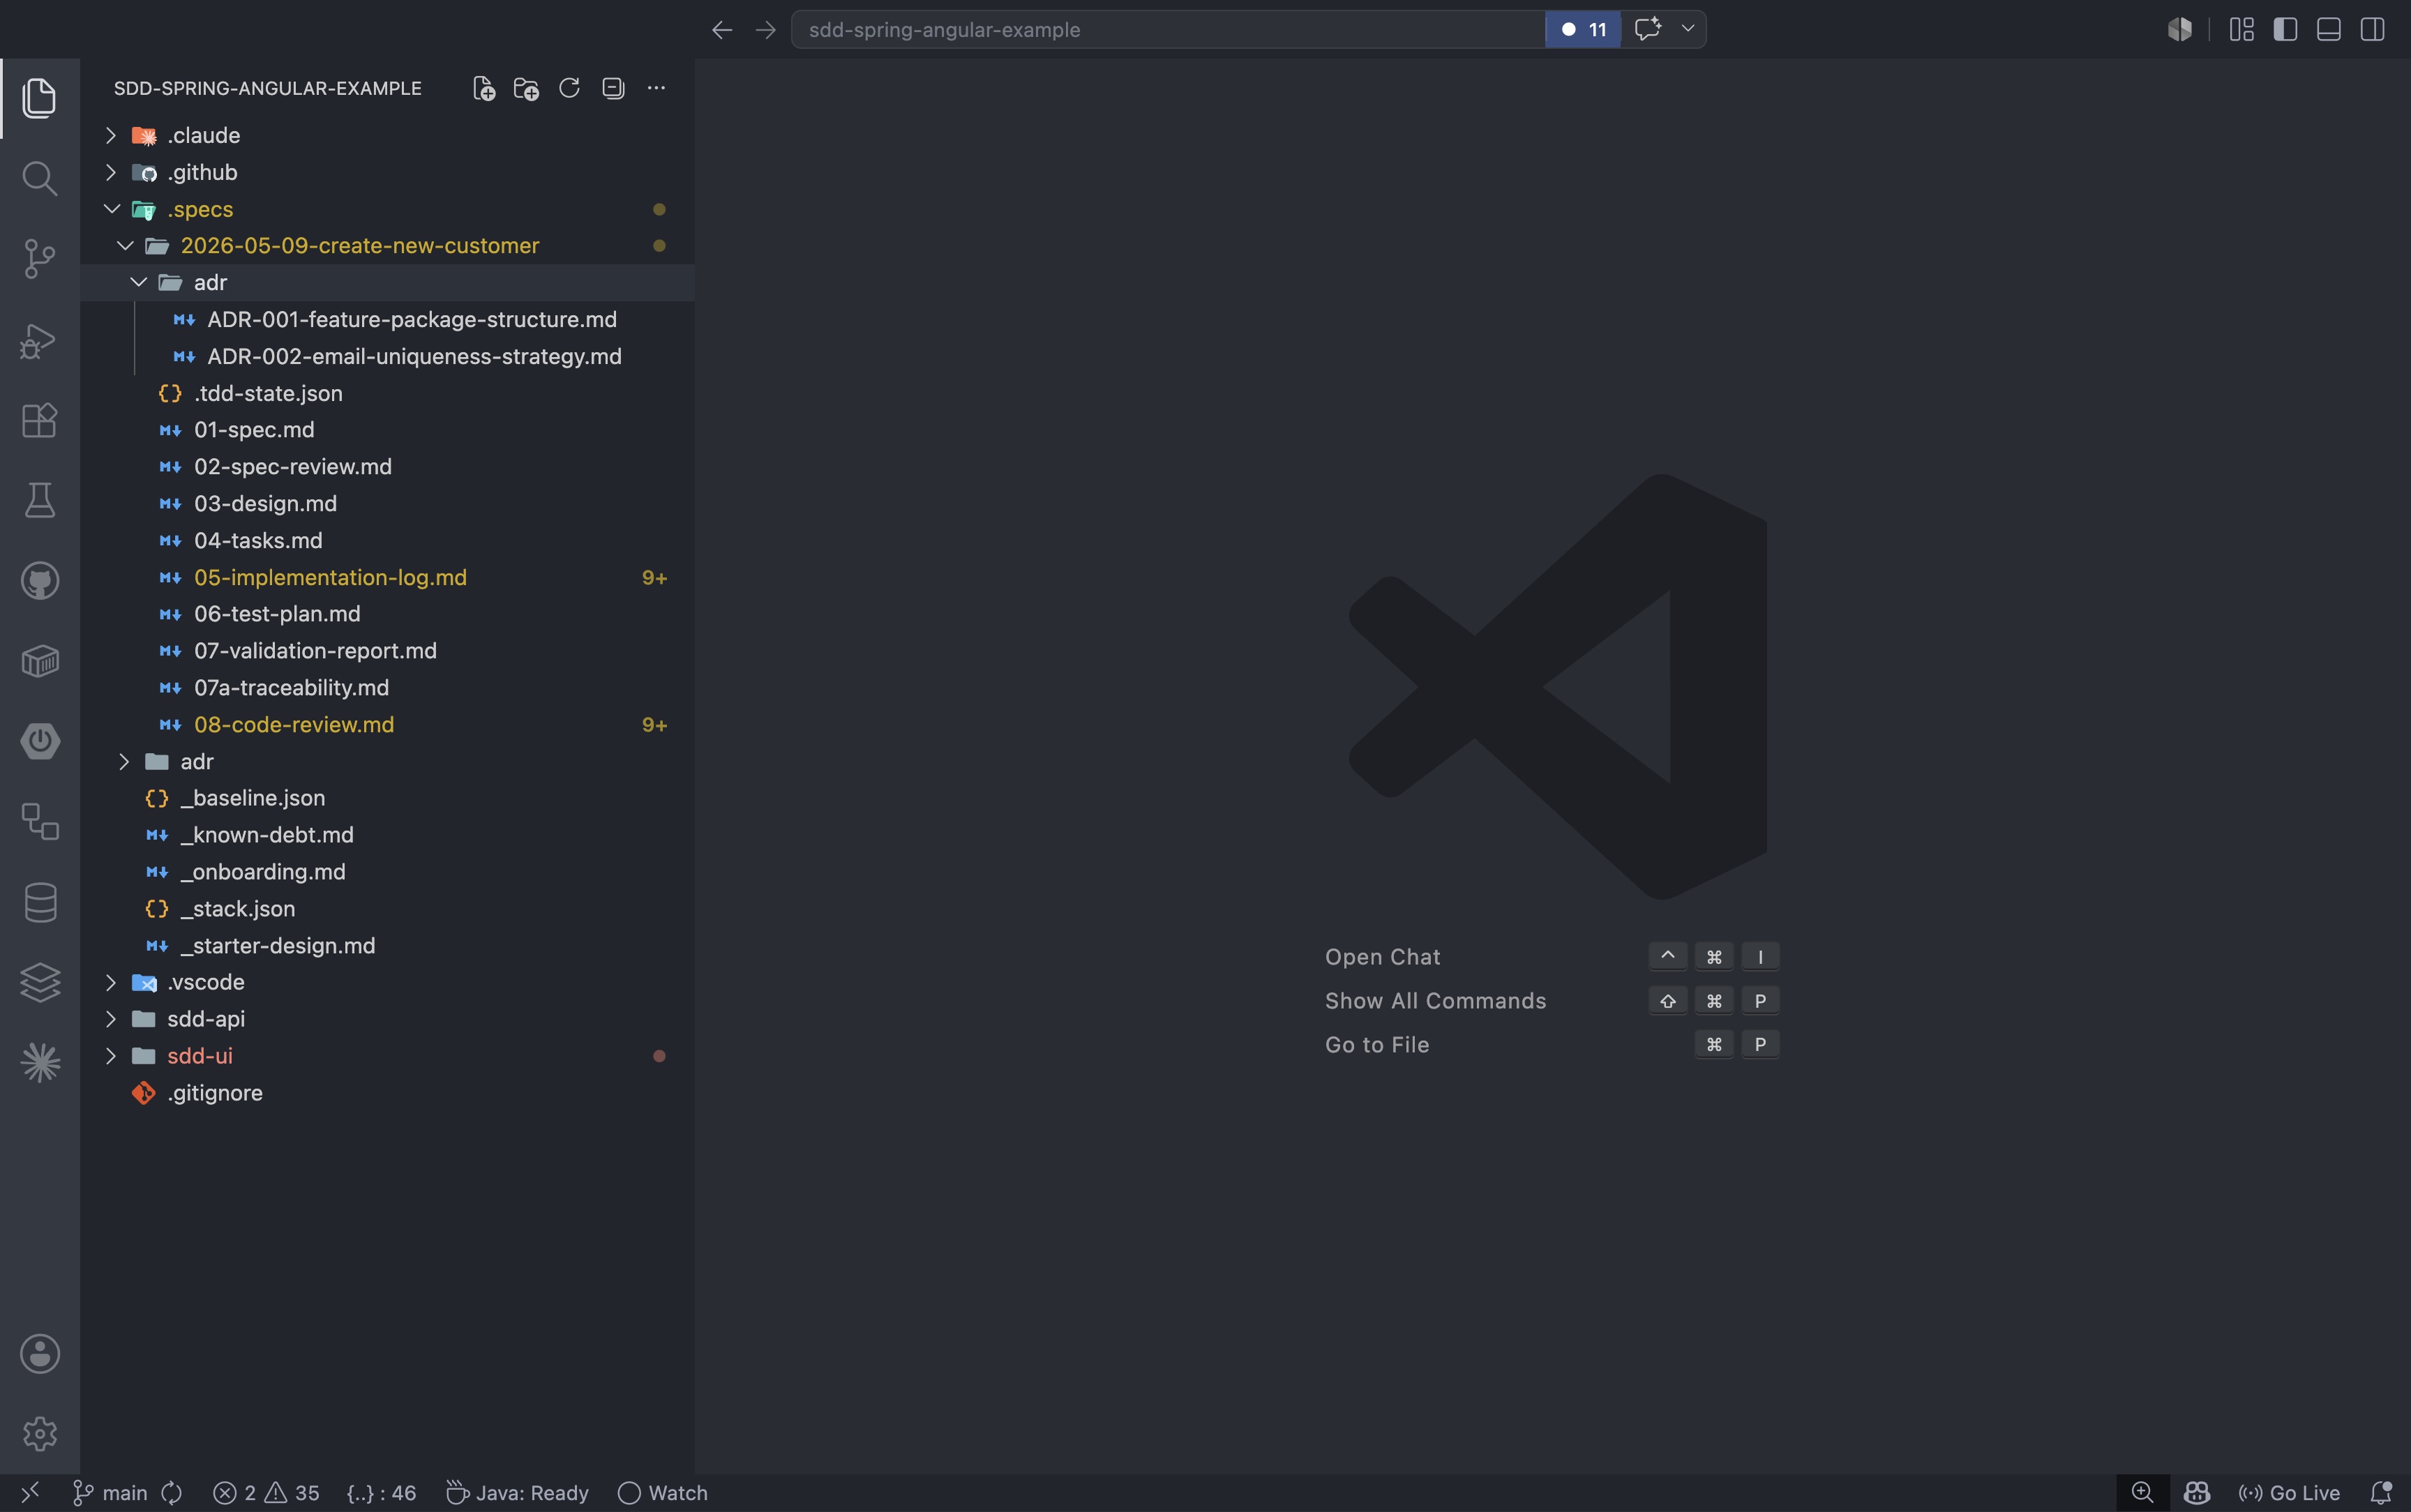
The example used throughout this post is sdd-spring-angular-example, a monorepo with two sub-projects: sdd-api (Spring Boot 4 with MySQL) and sdd-ui (Angular 21). Both were scaffolded using the official tools: Spring Initializr for the API and the Angular CLI for the UI. This is the starting state before any workflow artifacts are in place:
What the onboarding step should produce
- A clear repo classification
- A stack summary
- A baseline or starter design note
- The workflow files copied into the repo
- A
.specs/structure that can hold feature artifacts - A known starting point for the first feature
What to copy into the repo
The framework repo is organized around shared workflow artifacts. For a team adopting it, the important part is not just the ideas. It is the actual files. All the spec templates, agents, commands, skills, and review checklists used in this post are available in the specs-driven-development repo.
At minimum, I would copy the relevant workflow assets into the target repo:
- Agents and commands
- Skills
- Prompt templates
- Spec templates
- Review checklists
- Workflow documentation
That gives the repository a consistent language for:
- Spec writing
- Spec review
- Task decomposition
- Testing
- Validation
- Onboarding
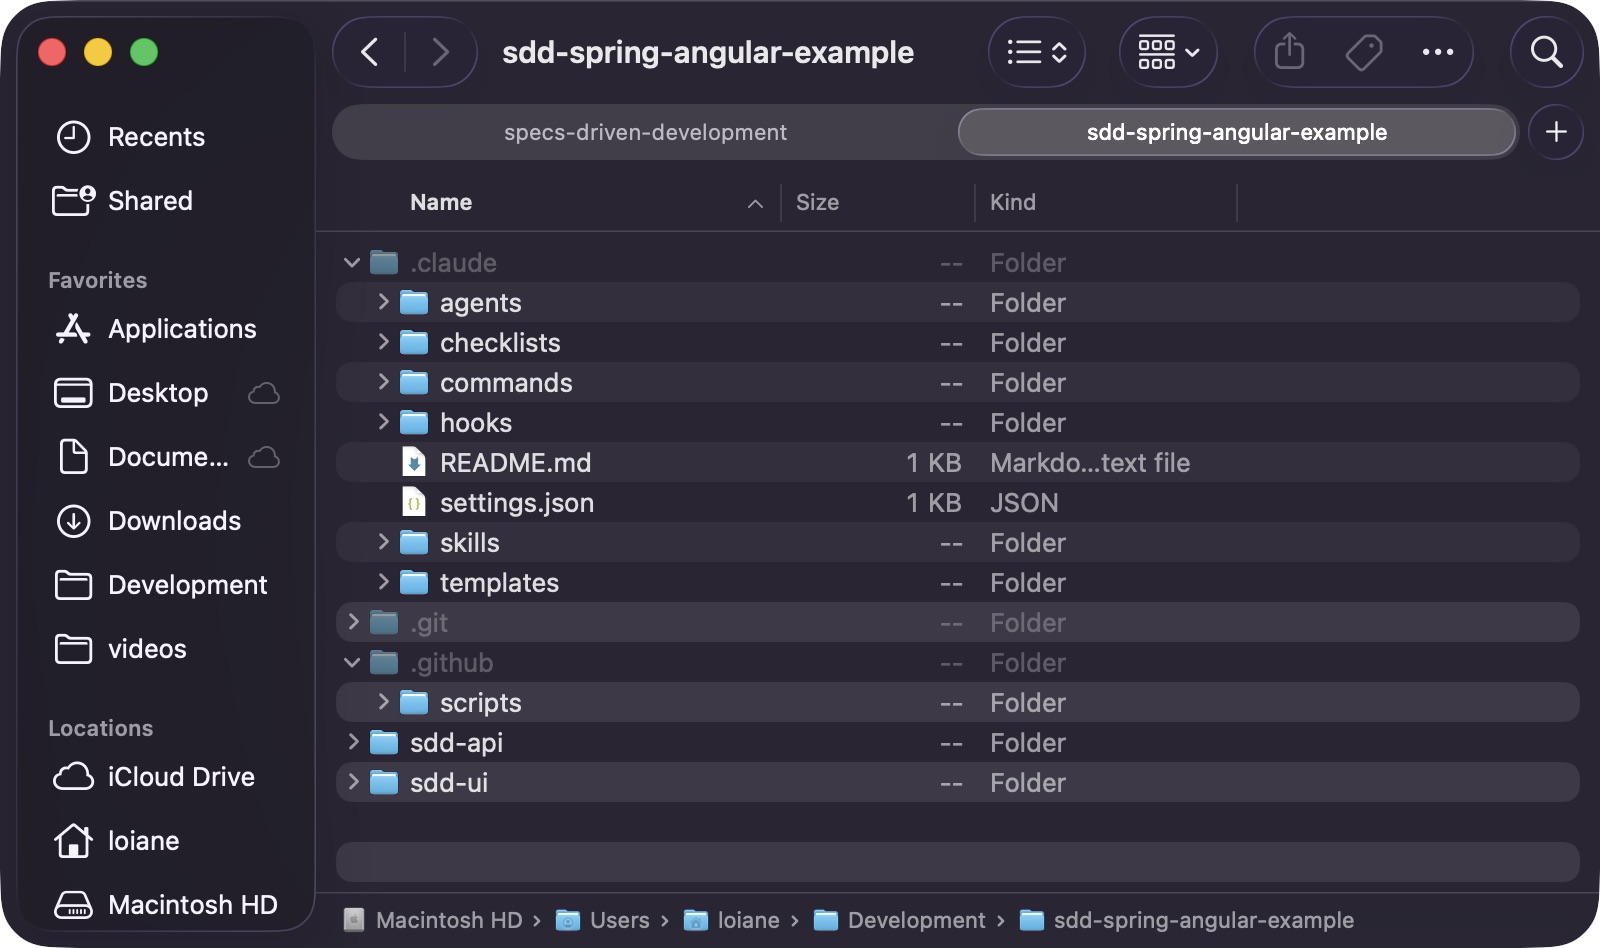
The exact folder layout depends on the toolchain, but the principle stays the same: the workflow lives with the codebase, not in someone’s head. In this example, I am using Claude Code, so I copied the .claude folder. If you are using GitHub Copilot, copy the .github folder instead (although .claude also works with Copilot). If you use another tool, check where it expects its agent and prompt definitions and copy the matching folder from the framework repo.
After copying the workflow files, the repository gains a .claude/ folder containing agents, checklists, commands, skills, and templates: the shared operating model the AI will use for every subsequent step:
Why this matters
Without onboarding, every new task starts from scratch.
With onboarding, the repo already has:
- Shared conventions
- Shared prompts
- Shared review gates
- Shared artifacts
- Shared validation expectations
That makes the rest of the workflow much easier to trust.
A practical onboarding flow looks like this:
- Inspect the repo structure and identify the stack.
- Decide whether this is greenfield or brownfield.
- Copy the workflow files into the repo.
- Create the initial
.specsstructure. - Record the baseline or starter design state.
- Verify the first feature can start from a known workflow entry point.
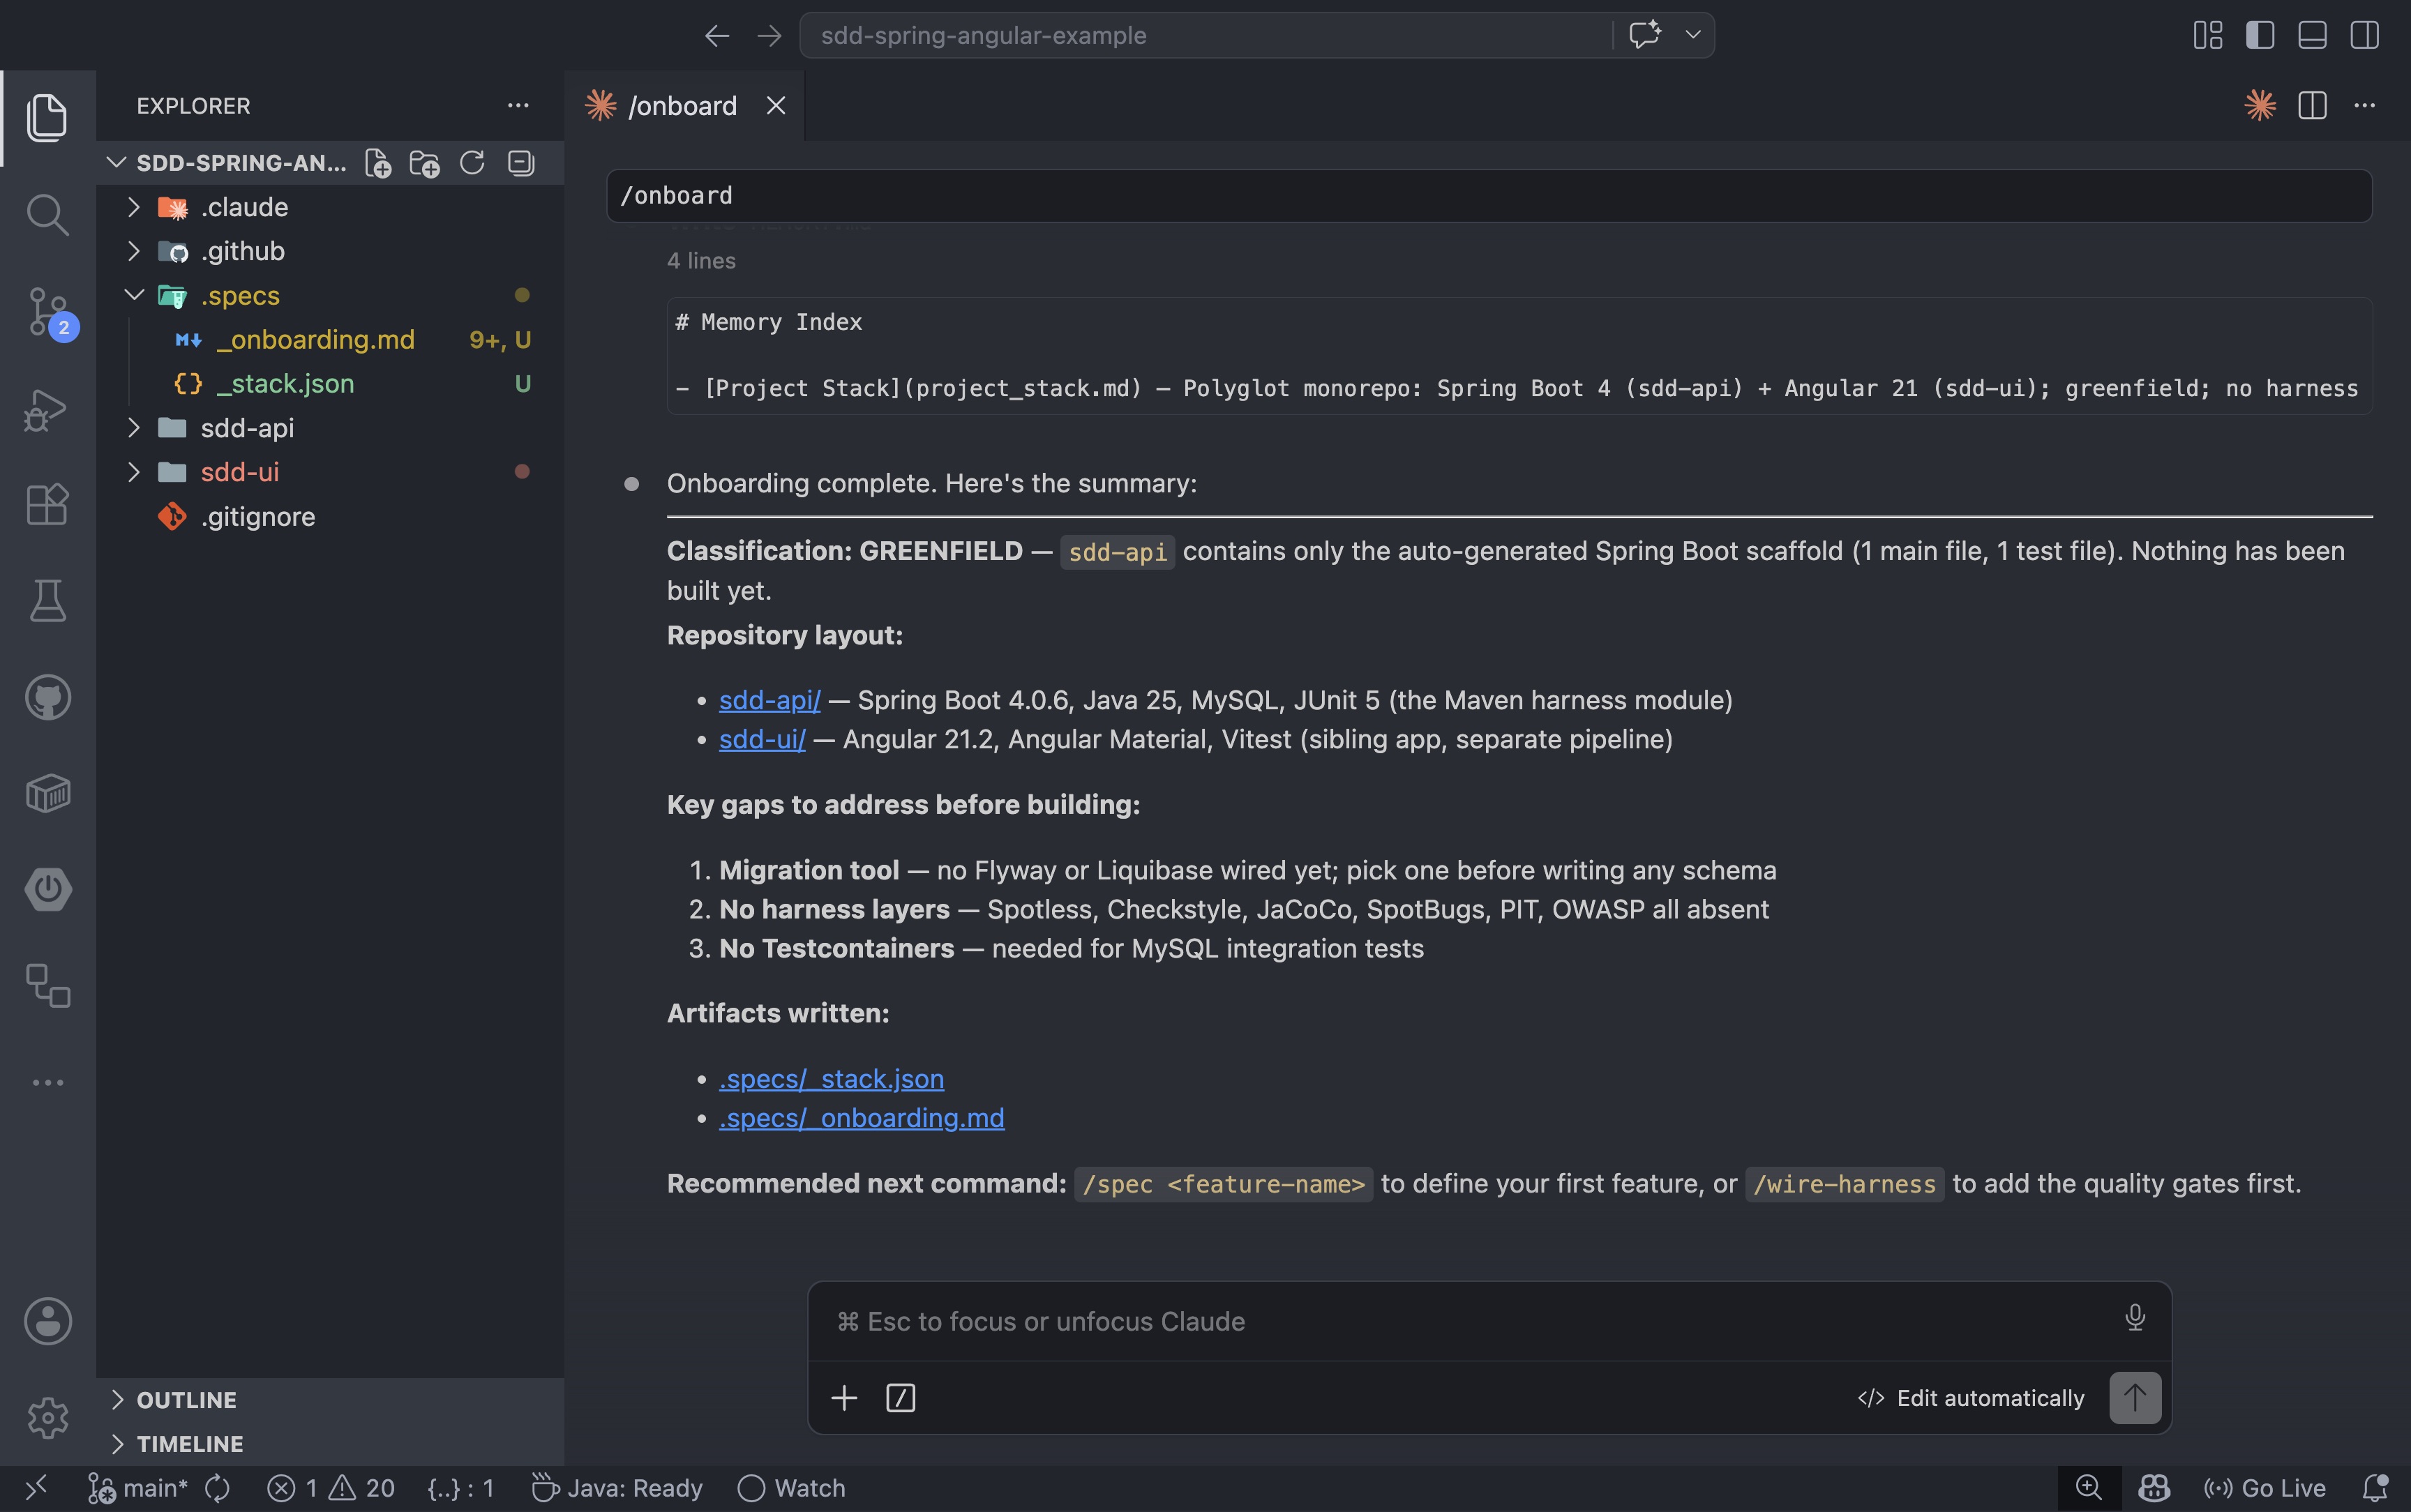
The first command to run against any repository is /onboard. It inspects the project, classifies the stack, and copies the framework workflow files into the repo:
1
/onboard
The /onboard agent inspects the stack, classifies the repo, identifies gaps, and writes two artifacts to .specs/: a _stack.json with the technology choices and an _onboarding.md with the baseline state. For the example repo, it classified the project as greenfield and flagged three gaps to address before the first build: no migration tool, no test harness, and no Testcontainers setup:
If the repo is brownfield, onboarding should also capture existing constraints, known debt, and the current harness state. If the repo is greenfield, the goal is simpler: establish the workflow from day one so the first feature follows the same path every time.
There is one important rule here for greenfield projects: do not let the AI tool create the project structure for you.
The reason is simple. The model has a knowledge cutoff, while framework and language versions keep moving. If you ask AI to scaffold a brand new project from scratch, there is a good chance it will generate something that is already one step behind the current recommended setup.
For Spring projects, use Spring Initializr to create the application. For Angular projects, use the Angular CLI to generate the workspace and starter structure. Only after the official project scaffold is in place should you start using AI to help with specs, design, implementation, and validation.
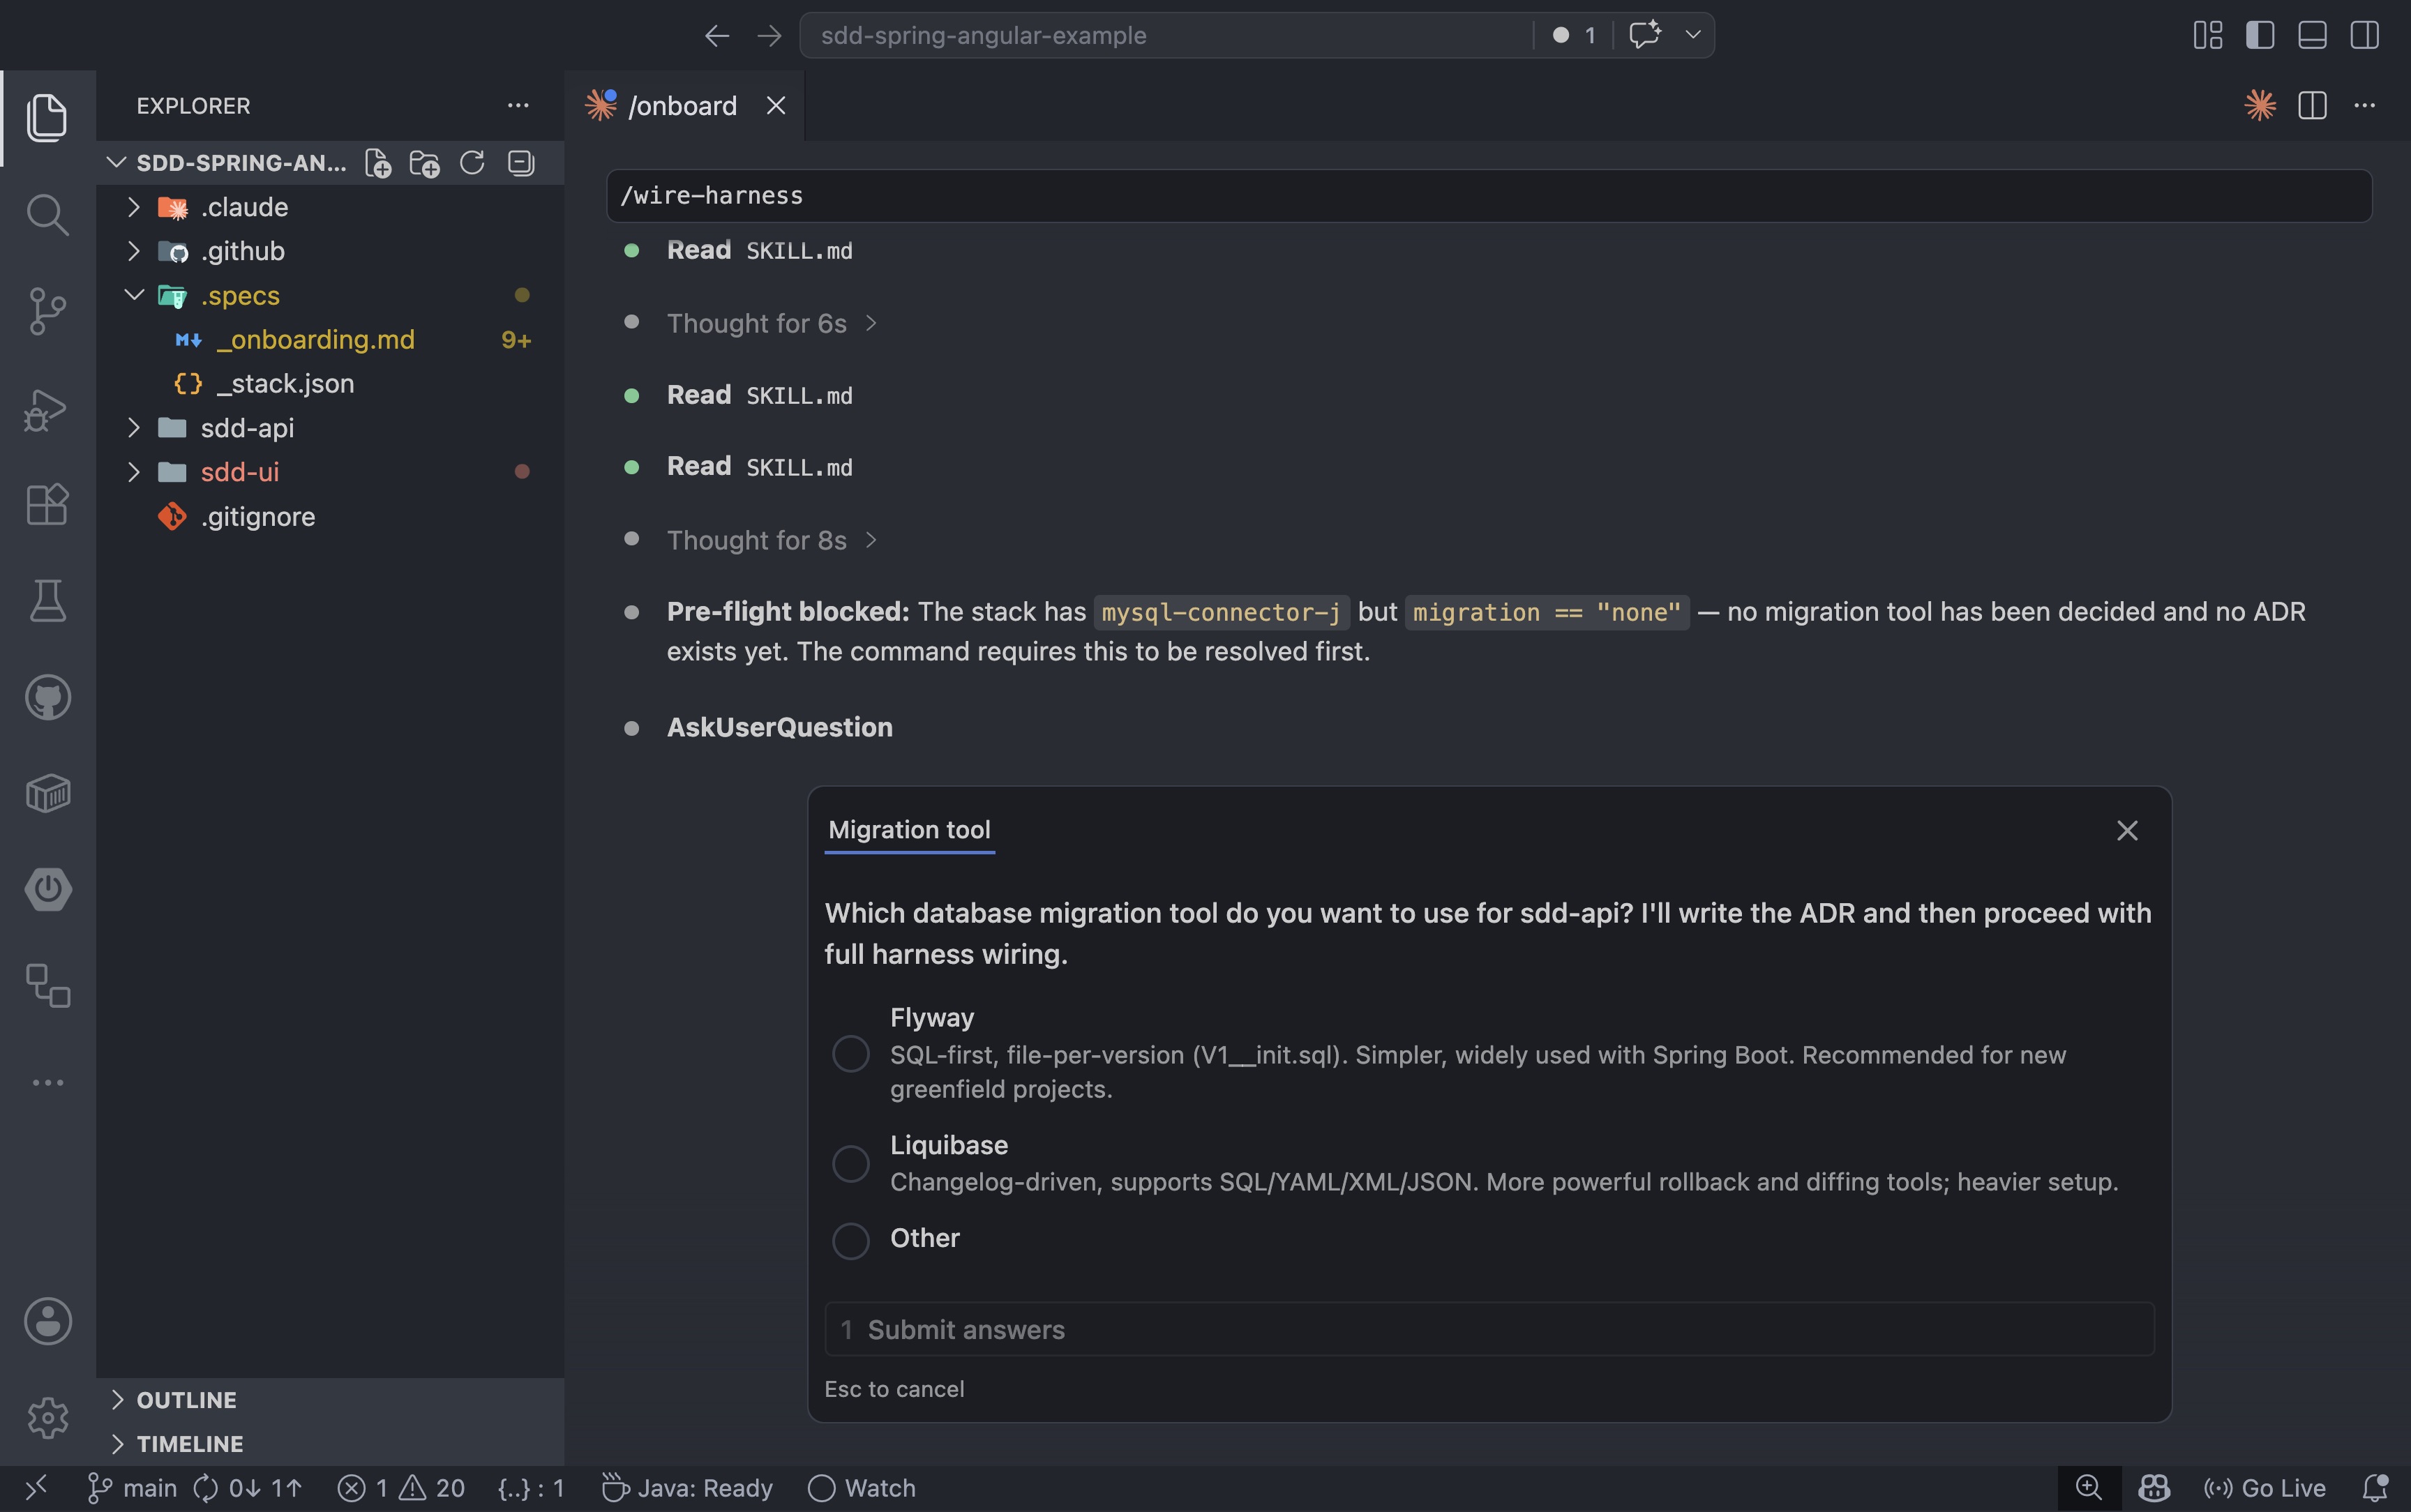
Before writing the first spec, it is worth wiring the quality gates. The /wire-harness command adds the test harness configuration to the project: coverage thresholds, linting rules, and integration test runners. For a Spring Boot project connected to MySQL, the agent performs a pre-flight check first:
1
/wire-harness
If a required decision is missing, the command stops and asks rather than guessing. In this case, the project had a MySQL dependency but no migration tool configured yet:
1. Why Specs First, Not Prompt First
Prompting can get you moving, but specs are what keep the work aligned once the feature stops being a demo and starts becoming something you need to review, test, and maintain.
That is the difference between experimenting and delivering.
When we skip the spec, the AI has too much freedom in the wrong places. It may choose the wrong defaults, miss edge cases, or implement a feature that looks plausible but does not actually match what the product needs. A prompt can ask for code. A spec defines what the code is supposed to accomplish.
That matters even more when the feature spans backend and frontend. Without a shared spec, the backend and frontend can drift apart quickly. The API contract becomes implicit. The UI assumes behavior that the backend does not guarantee. The team spends time fixing coordination problems that should have been decided before implementation started.
This is why I prefer a spec-first flow:
- Product intent is captured before code exists
- Decisions are explicit before implementation begins
- Acceptance criteria are visible before tests are written
- Open questions are surfaced before they become bugs
This is also the point where AI becomes more useful, not less. The model does better when the target is clear. It does not need to infer the whole system from a vague prompt. It gets a concrete workflow, a concrete feature, and concrete boundaries.
2. The Product Story and Feature Example
A good example matters.
The feature should be simple enough to follow, but real enough to show validation, contract boundaries, and frontend/backend coordination.
For this post, the example is a classic business flow: creating a customer. It has clear validation rules, an obvious API contract, and a real UI surface — concrete enough to demonstrate the workflow without getting lost in business complexity. The full user story is captured in the next section as part of the spec.
3. Write the Spec
This is where product intent becomes something concrete.
The spec should answer the questions the team actually needs to answer before implementation starts:
- What is the goal?
- What is in scope?
- What is out of scope?
- What does success look like?
- What terminology do we need to define?
- What is still unknown?
That means the final spec should include:
- User Story
- Field-level validation rules
- Acceptance Criteria
- Non-Goals
- Non-Functional Requirements
Before writing the spec, start with explicit user-story input:
User Story
As a sales or support user, I want to create a new customer from the application so that I can register customer data consistently and see validation errors before the record is saved.
The next step is to transform this into the structured spec sections used by the workflow.
Customer Fields and Validation Rules
| Field | Required | Max length | Format / Rules |
|---|---|---|---|
| First Name | yes | 100 | Letters, hyphens, apostrophes; no digits |
| Last Name | yes | 100 | Letters, hyphens, apostrophes; no digits |
| yes | 255 | Valid email format; unique across all customers | |
| Phone | no | 20 | Digits, spaces, +, (, ), - only |
| Company | no | 150 | Free text |
Acceptance Criteria
Form rendering
- AC-001: When a user navigates to the Create Customer page, the system shall display a form with the fields: First Name, Last Name, Email, Phone, and Company.
- AC-002: When a user navigates to the Create Customer page, the system shall display a submit button that is disabled until First Name, Last Name, and Email pass client-side validation.
Inline field validation
- AC-003: While a user leaves First Name, Last Name, or Email blank and moves focus away, the system shall display an inline “This field is required” error adjacent to that field.
- AC-004: While a user enters a value in First Name or Last Name that contains digits or disallowed characters, the system shall display an inline format error without submitting the form.
- AC-005: While a user enters a value in Email that is not a valid email format, the system shall display an inline “Invalid email address” error without submitting the form.
- AC-006: While a user enters a value in Phone that contains characters other than digits, spaces,
+,(,), or-, the system shall display an inline format error without submitting the form. - AC-007: When a user corrects a previously invalid field, the system shall immediately remove the inline error message for that field.
Saving the record
- AC-008: When a user submits the form with all valid data, the system shall save the new customer record.
- AC-009: When the record is saved successfully, the system shall display a success confirmation and navigate the user to the customer list page.
Validation errors on save
- AC-010: When the user submits the form and a required field is missing, the system shall not save the record and shall display an error message identifying which fields need to be filled in.
- AC-011: When the user submits a form with an email that already belongs to another customer, the system shall not save the record and shall display an error message on the Email field indicating it is already in use.
- AC-012: When the user submits a form with a field value that is too long, the system shall not save the record and shall display an error message on the offending field.
- AC-013: When an unexpected error occurs during save, the system shall display a generic error message and keep the user on the form so no data is lost.
Non-Goals
- Editing or updating an existing customer
- Deleting or archiving a customer
- Searching or listing customers
- Address, job title, or notes fields (future story)
- Bulk / CSV import
- Customer self-registration
Non-Functional Requirement
- Save action shall complete in under 500 ms (P95): Issue #1
That is the point of starting with a strong user story: it gives the team clear material to turn into a high-quality spec before design and code begin.
With the repo onboarded and harness wired, the first feature can start. The /spec command accepts a GitHub issue URL and turns the issue into a structured spec file. For the create-customer feature:
1
/spec https://github.com/loiane/sdd-spring-angular-example/issues/1
For this to work, you need the GitHub MCP server configured and connected to your AI assistant. The agent calls the GitHub API through the MCP server to read the issue title, body, and comments: no copy-paste required.
This is a good moment to step back and notice what is actually happening here. AI-assisted development is not just about prompting. When you combine an AI assistant with MCP servers and tool calling, the agent can read from your issue tracker, inspect your codebase, call your APIs, and write back to your repo, all in a single workflow. That is where the real productivity gain lives: not in a smarter prompt, but in a connected system.
The same principle applies to your specific toolchain:
- If your team uses Jira instead of GitHub Issues, you will need a Jira MCP server that the agent can query. Without it, the workaround is to copy and paste the story text into the prompt before running
/spec. - If the issue or story includes links to Figma designs, you will need the Figma MCP server connected so the agent can read the visual spec and extract layout intent, component names, and interaction notes. Without it, the agent will only work from the text description.
- Other sources (Confluence pages, ADO work items, Linear tickets) follow the same pattern: an MCP server that can read the source is what turns a generic AI assistant into one that actually knows your context.
The broader takeaway is this: the richer the context you can give the agent through connected tools, the less time you spend bridging the gap manually. MCP servers are not a nice-to-have. They are what make the workflow repeatable at team scale.
The agent reads the issue, extracts all acceptance criteria, and writes the spec to .specs/2026-05-09-create-new-customer/01-spec.md. It also surfaces any open questions that need answers before design can begin:
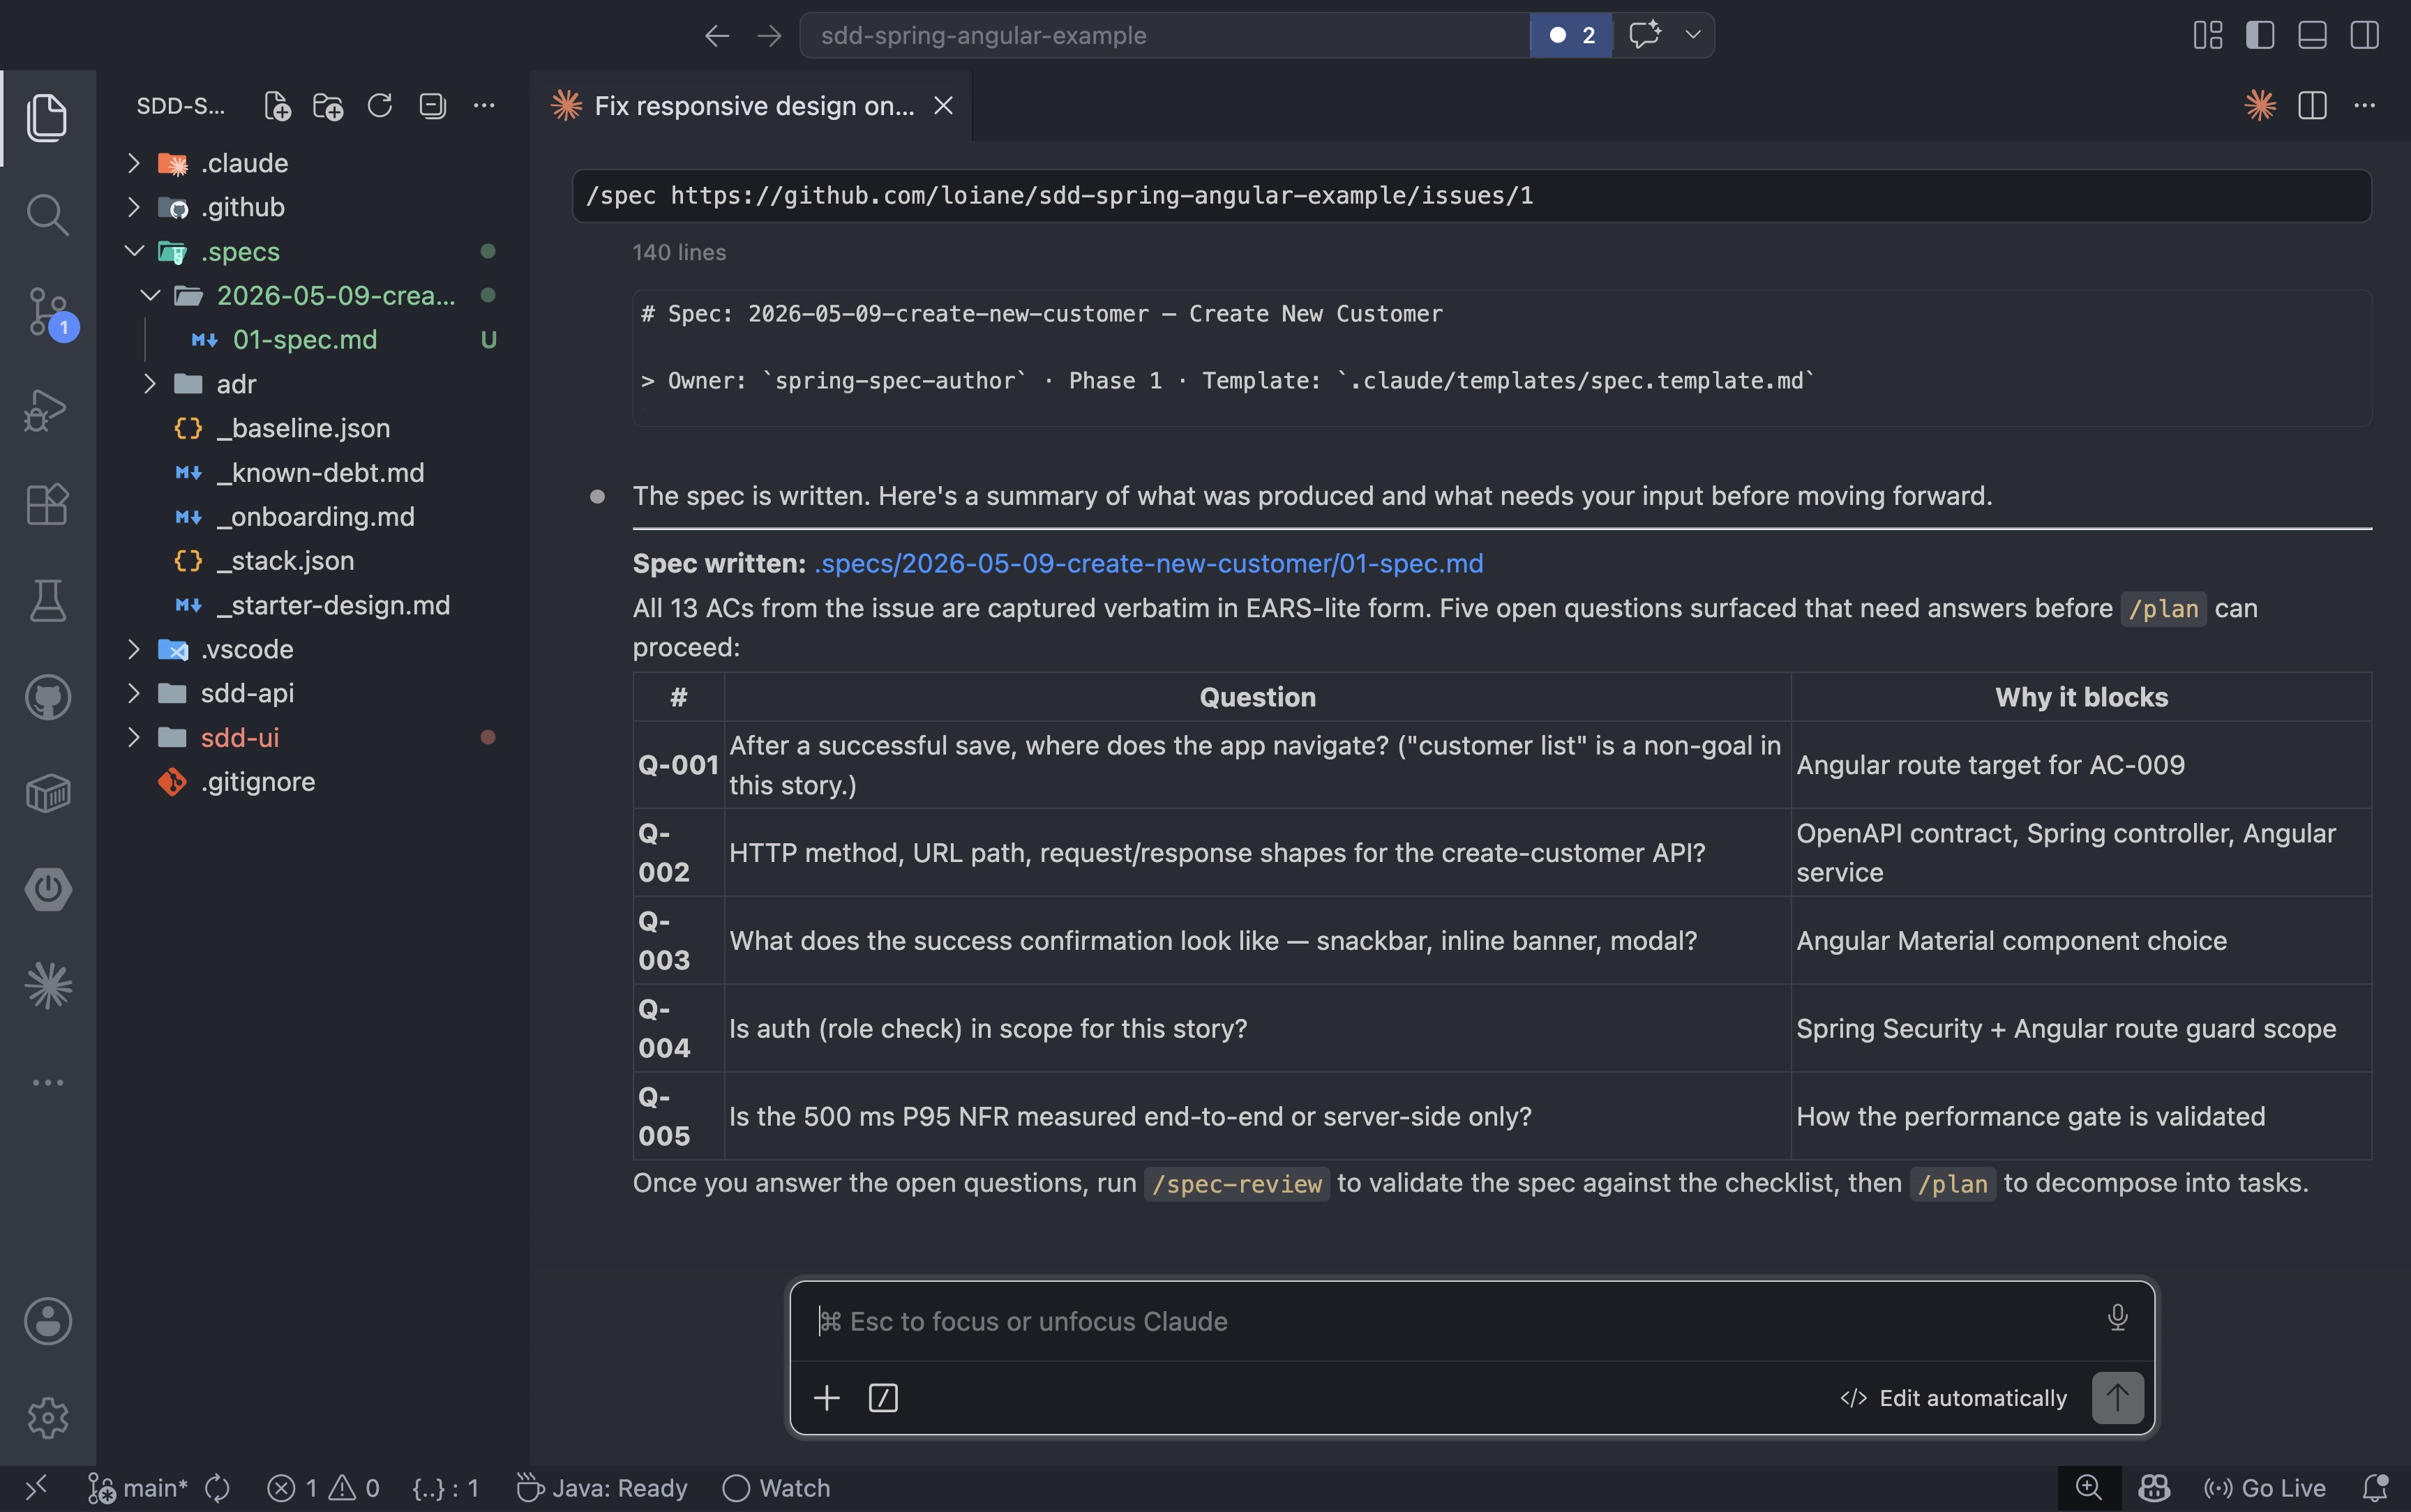
Before moving on, answer every open question the agent surfaced. Keep running /spec with updated answers until there are no open questions left. A spec with unresolved questions is not ready for review.
4. Review the Spec Before Design
A spec is only useful if it is clear.
This step is where ambiguity gets surfaced and resolved before the team starts making implementation decisions. The point is not to be formal for its own sake. The point is to prevent hidden assumptions from leaking into code.
In practice, the review should check for things like:
- Is the goal written in user-visible terms?
- Are the acceptance criteria atomic?
- Are the criteria testable?
- Are the non-goals explicit?
- Are the open questions really resolved before design starts?
This is also where the workflow earns its keep.
Without a review step, teams often move too quickly into architecture and implementation while still carrying unresolved assumptions. That is how you end up with code that is technically correct but functionally misaligned.
With a review step, the team can answer questions like:
- What happens when the input is invalid?
- What does success look like?
- Which behavior is mandatory?
- Which behavior is out of scope?
If the spec cannot answer those questions yet, the right move is not to guess. The right move is to pause, clarify, and resolve the missing pieces first.
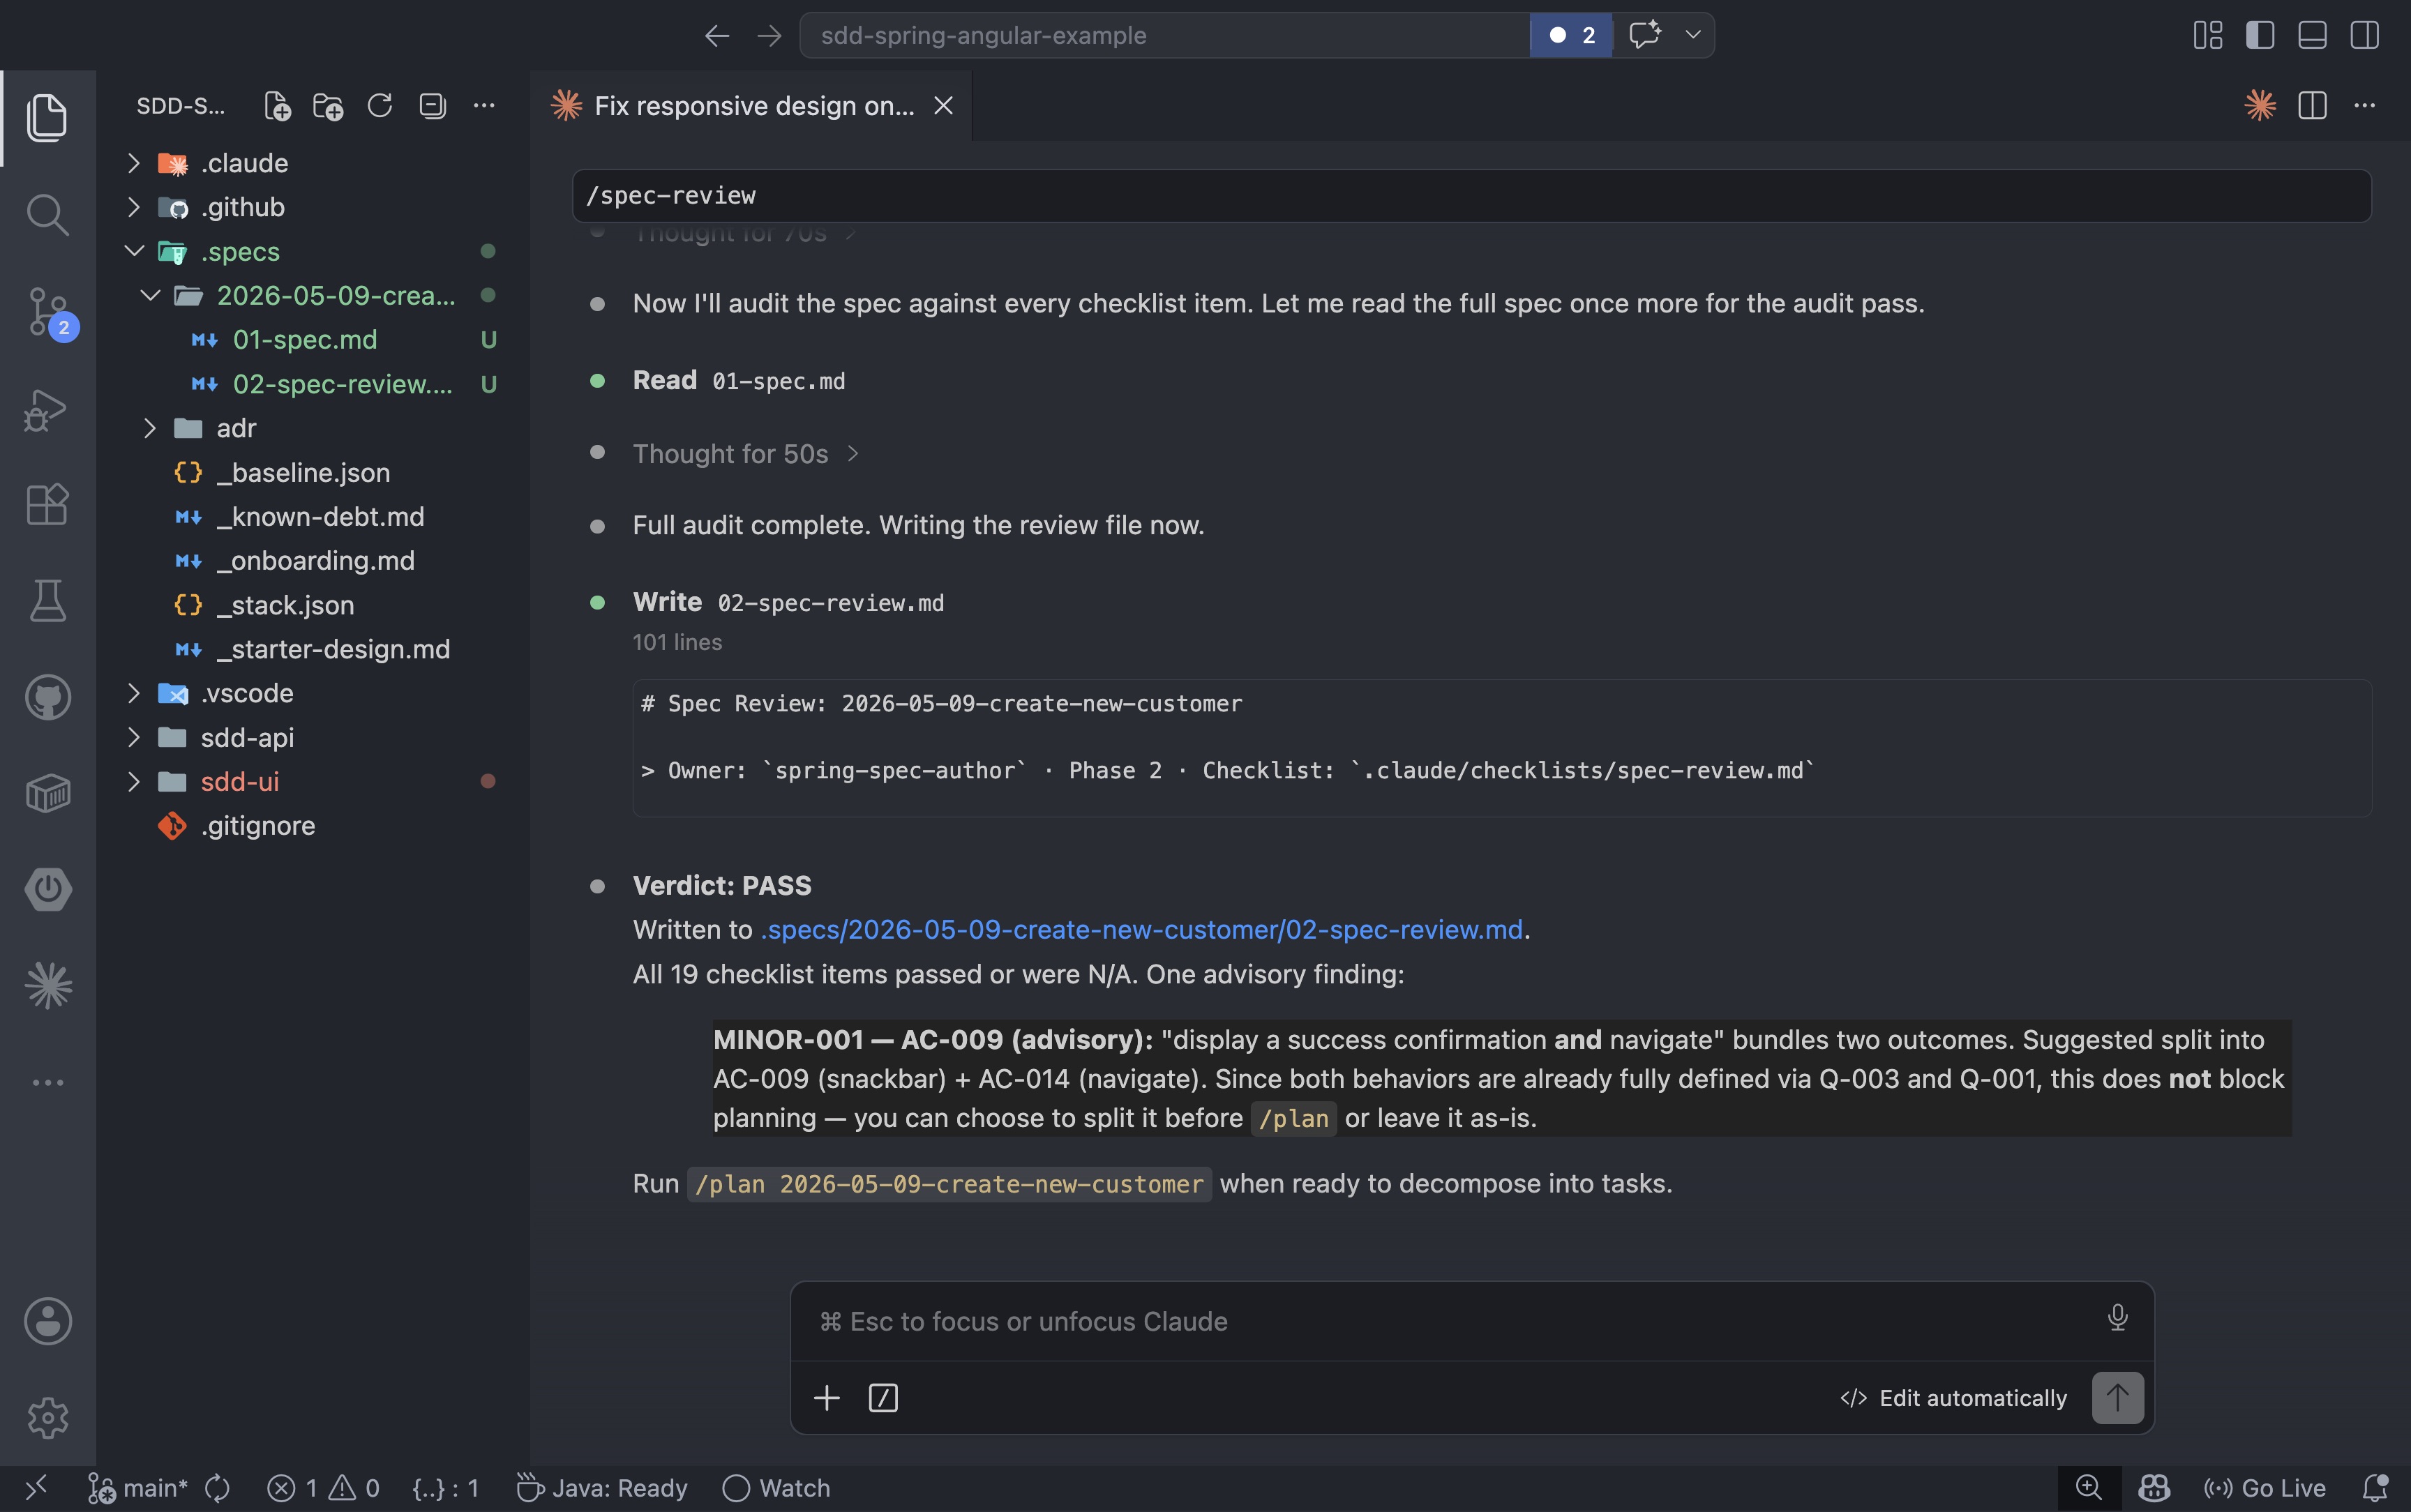
After the open questions are answered and added to the spec, the review step audits every section against the checklist:
1
/spec-review 2026-05-09-create-new-customer
A PASS means the spec is clear enough to design against. A FAIL means there are items to resolve before planning can begin:
5. High-Level Design
Once the spec is stable, the next step is to translate it into a system view.
At this point, we do not want code. We want the shape of the solution.
Yes, we are spending time understanding the problem before touching the keyboard. That is intentional. Good engineers do not start writing code without understanding what they are building and why. That is not a new idea: it is just good craft. With AI, the same rule applies. If you plan to ship this code to production, you cannot skip the thinking phase and jump straight to implementation. It might feel like you are losing time, but you are actually saving it: a well-defined design reduces AI hallucinations, narrows the solution space, and produces code that is easier to review, test, and maintain. The spec and design steps are not overhead. They are the part that makes the rest of the workflow worth trusting.
For the customer creation flow, the high-level design should explain:
- Which part belongs to the backend
- Which part belongs to the frontend
- How data moves between them
- What the API contract looks like
- How validation is divided between layers
- Which errors are expected and how they are represented
A simple high-level view might look like this:
- Angular form collects customer data
- Angular submits the form to a Spring Boot API
- Spring Boot validates the request and applies business rules
- Spring Boot persists the customer if validation passes
- Spring Boot returns a success response
- Angular displays success or validation errors
This is where the team should make decisions about:
- API structure
- Error payload format
- Validation responsibilities
- Loading states
- Retry behavior
- Any domain rules that matter
The important part is that the design comes after the spec, not before it. The spec defines the behavior. The design defines how the team will realize it.
6. Low-Level Design and Implementation Plan
This is where the work becomes executable.
The low-level design should break the feature into small slices tied to the acceptance criteria so implementation can be reviewed and validated in pieces. Instead of asking the AI to build the whole feature at once, we ask it to work on one slice at a time with a defined outcome. That is a much better fit for the way the model actually behaves.
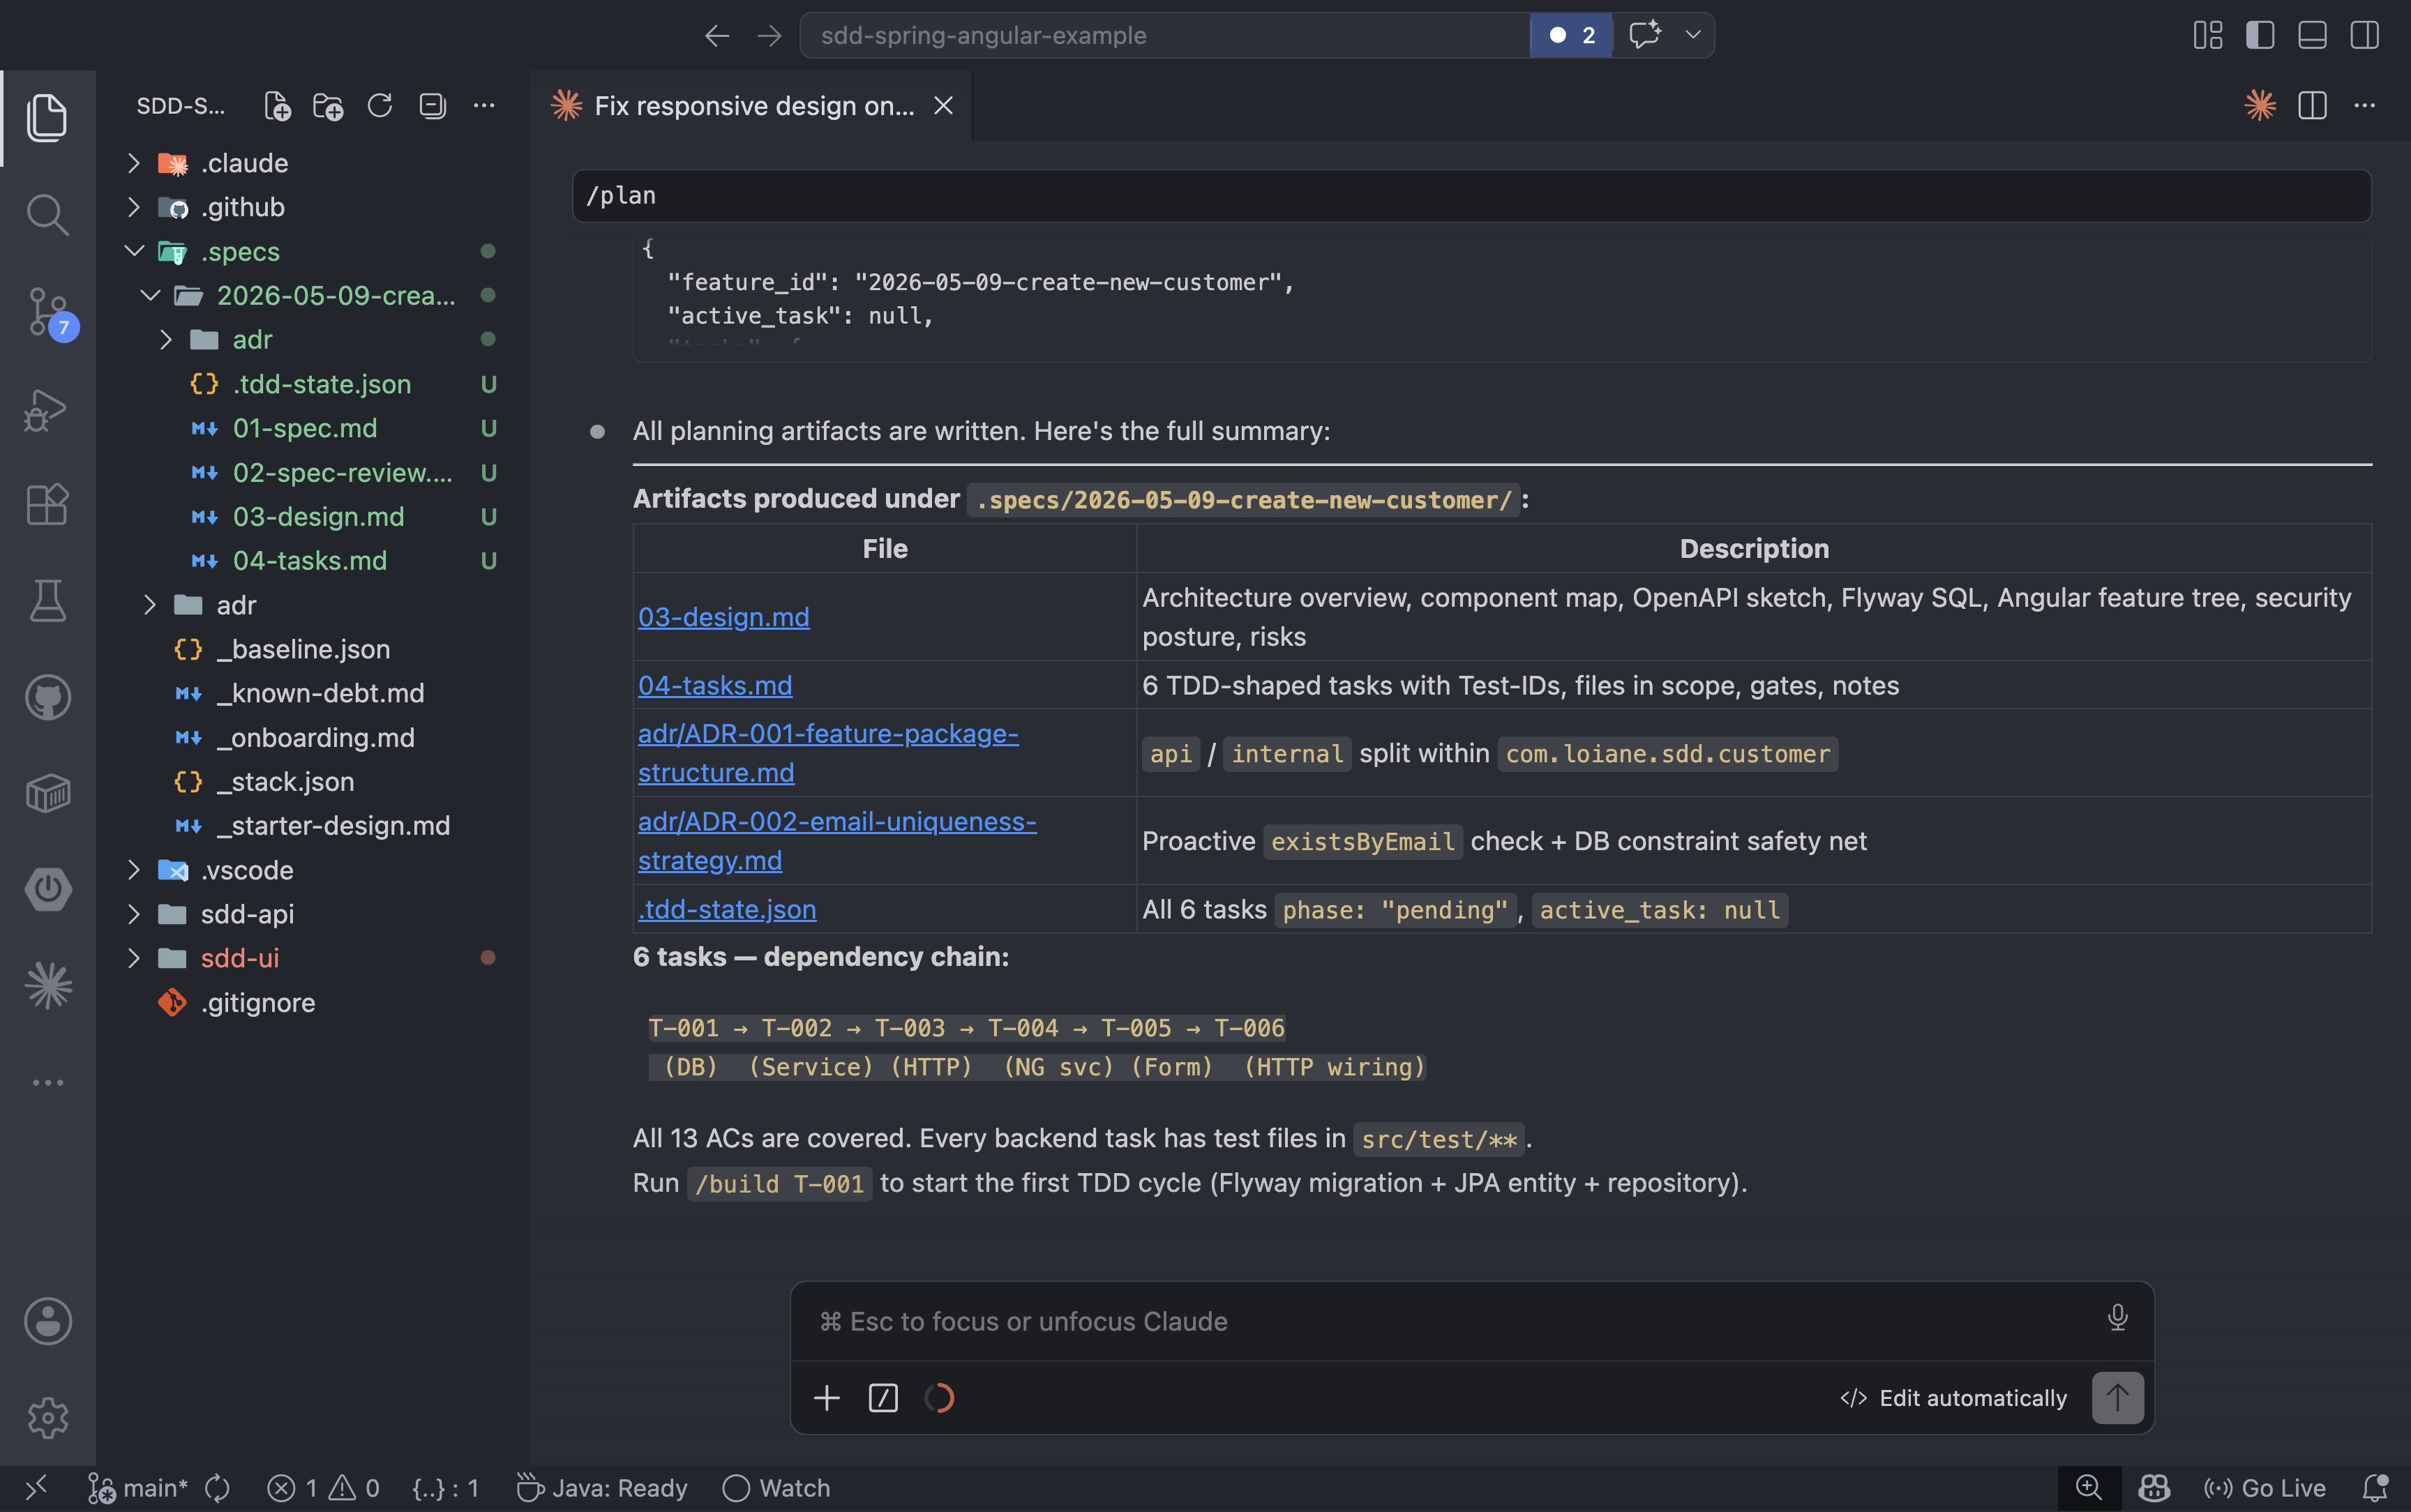
With a passing spec in hand, the next step is to turn it into an executable plan. The /plan command reads the spec and the design document and decomposes the feature into TDD-shaped tasks with a dependency chain:
1
/plan 2026-05-09-create-new-customer
Each task maps to specific acceptance criteria, lists the files that will change, and defines the gate that marks it done. The plan for the create-customer feature produced six tasks: three backend, three frontend:
Once the tasks are generated, the dependency chain becomes visible. Because the API contract is fully defined in the design document, the backend and frontend tracks do not need to wait for each other to start:
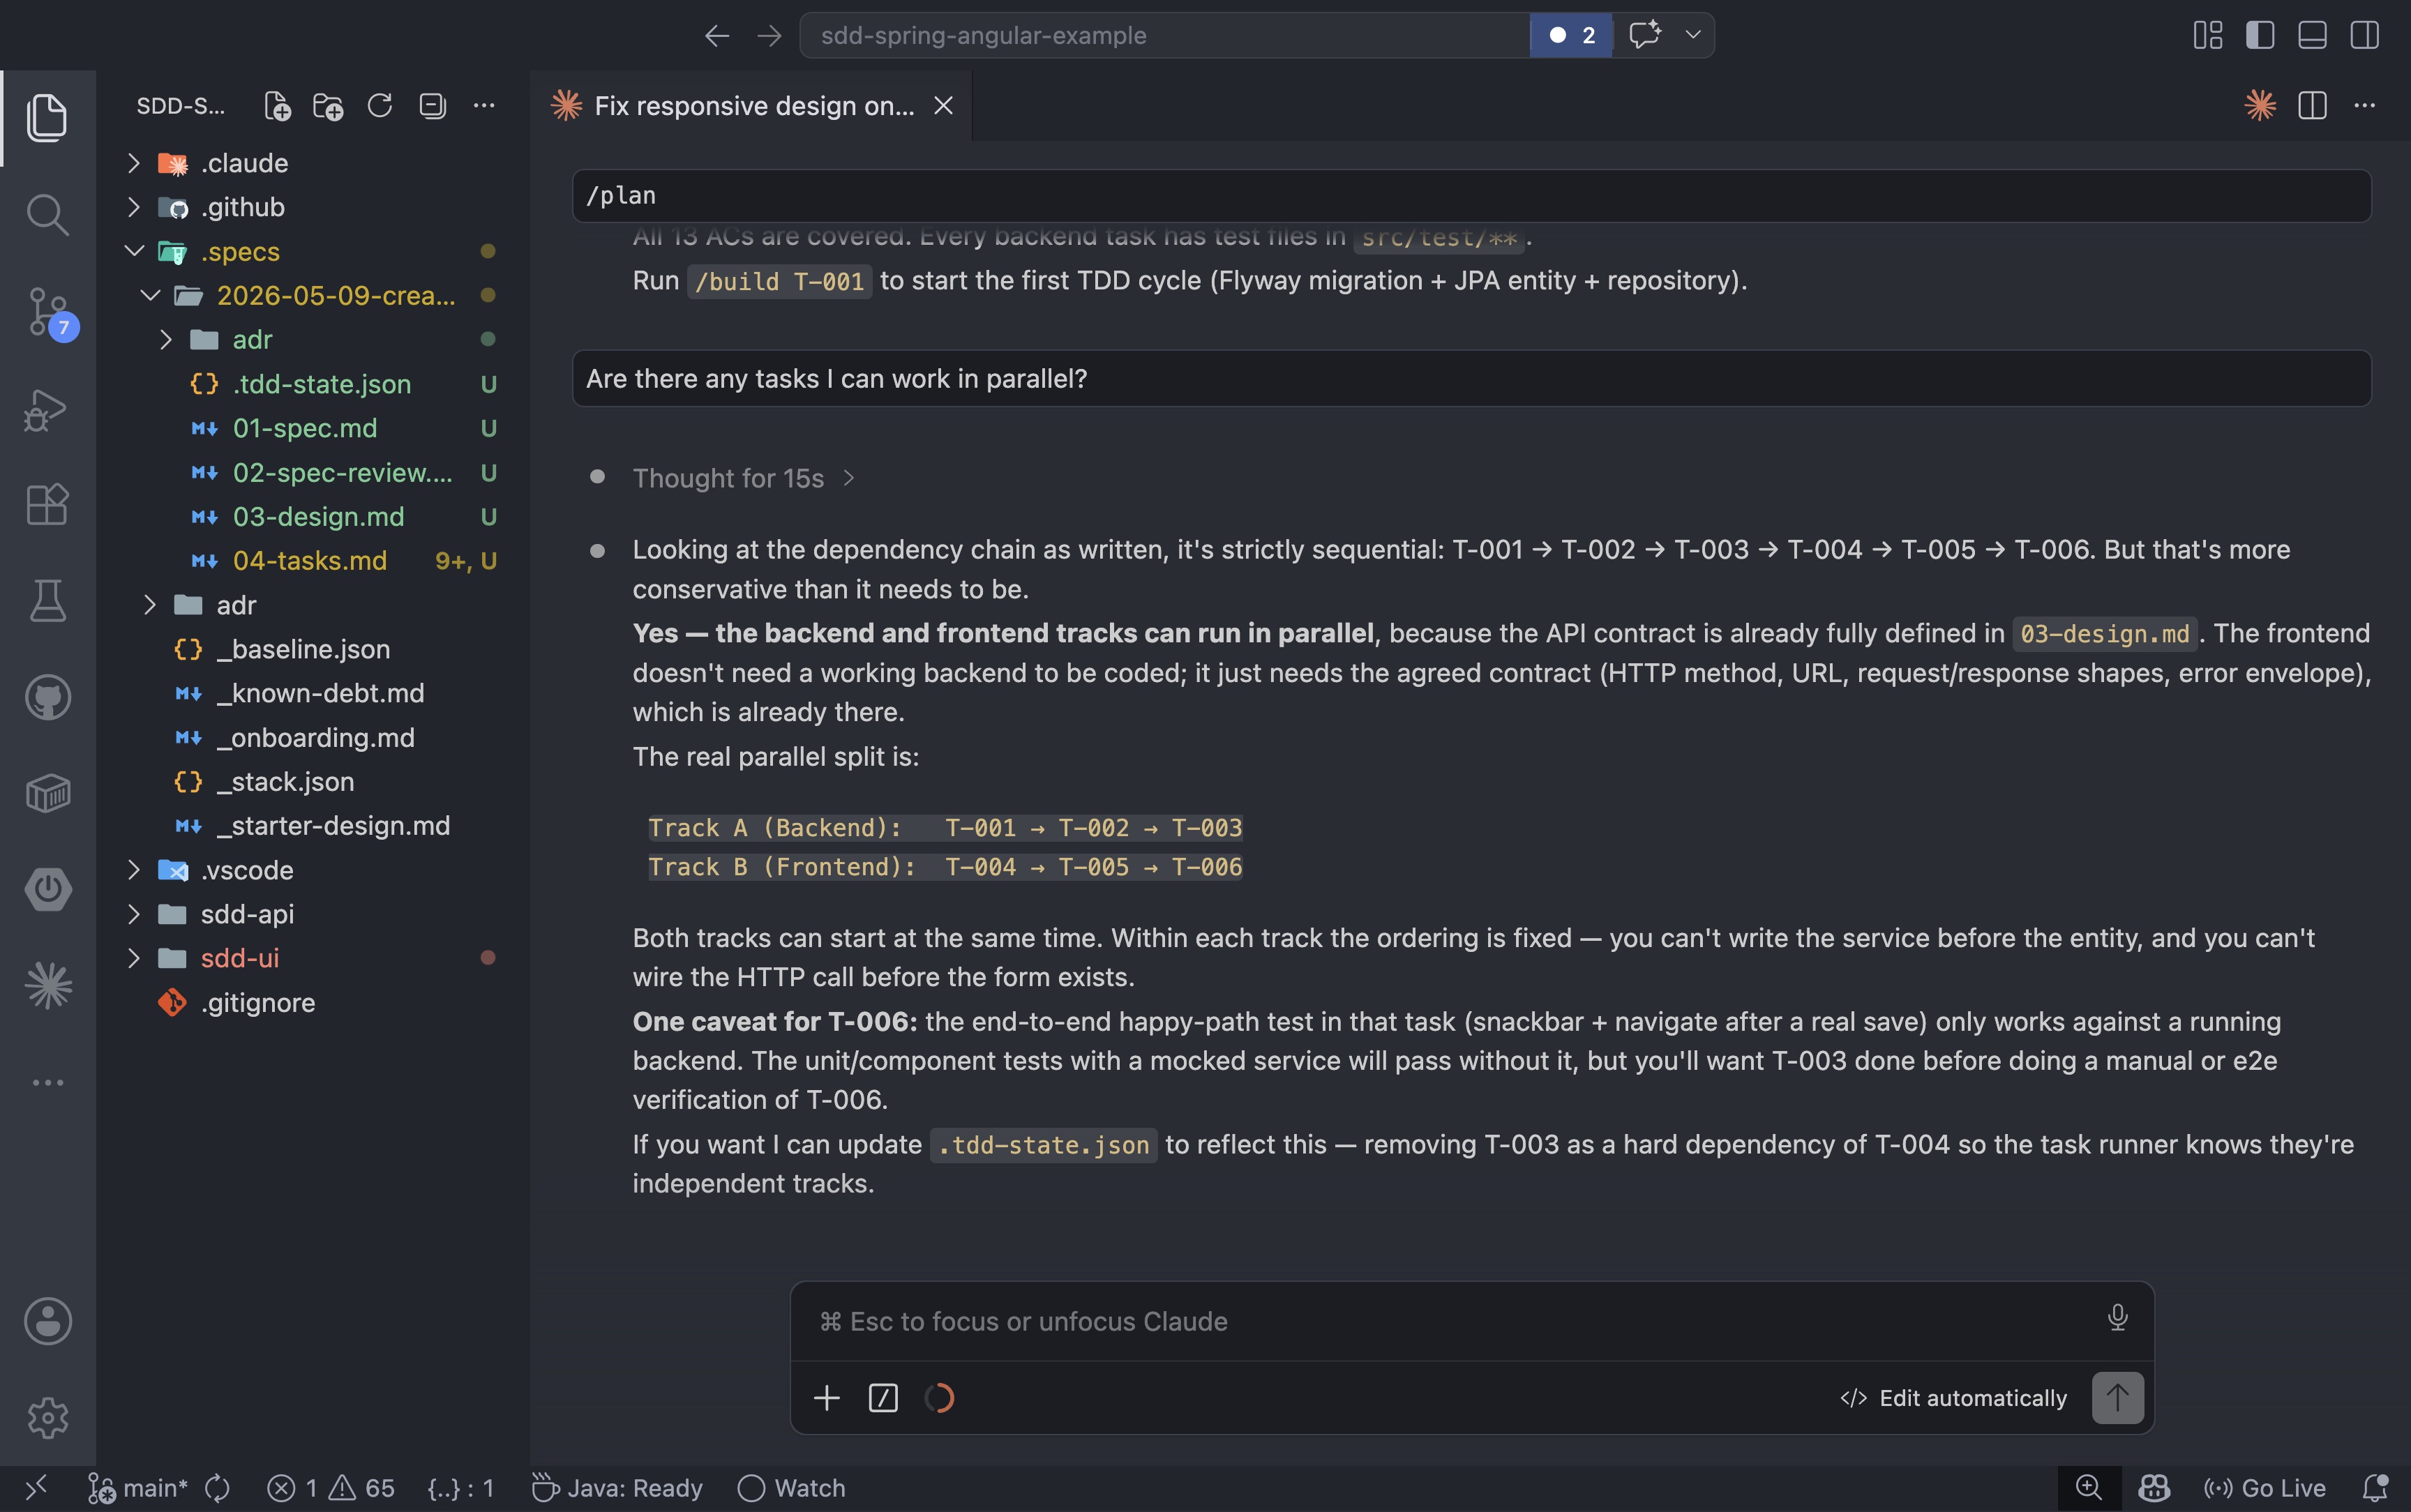
Breaking a big feature into small, well-defined tasks is one of the most important habits you can bring to AI-assisted development. It is during the details that you can still catch wrong assumptions and hallucinations before they compound across files. AI can generate code faster than any human, but speed without review is how bugs ship.
As I like to say: at the end of the day, it is your name in the commit. You are responsible for every line of code the AI produces. Breaking work into small tasks means bite-sized diffs that are actually reviewable. Reviewing one or two methods is a very different experience from opening a PR with 20 modified files and trying to figure out whether any of it is correct.
When you review each task, use that moment deliberately. Give the agent feedback on what you liked and what you did not, so the same mistakes are not repeated in the next task. Check whether the AI is following the best practices defined in your agents and skills, and feel free to change those definitions. I built this framework based on my own opinions and the practices I trust; your team may have different standards, and the framework should reflect yours.
The phrase “oh, the AI created the code like this” is not an acceptable explanation in a code review. It is your responsibility to make sure the code you are signing off on is as close as possible to the code you would write yourself, or better.
At this point, it is worth asking the agent which tasks are independent and which can run in parallel. This is also where multi-agent execution becomes an option: instead of building task by task in a single session, you can assign independent tracks to separate agents running concurrently. If your AI tooling supports it, parallel tracks like the backend and frontend slices here are a natural fit: each agent works from the same spec and design artifacts, and neither blocks the other.
After /plan completes, the .specs/2026-05-09-create-new-customer/ folder has all the planning artifacts in place: the spec, the review, the design, the task list, the ADRs, and the .tdd-state.json state machine. This is the full set of documents the implementation cycle will use:
This artifact set is also what makes the workflow resilient across time. If the feature takes multiple days, or you step away for the weekend, the state is never lost. When you come back, you can ask the agent where you left off: the .tdd-state.json tracks every task phase, and the implementation log captures what was done and what is still pending. You do not need to keep it all in your head.
7. Backend Implementation in Spring Boot
Now the implementation can begin, and the backend comes first.
That choice is deliberate. The backend defines the contract. The frontend should consume something stable, not guess at what the server might do later. Every backend behavior (validation rules, error responses, success payloads) should map back to the spec, so the API contract is explicit before any UI code is written.
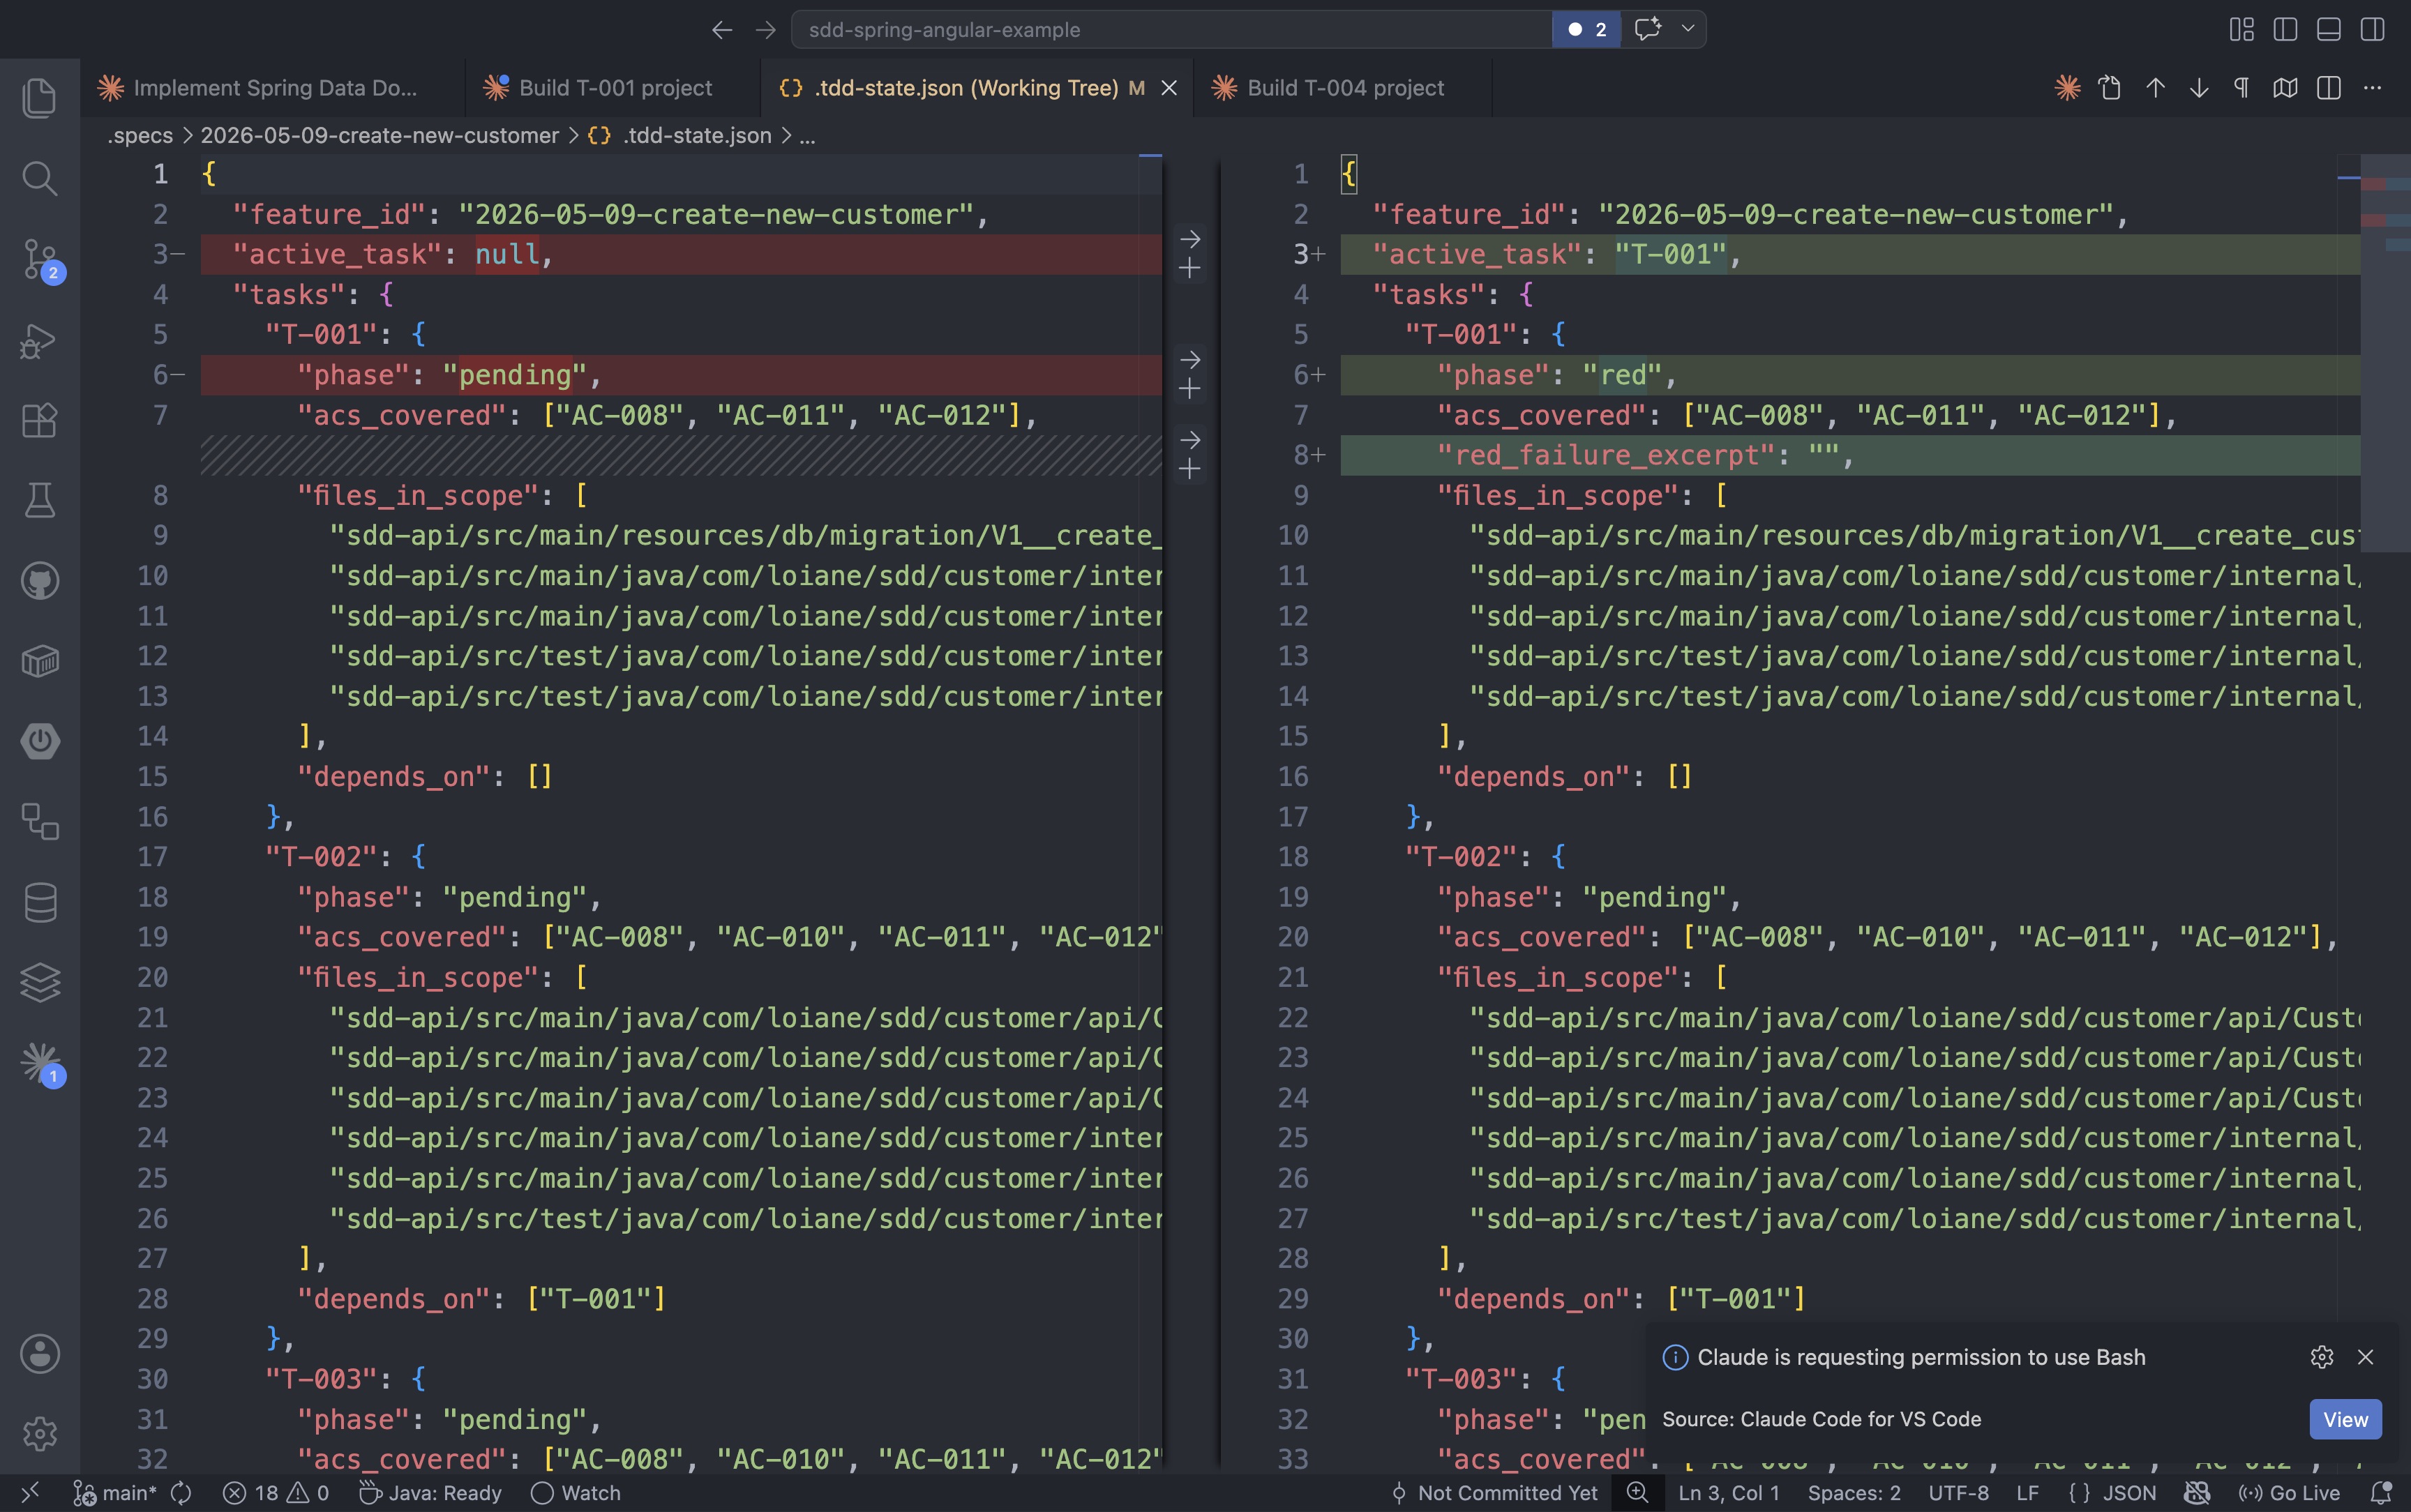
Each task is built using the /build command. The framework tracks progress in a .tdd-state.json file that moves each task through a TDD lifecycle: pending → red → green → refactor → done. Starting the first backend task looks like this:
1
/build T-001
As the agent picks up T-001, the state file updates: active_task moves from null to T-001 and the phase changes from pending to red, signaling the first failing test is ready to be written:
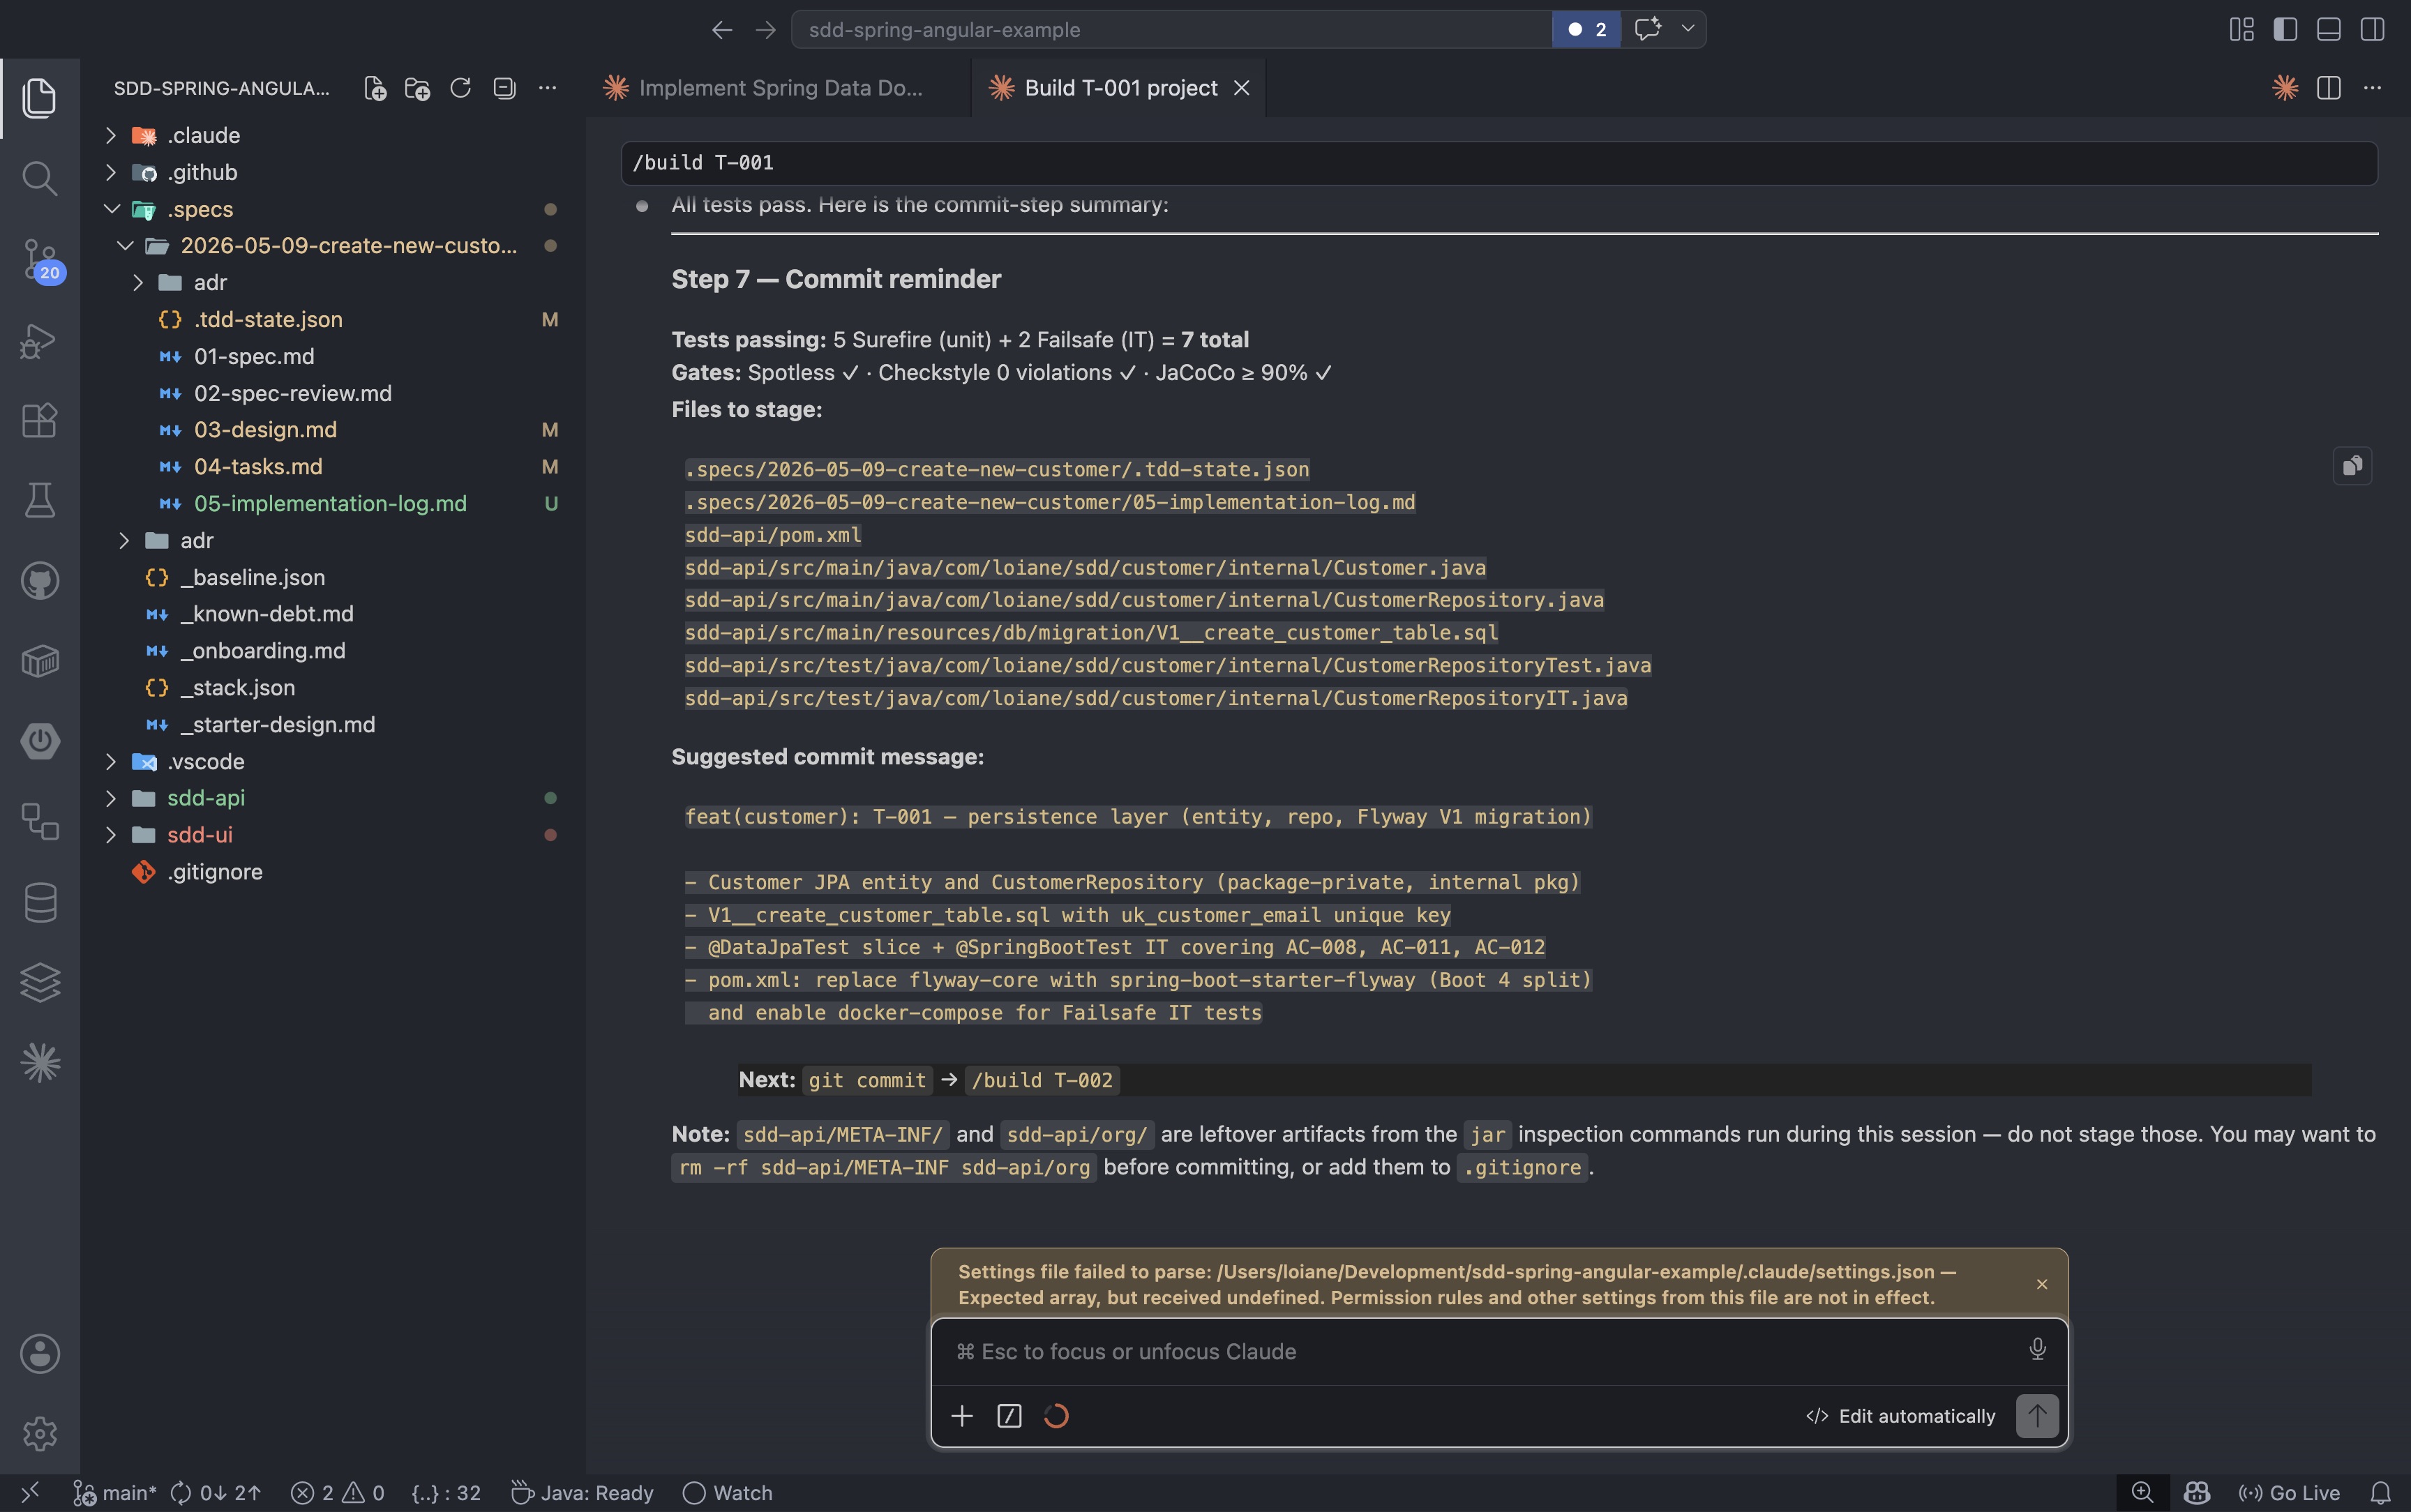
The /build agent works through the red-green-refactor cycle for each task: write the failing test, implement the minimum code to make it pass, then clean up. When the cycle is complete and all gates pass, the agent produces the commit message and advances the state to done.
Token usage is also a concern worth keeping in mind. Because every step produces a documented artifact in the repo, you can start a fresh session for each task without losing any context. The spec, the design, the task list, and the state file are all there. The next session picks up exactly where the last one left off, without needing to rebuild a long context window first. The bigger the context and the longer the session, the more tokens you spend. This framework was deliberately designed so you can close a session after every step and open a new one for the next, keeping each session small, focused, and cost-efficient.
8. Frontend Implementation in Angular
Once the backend contract is stable, the Angular slice can be added on top.
This is where the backend-first choice pays off. Because the API contract already exists, the Angular code can be written with confidence: form fields, error states, success response, and loading behavior are all known. The UI does not need to speculate about the contract; it can implement against it. That keeps the frontend small, honest, and aligned with the spec.
The Angular tasks follow the same pattern as the backend. T-006 is the final task: wiring the form submit to the backend service and mapping server error responses to the correct form fields. When it completes, all six tasks across both tracks are done:
1
/build T-006
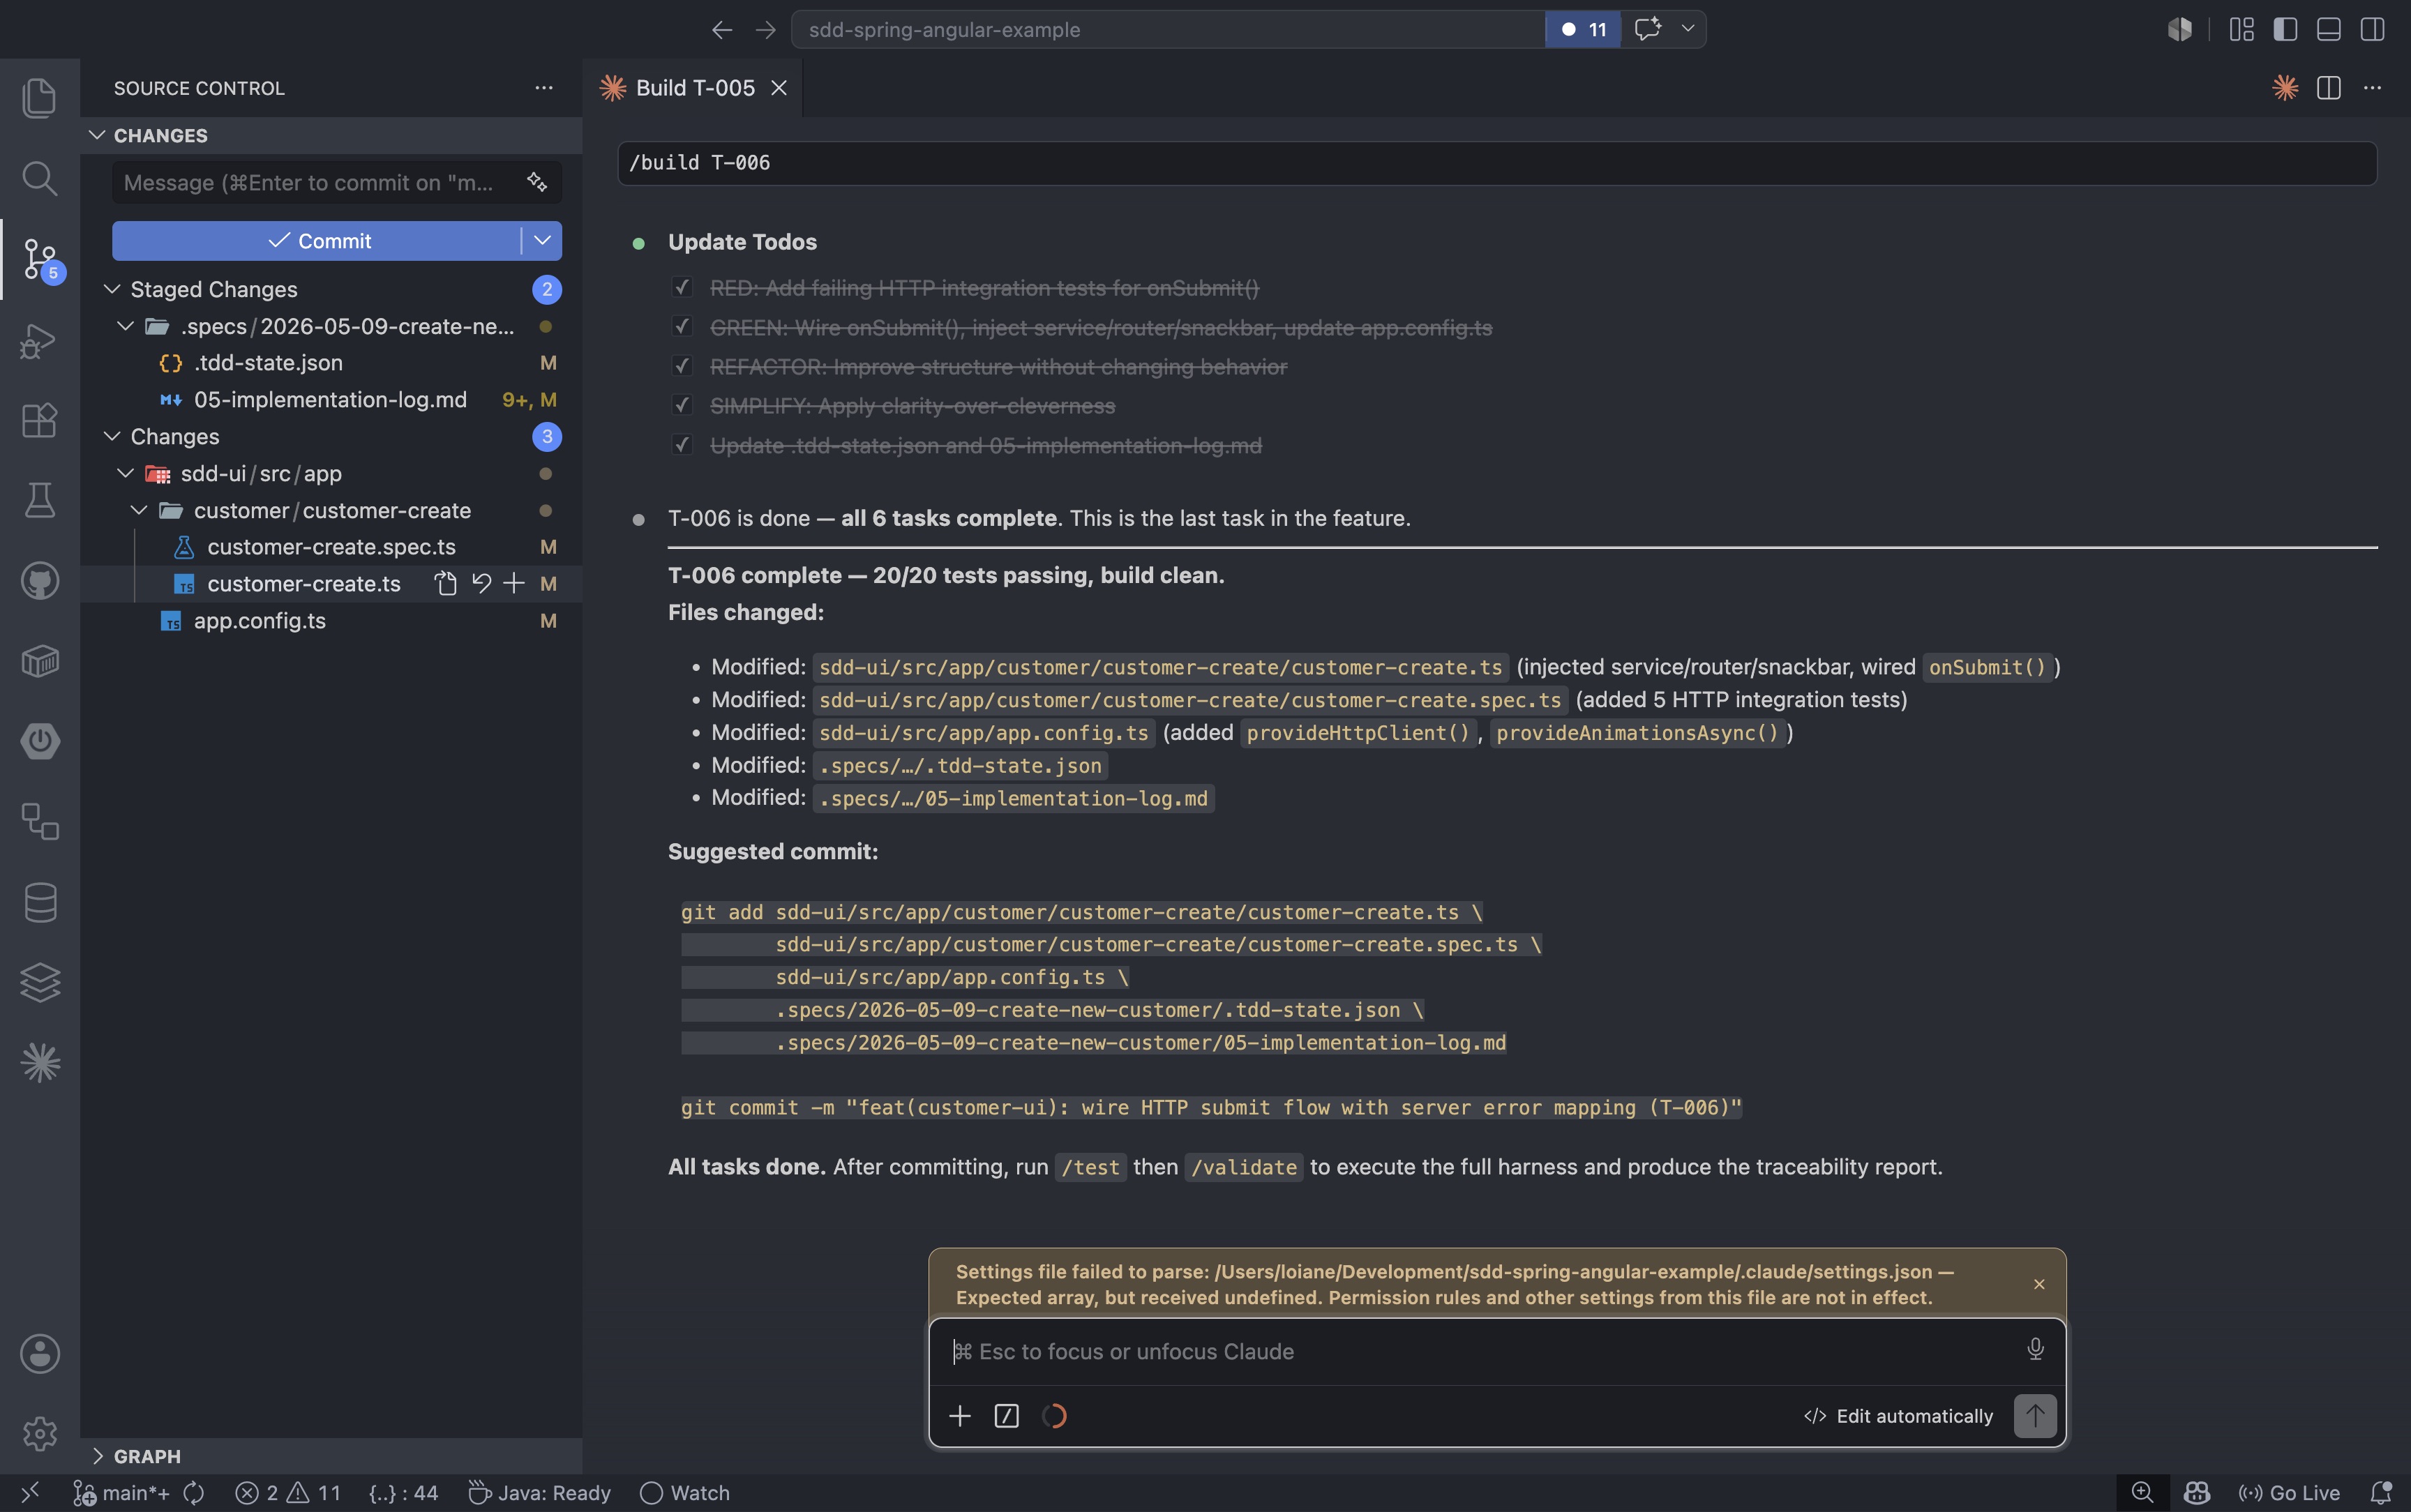
Rinse and repeat until all tasks are done. Commit after each task completes. The /build agent even includes a commit message suggestion so you do not forget. Small, focused commits are a best practice, and this workflow makes them the natural unit of progress.
9. Validate, Review, and Close the Loop
Unit tests are not the end of the story.
The browser-level flow is where everything comes together, where you see whether the workflow actually held up end to end.
This is where end-to-end validation matters.
For a customer creation flow, an end-to-end test should confirm things like:
- The user can open the form
- The user can fill in the required fields
- The user can submit the form
- The success message appears after a valid submission
- Validation errors appear when the form is invalid
- The system behaves correctly when the backend rejects the request
This closes the loop.
The spec said what should happen. The design defined the shape of the solution. The backend and frontend implemented it. The end-to-end test proves the experience works as a whole.
With all tasks complete, the next step is the full harness run. The /validate command exercises the test suite, checks coverage thresholds, and runs all linting and formatting checks:
1
/validate
If anything fails, the command reports exactly what needs to be fixed before the review step. In the example run, 18 unit tests and 6 integration tests passed with 97% line coverage and 100% branch coverage. Two Angular files had Prettier formatting issues that needed a quick fix:
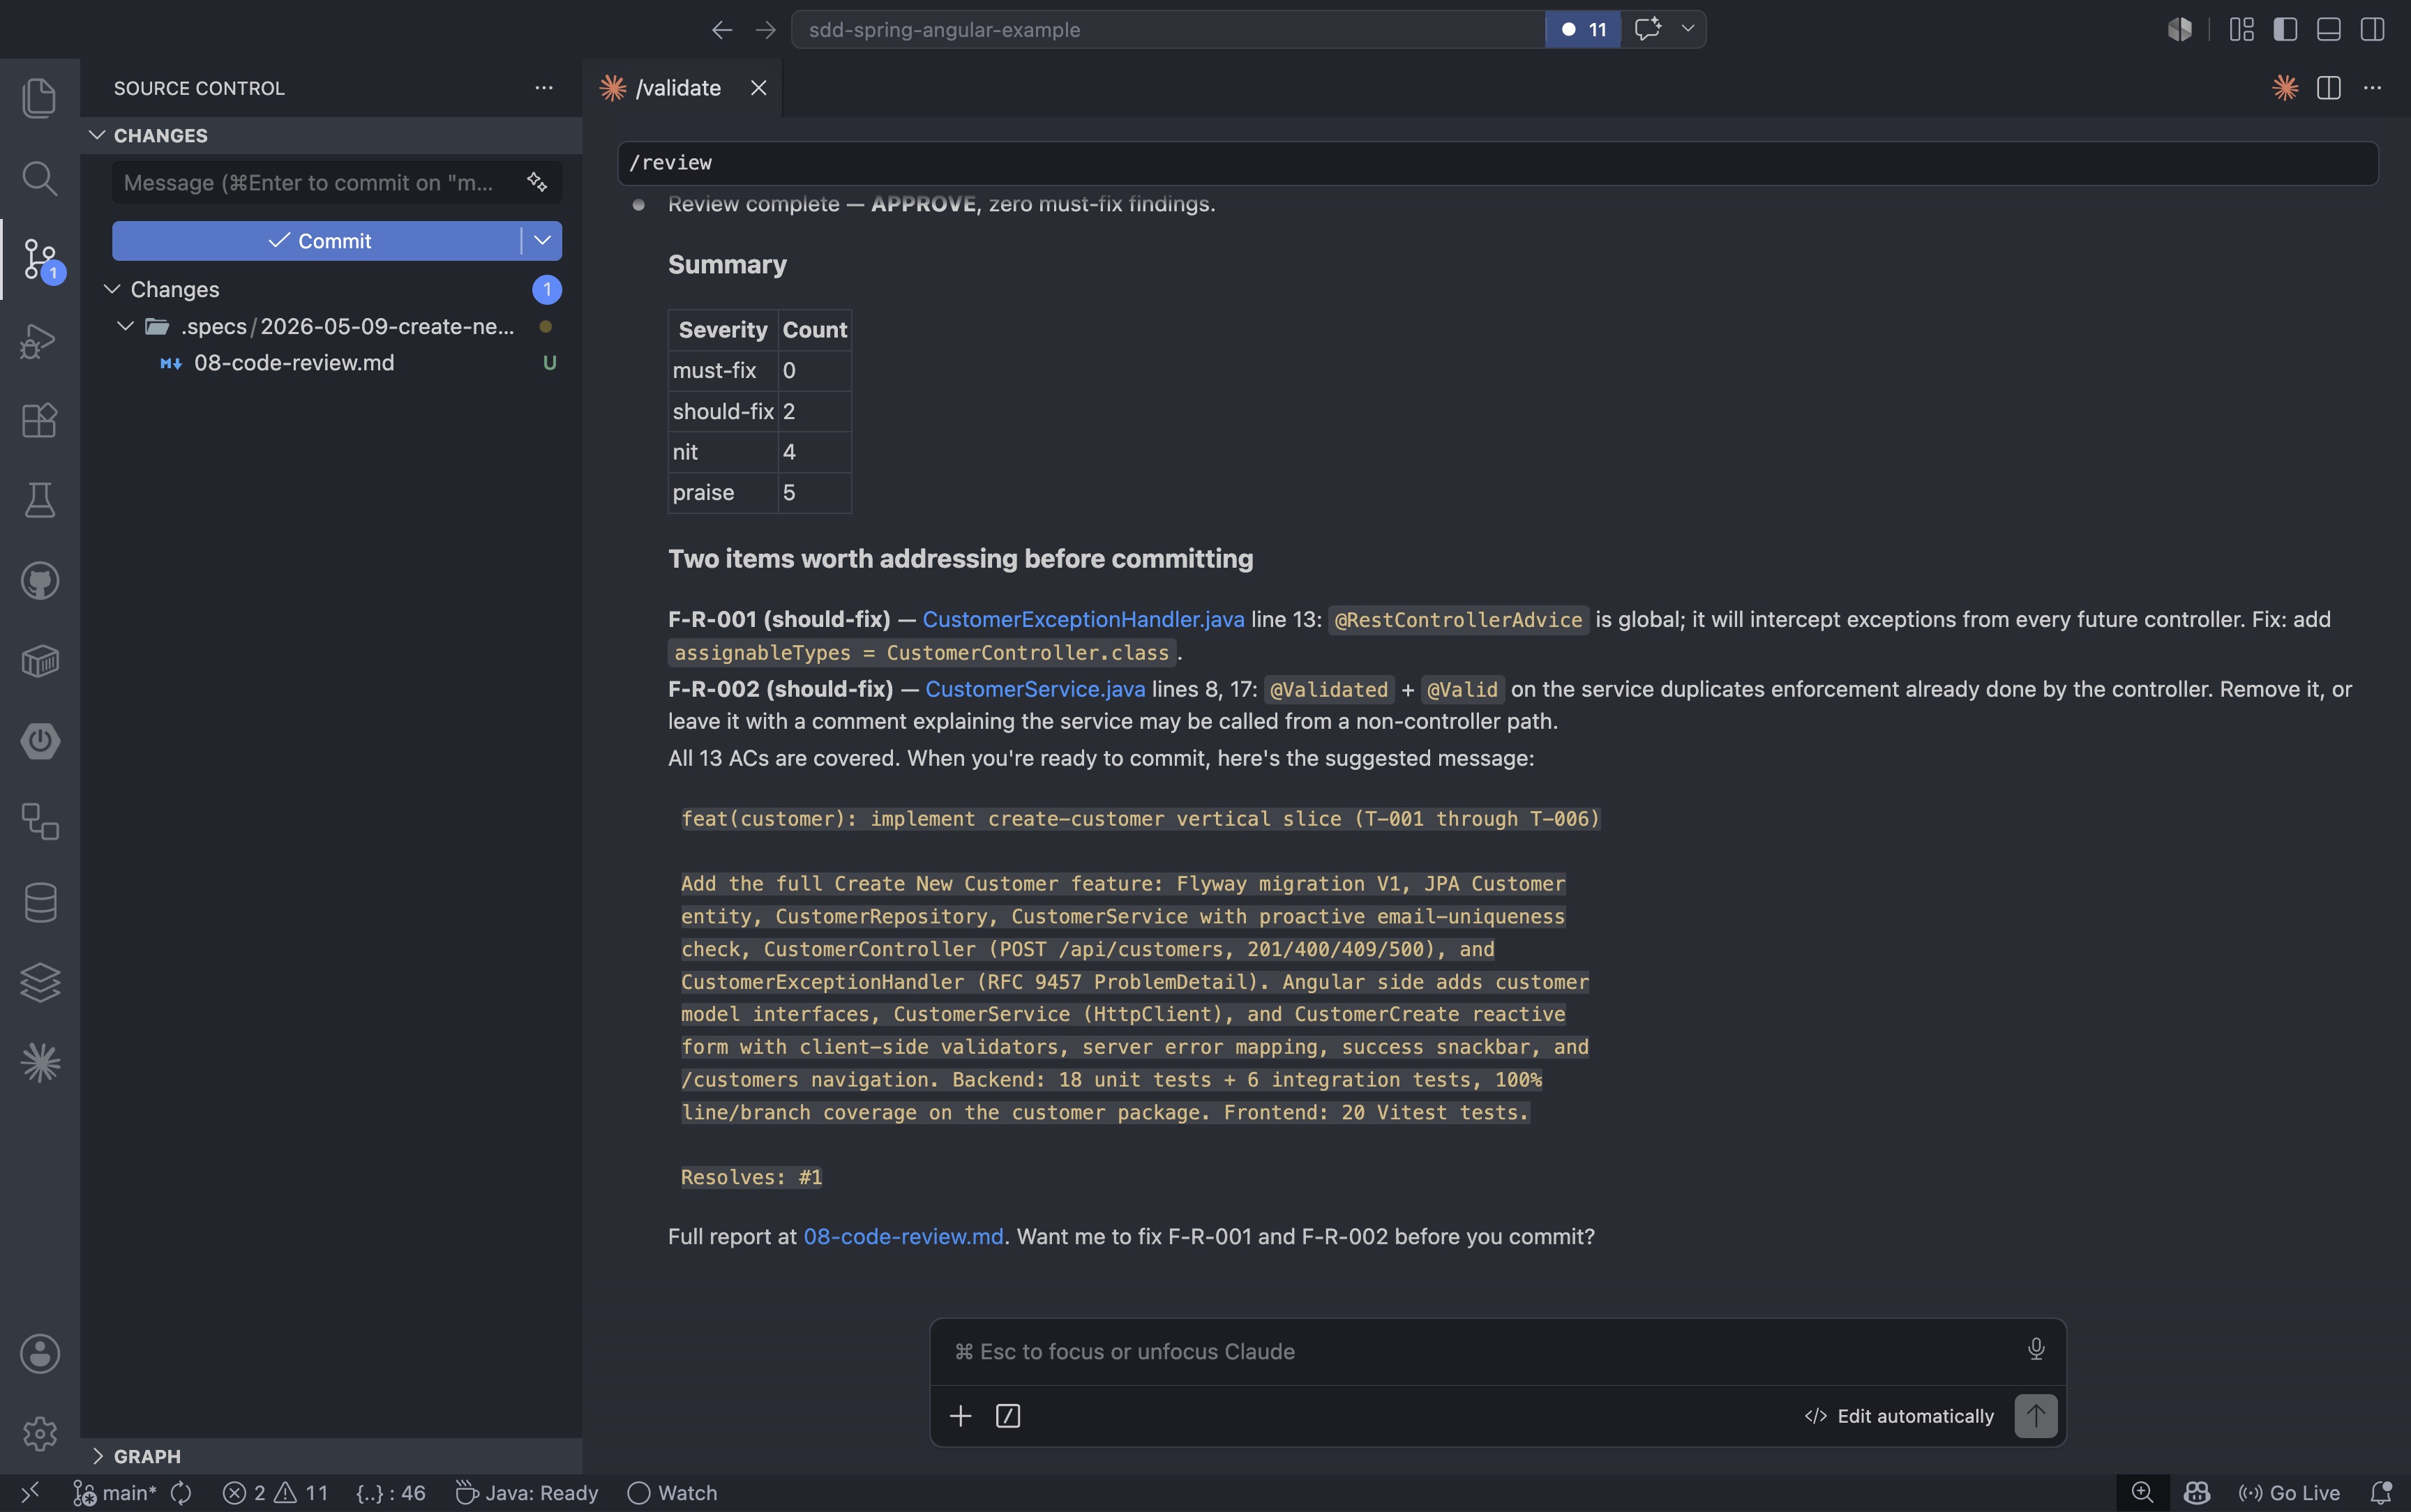
After formatting is clean and validation passes, the /review command performs a final audit of the implementation against the spec: checking that all acceptance criteria are covered and flagging any code-quality concerns before the commit:
1
/review
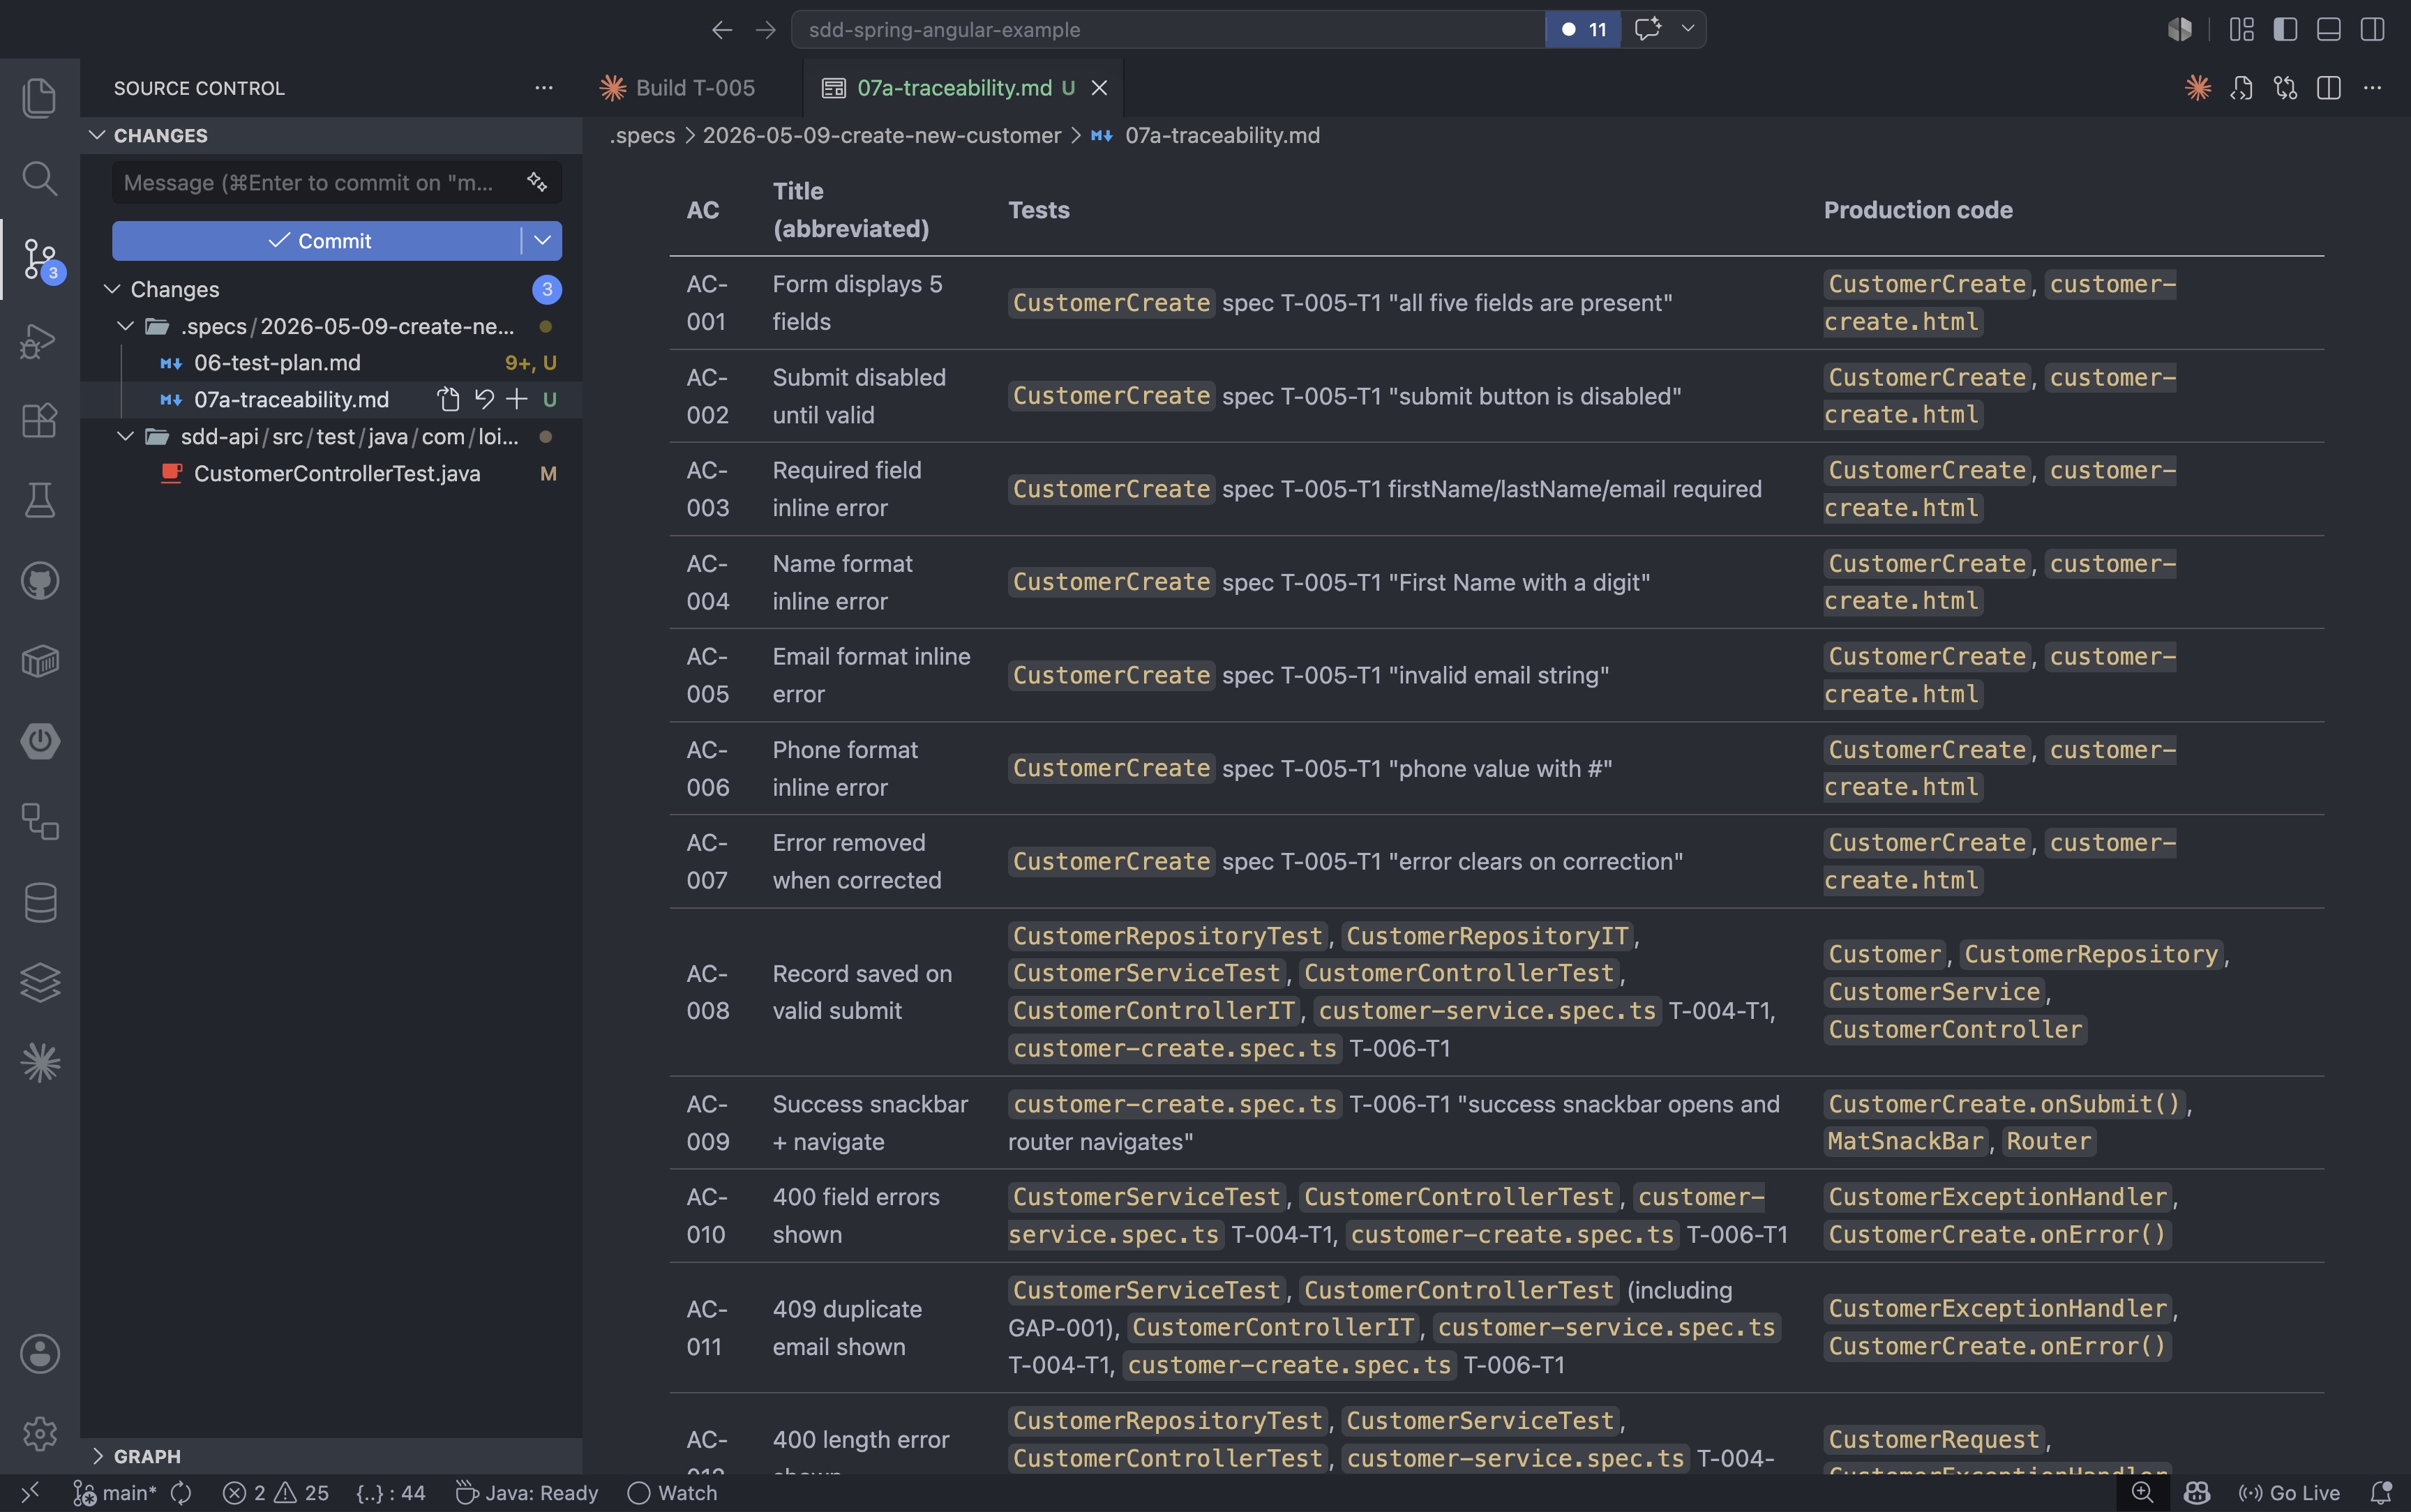
The review checks for things like overly broad exception handlers, duplicated validation logic, and missing scope annotations. It returns a structured verdict with must-fix, should-fix, nit, and praise categories:
After the review approves, the .specs/2026-05-09-create-new-customer/ folder contains the complete lifecycle artifact trail for the feature. Every document from the initial spec through the final code review is committed alongside the application code:
That is the difference between code that exists and code that is actually delivered.
10. Keeping the Repo Healthy as Specs Grow
When teams adopt specs-driven development with harness engineering, one thing becomes obvious very quickly: the repository starts collecting a lot of documents.
That is not a side effect. That is part of the model.
In this workflow, specs are not passive notes. They are living artifacts that drive generation, review, validation, and delivery. So the question is not “How do we avoid documents?” The real question is “How do we manage them with the same rigor as source code?”
Here is the approach I recommend.
1. Define a clear spec-to-artifact lifecycle
Once code is live, the role of a spec changes. Your repo structure should make that explicit.
- Keep active specs in a dedicated folder such as
/specsor/docs/blueprints - Move implemented, no-longer-driving specs into
/archiveor/history - Commit final harness and scaffold code so the repo is buildable without AI tooling
- Ignore temporary bridge files with
.gitignoreso transient outputs do not pollute the repo
This keeps the active surface area clean while preserving history.
2. Maintain a spec registry for discoverability
As specs increase, people lose time just finding the right document.
- Keep an index file (for example
README.mdorindex.json) in the specs folder - Map each spec to the module, service, or bounded context it governs
- Add YAML front matter metadata such as
status,author,target_module, andlast_reviewed
With this in place, you can script health checks and quickly answer: which specs are active, stale, or deprecated?
3. Validate specs automatically in CI
A healthy SDD repo requires machine-readable, consistently structured specs.
- Add structure checks to verify required sections are present (for example: Input, Output, Business Rules)
- Add sync checks that compare spec revisions with generated or implemented code
- Warn or fail the pipeline when the spec changed but the implementation was not updated
Specs-driven delivery requires the same enforcement level as tests and linting.
4. Separate harness templates from business specs
Harness engineering introduces framework-specific glue. Keep that layer isolated.
- Store reusable prompt templates and harness scripts separately from feature specs
- Update templates when framework behavior changes (for example Spring Boot or Angular upgrades)
- Avoid touching every spec file for toolchain-level changes
- Periodically prune intermediate one-off specs that no longer add architectural value
This keeps business intent stable while harness mechanics evolve safely.
5. Use multi-layer documentation to avoid clutter
Not every spec should live at the same level.
- Domain specs: high-level business behavior, long-lived
- Technical specs: service-level implementation decisions, updated more frequently
- Interaction specs: frontend/backend contracts, critical for end-to-end consistency
When these layers are explicit, the repo stays navigable and review conversations stay focused.
The key takeaway is simple: treat specification assets like production code. Version them, lint them, index them, validate them, and retire them intentionally. That is how you avoid a document graveyard and keep SDD as an operational advantage instead of administrative overhead.
11. When to Use This Workflow
This workflow is best for features with real behavior and real risk: business rules, API contracts, validation, UI and backend coordination, end-to-end verification, traceability that matters.
Do not overuse the full process for tiny cosmetic edits or throwaway experiments. The point is not ceremony. The point is control where control matters.
Specs-driven development is not about slowing everything down. It is about making the important work explicit, testable, and easier to trust.
If you want the reasoning behind this workflow, the two earlier posts in this series cover the foundations:
- Vibe Coding, But Production-Ready: A Specs-Driven Feedback Loop for AI-Assisted Development
- Harness Engineering: The Missing Layer in Specs-Driven AI Development
Final Takeaway
Prompt-first AI work is a good way to explore ideas.
Specs-driven development is a better way to deliver them.
If the feature matters, the process should make the intent visible, the decisions explicit, the implementation testable, and the validation unavoidable. That is how AI becomes useful in a real software team.
The workflow I outlined here is the one I actually use to deliver, especially for Epics, where you can really see the beauty of accelerated development: onboard the repo, write the spec, review it, design the solution, implement the backend, add the Angular slice, and prove the whole thing end to end. That is the difference between getting code and shipping a feature.
One last thing worth noticing: in every command we ran, we did not do any prompting. No “act as a senior Spring Boot developer”, no clever persona tricks, no carefully tuned instructions. That is the beauty of this framework. Prompting is minimal, which is exactly why it helps level set a team regardless of experience level. The little prompting we do here is mostly answering questions and providing feedback. The structure carries the weight, not the prompt.
I hope this framework helps you and your team. Feel free to change it according to your needs, and happy coding!