Mutation Testing for Java with PIT: Stop Trusting Your Coverage Numbers

You have 100% line coverage for unit testing. A bug ships anyway.
It happens because line coverage measures which lines of code your tests execute, not whether your tests are actually capable of detecting a defect. A test that calls a method but never asserts anything will push your coverage number to 100% while catching precisely nothing. That is not a corner case. It is a systematic blind spot in how most teams measure test quality.
Mutation testing is the answer. It works by automatically introducing small bugs into your code, called mutants, and then running your test suite against each one. If your tests fail, the mutant is killed. If your tests pass, the mutant survived, and you have found a gap in your test suite.
An important clarification before going further: PIT does not require you to write a new category of tests. It runs against the JUnit tests you already have. Think of it as a quality harness layered on top of your existing test suite. It evaluates how well those tests do their job, rather than replacing or supplementing them with something else.
PIT (PITest) is the most widely used mutation testing tool for the JVM. It is fast compared to older mutation testing systems, integrates directly with Maven and Gradle, and produces an HTML report you can read in a browser. This post walks through everything you need to set up PIT in a Spring Boot project with Maven and JUnit 5, read the report, enforce quality thresholds, and run it in CI.
Want the code? The full demo project is available on GitHub: loiane/spring-boot-pit-demo
In this post, we cover:
- Why line coverage is not enough and what mutation testing measures instead
- How PIT mutants work and which mutators are active by default
- What equivalent mutations are and why 100% mutation score is not realistic
- Setting up PIT in a Spring Boot + Maven + JUnit 5 project (including the JUnit 5 gotcha that breaks most first-time setups)
- Running PIT behind a Maven profile to keep normal builds fast
- Reading and acting on the PIT HTML report
- Running PIT in GitHub Actions with artifact archiving
- Performance tuning for real projects
Why Line Coverage is Not Enough
Line coverage answers one question: did my test suite execute this line? It does not answer: would my test suite detect a defect on this line?
The gap is real. Consider this service method:
1
2
3
public double applyDiscount(double price, double discountPercent) {
    return price - (price * discountPercent / 100);
}
And this test:
1
2
3
4
5
@Test
void testApplyDiscount() {
    service.applyDiscount(100.0, 10.0);
    // no assertion
}
Line coverage: 100%. Defect detection: 0%. If someone changes * to / in the formula, the test still passes.
Mutation testing catches this. PIT would replace * with /, rerun the test, and find that it passes. The mutant survives. The report surfaces the gap.
The formal definition: mutation score = killed mutations / total mutations. A score of 80% means 20% of injected bugs were not caught by your test suite.
How PIT Mutants Work
PIT modifies compiled bytecode, not source files. This makes it fast to run and compatible with the Java build lifecycle without any source rewriting.
For each class under test, PIT generates a set of mutants by applying one operator at a time. It then collects per-test line coverage to determine which existing tests cover the mutated line, and runs only those tests against each mutant. No new test classes, no separate test runner configuration. PIT discovers and reuses the JUnit 5 tests already on your classpath. Most modern runs measure in minutes, not hours, for typical services.
Three outcomes are possible for each mutant:
| Outcome | Meaning |
|---|---|
| Killed | At least one test detected the fault and failed |
| Survived | All tests passed with the bug present |
| No coverage | No test executes the mutated line |
A survived mutant and no-coverage mutant both indicate a testing gap, but they are different problems. No coverage means the line is not reached. Survived means the line is reached but the tests do not assert anything meaningful about its output.
The Default Mutators You Should Know
PIT ships with several mutator groups. The DEFAULTS group is active unless you override it. You do not need to configure this to get started, but knowing what PIT is changing helps you understand the report.
| Mutator | What it changes | Example |
|---|---|---|
CONDITIONALS_BOUNDARY |
Replaces < with <=, > with >=, etc. |
if (a < b) → if (a <= b) |
NEGATE_CONDITIONALS |
Flips == to !=, < to >=, etc. |
if (a == b) → if (a != b) |
MATH |
Swaps arithmetic operators | a + b → a - b |
INCREMENTS |
Flips ++ and -- on local variables |
i++ → i-- |
VOID_METHOD_CALLS |
Removes calls to void methods entirely | validate(input) → (removed) |
NULL_RETURNS |
Returns null from non-null returning methods |
return user → return null |
EMPTY_RETURNS |
Returns an empty value for collections, optionals | return list → return emptyList() |
FALSE_RETURNS |
Returns false from boolean methods |
return isValid → return false |
TRUE_RETURNS |
Returns true from boolean methods |
return isValid → return true |
Beyond DEFAULTS, PIT provides a STRONGER group that adds more return-value mutators, and an ALL group that enables every experimental operator. The maintainers explicitly discourage using ALL in practice, because it generates too many equivalent mutations and makes reports hard to act on.
To use the stronger set:
1
2
3
4
5
<configuration>
  <mutators>
    <mutator>STRONGER</mutator>
  </mutators>
</configuration>
Equivalent Mutations: Why 100% Is Not a Realistic Target
Not every surviving mutant represents a test suite gap. Some mutations are equivalent: the modified code produces exactly the same observable behavior as the original, so no test can ever kill them.
A common example is a performance-only optimization, such as pre-sizing a collection:
1
2
// the "+ 1" is a capacity hint, not part of the result
Map<String, String> cache = new HashMap<>(items.size() + 1);
PIT’s MATH mutator can change + 1 to - 1. The map still stores exactly the same entries and returns exactly the same results, and only its internal resizing behavior changes, which is invisible to any functional assertion. The observable behavior is identical, so no test you write will ever kill that mutant.
This matters for threshold setting. A mutation score of 80 to 85% is a strong result for most production codebases. Trying to push to 100% typically means writing fragile tests that exist only to kill specific mutants, not to validate behavior.
The practical approach: treat surviving mutants as a prioritized backlog. Read the report, decide which survivors represent real gaps, add targeted assertions for those, and accept that some survivors will always be equivalent mutations.
To make equivalent mutations more visible, you can add an XML output format and diff reports between runs. More on this in the CI section.
Setting Up PIT in a Spring Boot Project
The Demo Project
The demo is a Spring Boot REST API with three layers: a ProductController, ProductService, and ProductRepository. The full source is on GitHub at loiane/spring-boot-pit-demo.
Project structure:
1
2
3
4
5
6
7
8
9
10
11
12
13
14
15
src/
  main/java/com/loiane/pit/
    controller/
      ProductController.java
    service/
      ProductService.java
    model/
      Product.java
    repository/
      ProductRepository.java
  test/java/com/loiane/pit/
    controller/
      ProductControllerTest.java
    service/
      ProductServiceTest.java
Prerequisites
- Java 21 (LTS). PIT’s bytecode analysis does not yet support Java 26 class files, so the demo targets Java 21. Bump
java.versiononce your PIT release supports a newer JDK. - Maven 3.8+ (the demo ships the Maven Wrapper, so
./mvnwworks without a local Maven install) - The demo runs on Spring Boot 4.1. JUnit 5 comes transitively through the Spring Boot test starters (
spring-boot-starter-webmvc-testandspring-boot-starter-data-jpa-test). On Spring Boot 3.x the singlespring-boot-starter-teststarter works the same way for PIT.
The JUnit 5 Gotcha
PIT does not auto-detect JUnit 5 tests out of the box. If you add the pitest-maven plugin without the JUnit 5 bridge, PIT will report 0 tests found and either fail the build or skip mutation entirely. This is the single most common reason first-time PIT setups silently do nothing.
The fix: declare pitest-junit5-plugin as a dependency inside the plugin block, not as a project dependency.
Minimal Working Configuration
Add the following to <build><plugins> in your pom.xml:
1
2
3
4
5
6
7
8
9
10
11
12
13
<plugin>
  <groupId>org.pitest</groupId>
  <artifactId>pitest-maven</artifactId>
  <version>1.20.4</version>
  <dependencies>
    <!-- Required for JUnit 5: PIT finds 0 tests without this -->
    <dependency>
      <groupId>org.pitest</groupId>
      <artifactId>pitest-junit5-plugin</artifactId>
      <version>1.2.3</version>
    </dependency>
  </dependencies>
</plugin>
Run it once to verify the setup works:
1
mvn test-compile org.pitest:pitest-maven:mutationCoverage
The report lands in target/pit-reports/. Open index.html in a browser. If you see a table of classes with mutation scores, you are up and running.
Production-Ready Configuration
The minimal config is enough to explore. For a real project, you want explicit scoping, thresholds that fail the build, output in both HTML and XML (for CI diffs), and incremental history to speed up local runs.
1
2
3
4
5
6
7
8
9
10
11
12
13
14
15
16
17
18
19
20
21
22
23
24
25
26
27
28
29
30
31
32
33
34
35
36
37
38
39
40
41
42
43
44
45
<plugin>
  <groupId>org.pitest</groupId>
  <artifactId>pitest-maven</artifactId>
  <version>1.20.4</version>
  <dependencies>
    <dependency>
      <groupId>org.pitest</groupId>
      <artifactId>pitest-junit5-plugin</artifactId>
      <version>1.2.3</version>
    </dependency>
  </dependencies>
  <configuration>
    <!-- Scope to business logic: exclude DTOs, config, generated code -->
    <targetClasses>
      <param>com.loiane.pit.service.*</param>
      <param>com.loiane.pit.controller.*</param>
    </targetClasses>
    <targetTests>
      <param>com.loiane.pit.*</param>
    </targetTests>
    <!-- Use multiple threads to parallelize mutation analysis -->
    <threads>4</threads>
    <!-- Fail the build if mutation score falls below this percentage -->
    <mutationThreshold>80</mutationThreshold>
    <!-- Fail the build if test strength falls below this percentage -->
    <!-- Test strength = killed / (killed + survived), excludes no-coverage -->
    <testStrengthThreshold>90</testStrengthThreshold>
    <!-- Use decimal precision to avoid the integer rounding blind spot -->
    <thresholdPrecision>1</thresholdPrecision>
    <!-- HTML for humans, XML for CI tooling and report diffing -->
    <outputFormats>
      <outputFormat>HTML</outputFormat>
      <outputFormat>XML</outputFormat>
    </outputFormats>
    <!-- Speed up repeated local runs by reusing mutation history -->
    <withHistory>true</withHistory>
    <!-- Exclude logging calls from mutation. PIT already avoids common -->
    <!-- logging frameworks by default; list them explicitly to be safe -->
    <!-- and to document the intent for your team. -->
    <avoidCallsTo>
      <avoidCallsTo>java.util.logging</avoidCallsTo>
      <avoidCallsTo>org.slf4j</avoidCallsTo>
    </avoidCallsTo>
  </configuration>
</plugin>
A note on thresholdPrecision: the default threshold comparison uses integer percentages. A project at 80.49% mutation score with a threshold of 80 passes, because 80.49 rounds to 80. A project at 79.51% also passes (rounds to 80). That is a 1% blind spot. Setting thresholdPrecision to 1 compares at one decimal place and closes the gap.
A note on withHistory: this tells PIT to cache mutation results between runs locally. If a class and its tests have not changed, PIT skips re-running those mutants. On a medium-sized project this can cut run time by 50 to 70% for incremental runs. It is only useful locally, since CI starts fresh.
Excluding Noise
Not all code should be mutated. DTOs, records, configuration classes, and Spring Boot auto-configuration are all candidates for exclusion. Mutating them generates equivalent mutations and inflates the report without adding signal.
1
2
3
4
5
<excludedClasses>
  <param>com.loiane.pit.model.*</param>
  <param>com.loiane.pit.*Application</param>
  <param>com.loiane.pit.config.*</param>
</excludedClasses>
Also exclude methods that cannot meaningfully be tested by mutation, such as hashCode, equals, and toString on simple value types:
1
2
3
4
5
<excludedMethods>
  <param>hashCode</param>
  <param>equals</param>
  <param>toString</param>
</excludedMethods>
Using a Maven Profile to Keep Normal Builds Fast
Mutation testing is slow relative to a unit test run. On a medium-sized project, a full PIT run might take 3 to 10 minutes. You do not want that on every mvn test.
The recommended pattern is to isolate PIT behind a Maven profile. Move the entire plugin configuration inside a <profiles> block:
1
2
3
4
5
6
7
8
9
10
11
12
13
14
15
16
17
18
19
20
21
22
23
24
<profiles>
  <profile>
    <id>pitest</id>
    <build>
      <plugins>
        <plugin>
          <groupId>org.pitest</groupId>
          <artifactId>pitest-maven</artifactId>
          <version>1.20.4</version>
          <dependencies>
            <dependency>
              <groupId>org.pitest</groupId>
              <artifactId>pitest-junit5-plugin</artifactId>
              <version>1.2.3</version>
            </dependency>
          </dependencies>
          <configuration>
            <!-- full configuration here -->
          </configuration>
        </plugin>
      </plugins>
    </build>
  </profile>
</profiles>
Now the normal build is unchanged:
1
2
mvn test            # fast, no mutation analysis
mvn -Ppitest test   # runs unit tests + full mutation analysis
In CI, activate the profile on the mutation testing step only.
Reading the PIT Report
The HTML report lives in target/pit-reports/. Open index.html.
Overview Page
The summary table shows every class in scope with four metrics:
| Column | What it measures |
|---|---|
| Line % | Standard line coverage |
| Mutation % | Mutation score (killed / total) |
| Test Strength | Killed / (killed + survived), excludes no-coverage mutants |
| Mutations | Raw counts: killed, survived, no coverage, timed out |
Sort by mutation % ascending to find the weakest-tested classes first.
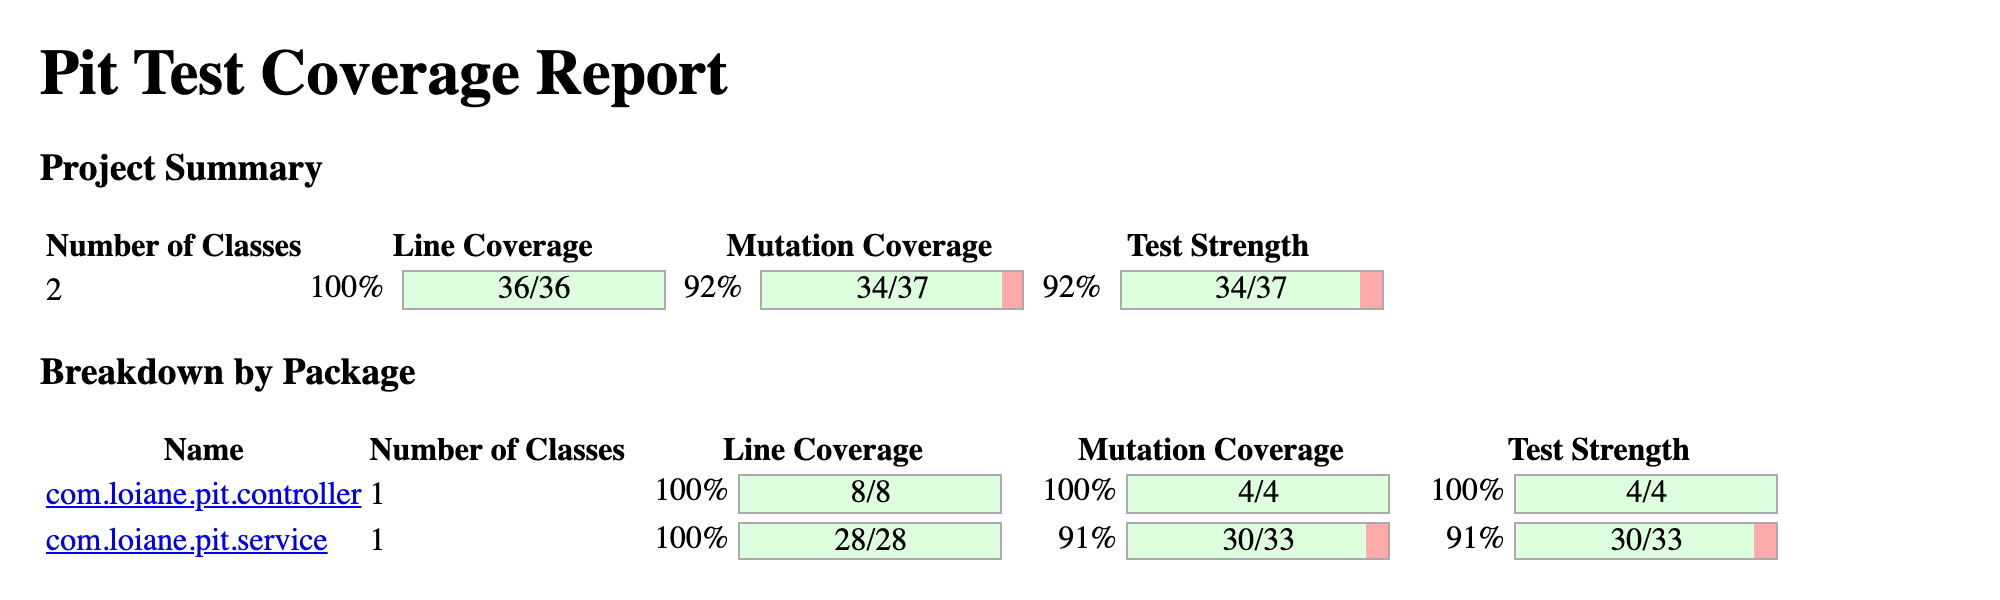
The demo project lands at 92% mutation coverage and 92% test strength. The thin pink slivers on the com.loiane.pit.service row flag the surviving mutants that are still waiting on an assertion.
Class-Level Drill-Down
Click any class name to open its source view. Each line is annotated:
- Light green: line covered by tests
- Dark green: all mutants on this line were killed
- Light pink: line not covered by tests
- Dark pink: at least one mutant survived on this covered line
Dark pink lines are the ones to focus on. They tell you that your tests reach the code but do not validate it well enough to catch a simple change.
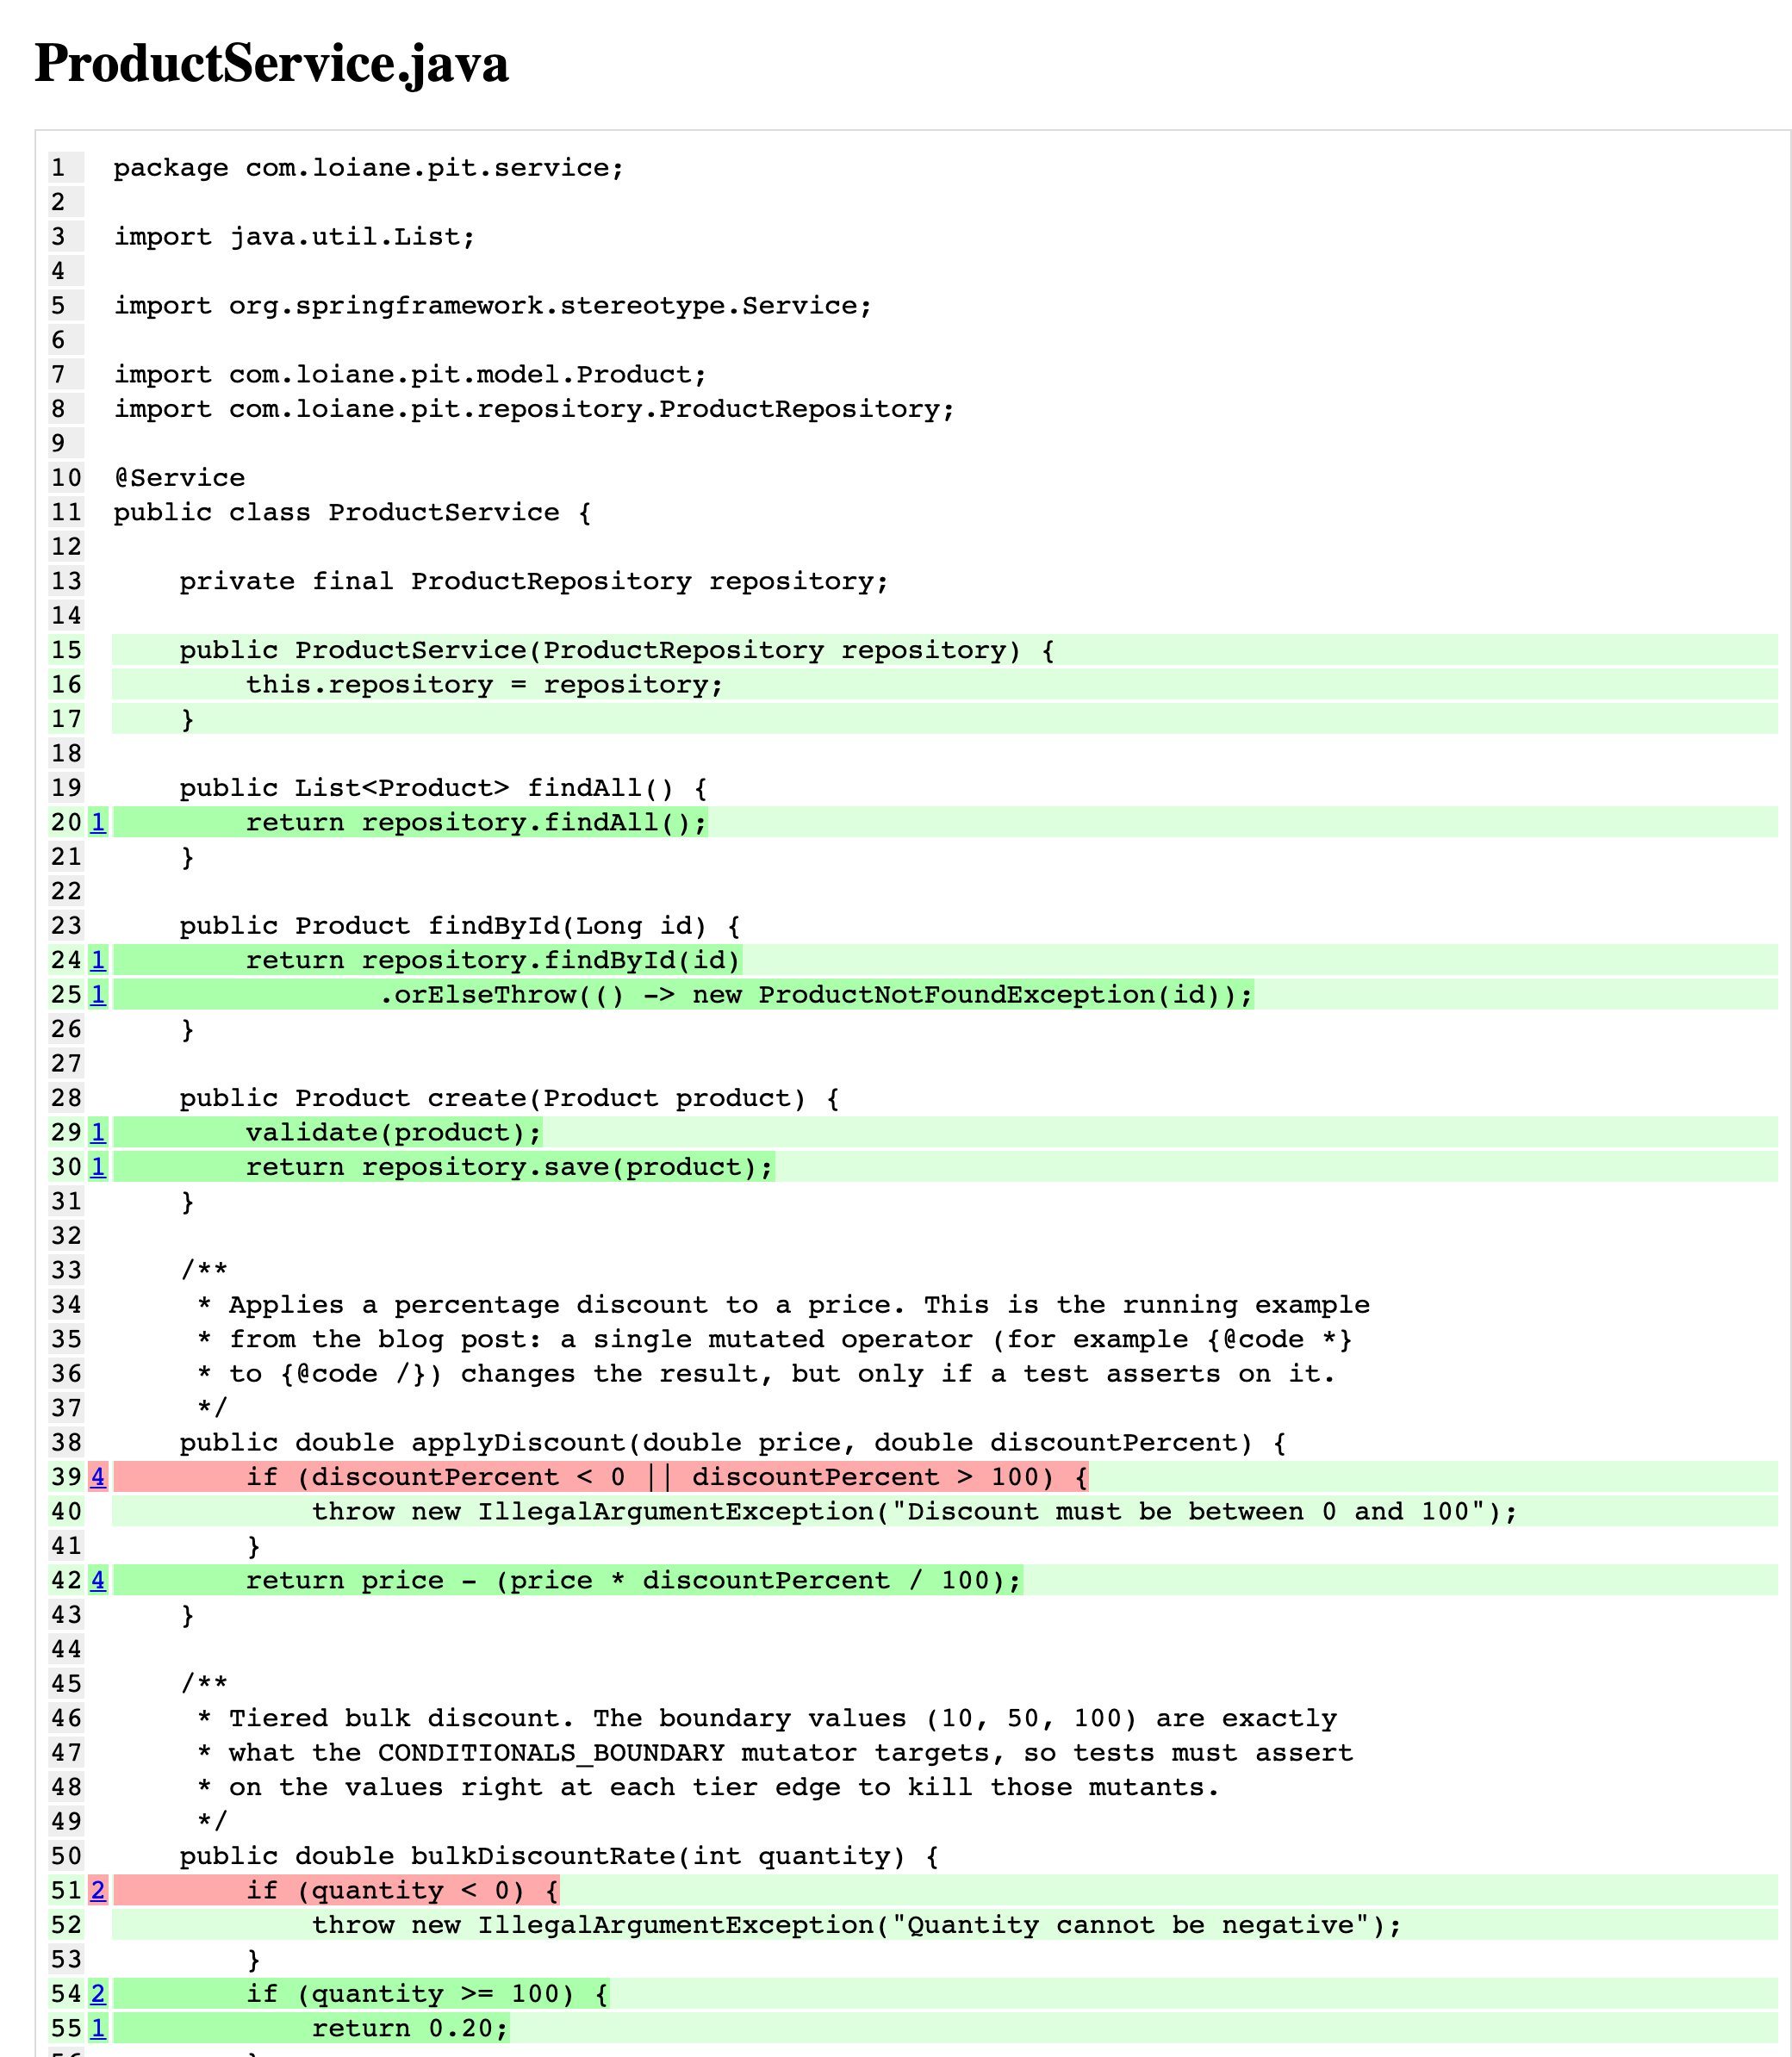
In the ProductService source view above, the green lines are fully killed, while the two pink lines (the discountPercent guard in applyDiscount and the quantity guard in bulkDiscountRate) each have a surviving CONDITIONALS_BOUNDARY mutant. Both are reached by tests but never asserted exactly at the boundary.
Acting on the Report
Use this decision table when reviewing survivors:
| Status | Meaning | Recommended action |
|---|---|---|
| Killed | Test caught the fault | No action needed |
| Survived | Tests passed with a bug present | Add or strengthen an assertion |
| No coverage | No test reaches this line | Add a test that exercises the path |
| Timed out | Mutant likely caused an infinite loop | Usually noise; review if frequent |
For survived mutants, click the line to see the exact mutation. PIT shows you what it changed. Write the minimal assertion that would catch that specific change. In most cases this means asserting on the return value of the method being tested, not just verifying it was called.
Example: in the demo project, PIT reports a 92% mutation score with three survivors, all CONDITIONALS_BOUNDARY mutants on exact-boundary checks (the discountPercent > 100 guard in applyDiscount, the quantity < 0 guard in bulkDiscountRate, and the stockQuantity < 0 guard in validate). Each one means the tests exercise the method but never assert behavior exactly at the boundary value. Add a test that provides an input exactly at the boundary and asserts the expected output, and the mutant dies.
Running PIT in GitHub Actions
This workflow runs PIT as a separate step on every push and pull request targeting main. The HTML report is archived as a build artifact so reviewers can inspect it without re-running the analysis.
Create .github/workflows/mutation.yml:
1
2
3
4
5
6
7
8
9
10
11
12
13
14
15
16
17
18
19
20
21
22
23
24
25
26
27
28
29
30
31
32
33
34
name: Mutation Testing

on:
  push:
    branches: [ main ]
  pull_request:
    branches: [ main ]

jobs:
  mutation:
    name: PIT Mutation Analysis
    runs-on: ubuntu-latest

    steps:
      - name: Checkout code
        uses: actions/checkout@v4

      - name: Set up Java
        uses: actions/setup-java@v4
        with:
          java-version: '21'
          distribution: 'temurin'
          cache: maven

      - name: Compile and run mutation tests
        run: ./mvnw -Ppitest -B test-compile org.pitest:pitest-maven:mutationCoverage

      - name: Archive mutation report
        if: always()
        uses: actions/upload-artifact@v4
        with:
          name: pit-mutation-report
          path: target/pit-reports/
          retention-days: 14
A few design decisions in this workflow worth noting:
if: always()on the archive step means the report is uploaded even when the build fails due to a threshold violation. This is intentional, since you want to read the report to understand why the threshold failed, not just know that it did.retention-days: 14keeps the report for two weeks, which is enough for most PR review cycles without accumulating storage costs.cache: mavenreuses the local Maven repository between runs to avoid re-downloading PIT and Spring Boot dependencies on every run.- The
withHistoryoption in the plugin config is useful locally but not in CI. CI runners start fresh, so there is no history to reuse. For CI speed, rely ontargetClassesscoping andthreadsinstead.
Failing the Build on Threshold Violations
With mutationThreshold and testStrengthThreshold set in the plugin config, the mutationCoverage goal will exit with a non-zero code when the score falls below the threshold. GitHub Actions treats non-zero exit codes as failures, so no additional configuration is needed, and the job will turn red.
Start with a threshold of 70% and ratchet it up as you add assertions. Setting it to 80% on day one against a legacy codebase with poor coverage will only create friction. The threshold is a floor, not a target.
Performance: Keeping PIT Fast in Real Projects
On a small project, PIT runs in under a minute. On a medium-sized Spring Boot application, it can run for 5 to 15 minutes without tuning. Here are the most effective controls:
Use multiple threads. PIT parallelizes mutation analysis across threads. Setting <threads>4</threads> on a 4-core CI runner typically halves run time. The optimal number is usually between 1 and the number of available CPUs.
Scope targetClasses aggressively. The single biggest lever. Every class you add to scope contributes its full set of mutants to the run, and run time scales with the total number of mutants generated. Focus on business logic (services, domain objects, validators) and exclude:
- Data classes, records, DTOs
- Spring configuration classes
- Generated code (Swagger clients, QueryDSL Q-types, Mapstruct mappers)
- Application entry points and bootstrap classes
Use withHistory locally. When running PIT repeatedly during development, withHistory reuses results from unchanged classes. The first run is slow. Subsequent runs on unchanged code are instant.
Exclude slow tests from the mutation run. If your test suite includes integration tests or slow @SpringBootTest slices, PIT will try to run them for every mutant. Use excludedTestClasses or targetTests to scope PIT to fast unit tests only. Run integration tests in a separate CI step.
Use dry run mode to debug config problems. If PIT is misbehaving (wrong classes found, tests not discovered), add <dryRun>true</dryRun> to the config. Dry run mode gathers coverage and generates mutants without executing them against tests. It is much faster and surfaces configuration mistakes without waiting for a full mutation run.
Conclusion
Line coverage is a necessary baseline. It is not a sufficient signal for test quality. Mutation testing is what closes the gap. It tells you not just which lines your tests touch, but which logic changes your tests would actually catch.
PIT is the most practical way to add mutation testing to a Java project today. With the JUnit 5 plugin in place and a Maven profile wrapping the configuration, you can integrate it into an existing Spring Boot project in under an hour, run it in CI with a GitHub Actions workflow, and get a report that tells you exactly where to strengthen your assertions.
A reasonable adoption path:
- Add the plugin with the JUnit 5 dependency. Run once locally. Establish a baseline mutation score.
- Scope to business-logic packages only. Exclude DTOs, config, and generated code.
- Set a threshold at or slightly below the baseline. Commit.
- Add targeted assertions for surviving mutants in critical classes. Raise the threshold as you improve.
- Add the GitHub Actions workflow. Archive reports. Gate PRs on the threshold.
- Use
withHistorylocally to keep the feedback loop fast during development.
The goal is not 100%. The goal is confidence that the tests you have will catch the bugs that matter.
References
- PIT (PITest) official site - documentation home
- PIT Maven quickstart - plugin goals and configuration reference
- PIT mutator reference - every mutator and which group it belongs to
- pitest-junit5-plugin - the JUnit 5 bridge used in this post
- hcoles/pitest on GitHub - source, release notes, and issue tracker
- loiane/spring-boot-pit-demo - the full demo project for this post
Happy Coding!