
Building an AI Chat with Memory (Context) using Spring AI and Angular

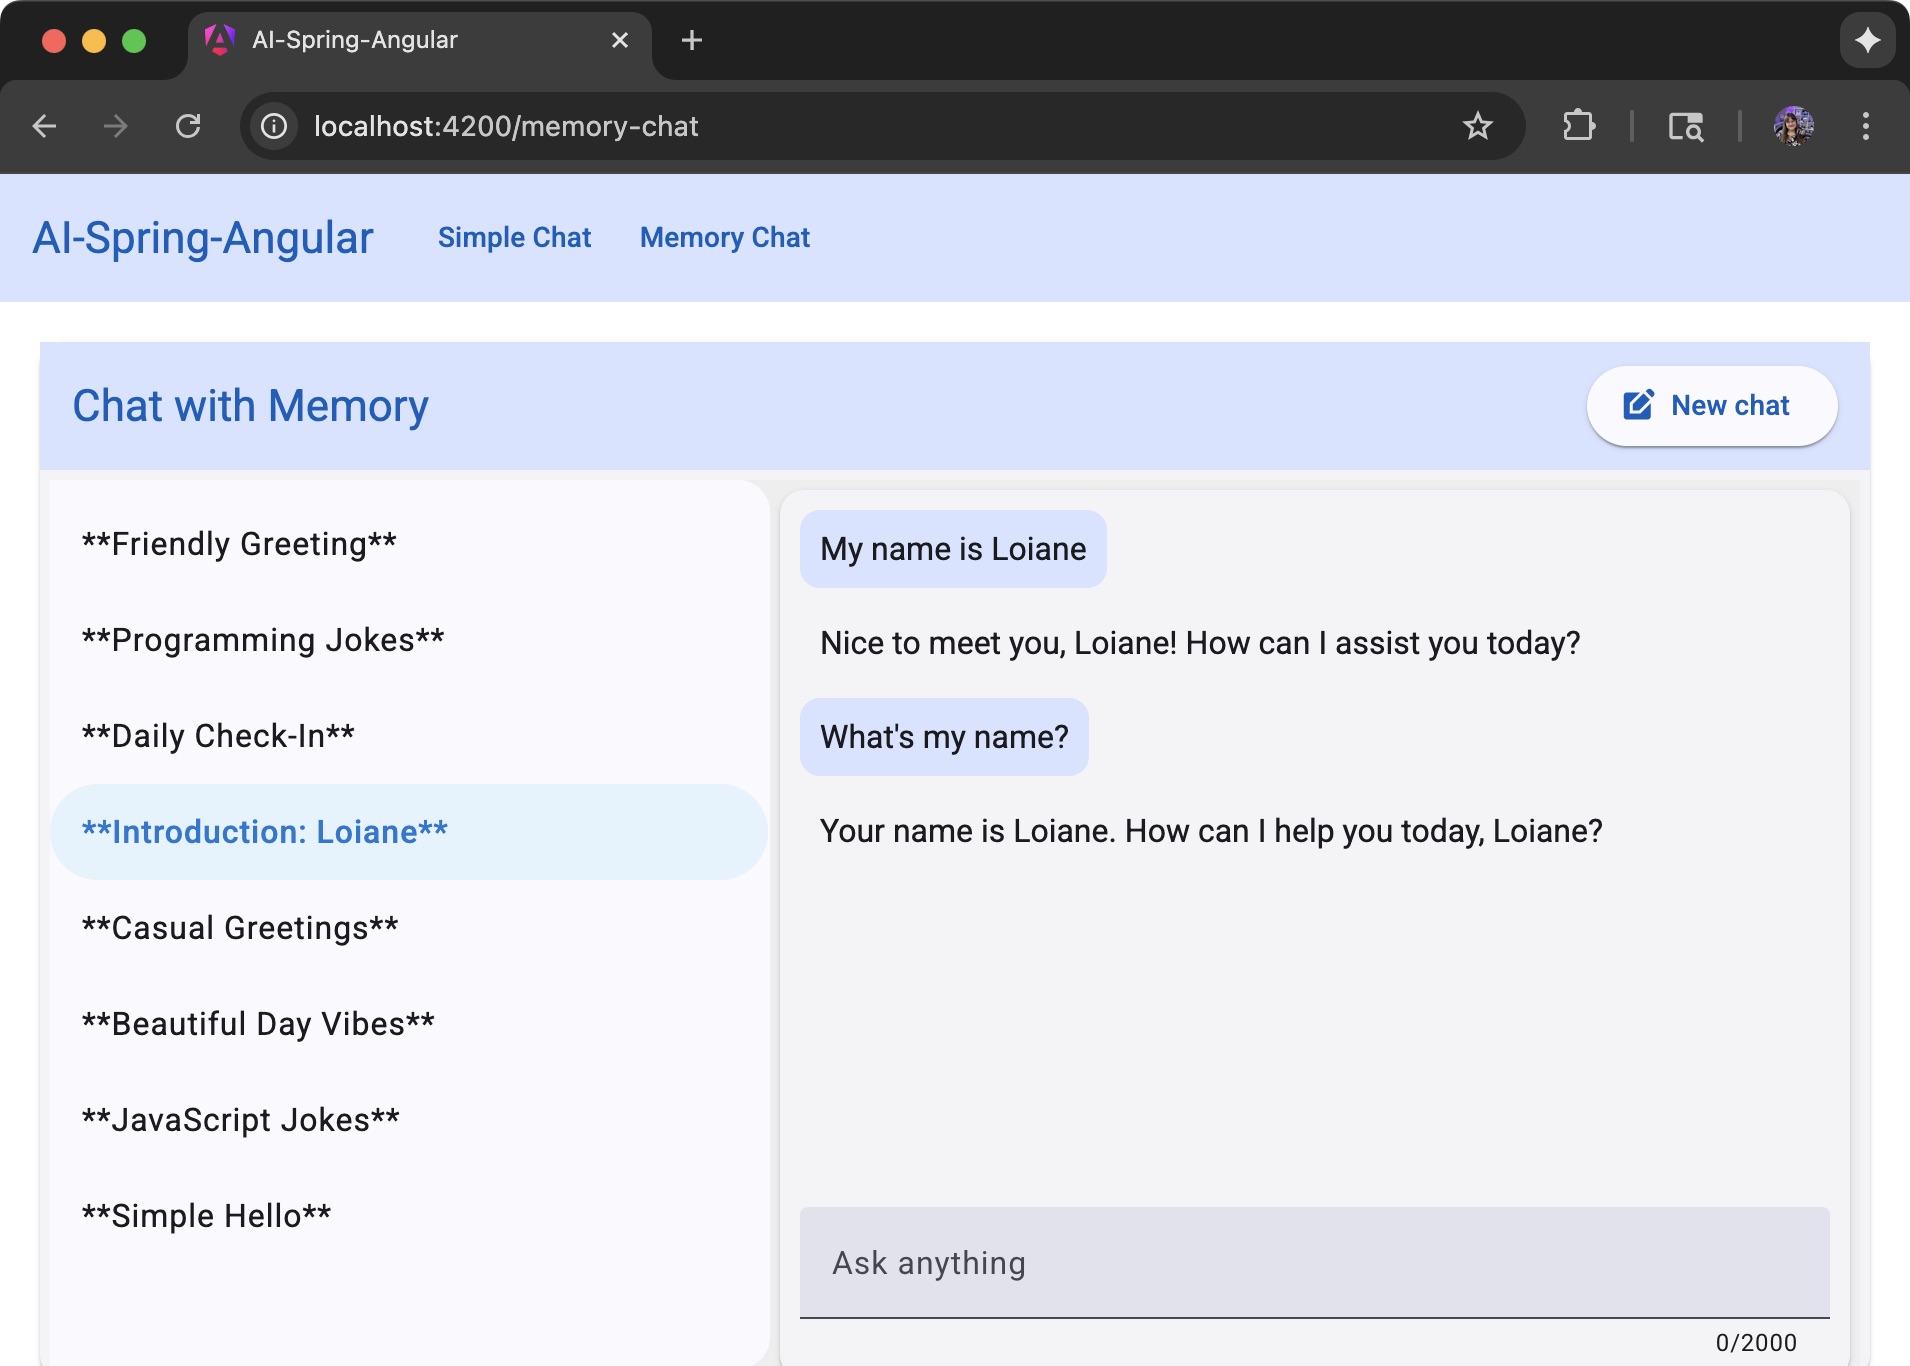
Most AI chat apps feel forgetful: once you move on, the AI loses context. In this tutorial, we’ll fix that by building a chat application that remembers conversations using Spring AI and Angular. This takes our simple chat app to the next level, making interactions feel more natural and human.
- Tutorial Roadmap
- What We’ll Build
- Prerequisites
- Project Structure
- Setting up the Spring AI Backend: In Memory Chat
- Moving to Production: Adding Persistence
- Checkpoint: Backend Complete!
- Creating the Angular Frontend
- Building the Components
- Step 1: Define TypeScript Models
- Step 2: Create the Markdown Pipe
- Step 3: Create the Memory Chat Service
- Step 4: Create the Chat List Component
- Step 5: Create the Chat List Template
- Step 6: Add Chat List Styles
- Step 7: Create the Chat Panel Component
- Step 8: Create the Chat Panel Template
- Step 9: Add Chat Panel Styles
- Step 10: Update Main App Component
- Testing Our Memory Chat
- Key Takeaways
- Security Considerations
- Performance and Cost Optimization
- What’s Next?
- Conclusion
Tutorial Roadmap
We’ll build this in four phases:
Phase 1: Quick Win          Phase 2: Add Persistence       Phase 3: REST API         Phase 4: Angular UI
├─ In-memory chat          ├─ PostgreSQL setup           ├─ Controllers           ├─ Service layer
├─ Test memory works       ├─ Data models                ├─ CRUD endpoints        ├─ Chat list
└─ Understand basics       ├─ Repository layer           └─ Test with curl        ├─ Chat panel
                           └─ Service layer                                       └─ Styling
What We’ll Build
We’ll create a chat interface where:
- Users can start multiple conversations
- Each conversation maintains its own context and memory
- AI responses are aware of past messages
- Chat history is persisted in PostgreSQL
- Users can switch between sessions
- Auto-generated chat descriptions help identify conversations
The tech stack:
- Spring Boot backend with Spring AI memory integration
- PostgreSQL database for persistent chat storage
- Angular frontend with chat list and conversation panels
- Real-time conversation switching
Prerequisites
Before we start, make sure you have:
- Java 21+
- Node.js and npm
- Angular CLI 20+ (
npm install -g @angular/cli) - PostgreSQL database running (case use a docker image for this)
- A Gemini Project ID (check how to create one here Gemini)
- Your favorite IDE (I’ll be using VS Code and IntelliJ)
💡 Get 3 months free of IntelliJ Ultimate with the coupon:
LoianeGroner.
Project Structure
Here’s how our project is organized:
spring-ai-angular/
├── api-ai/                           # Spring Boot Backend
│   ├── src/main/java/com/loiane/api_ai/
│   │   ├── memory/
│   │   │   ├── MemoryChatController.java
│   │   │   ├── MemoryChatService.java
│   │   │   ├── ChatMemoryIDRepository.java
│   │   │   ├── Chat.java
│   │   │   ├── ChatMessage.java
│   │   │   └── ChatStartResponse.java
│   │   ├── chat/
│   │   │   ├── SimpleChatService.java (from previous tutorial)
│   │   └── ApiAiApplication.java
│   ├── src/main/resources/
│   │   ├── application.properties
│   │   └── schema.sql
│   ├── compose.yaml
│   └── pom.xml
│
└── angular-ai/                       # Angular Frontend
    ├── src/app/
    │   ├── chat/
    │   │   ├── memory-chat/
    │   │   │   ├── memory-chat.service.ts
    │   │   │   ├── chat-list/
    │   │   │   │   ├── chat-list.ts
    │   │   │   │   ├── chat-list.html
    │   │   │   │   └── chat-list.scss
    │   │   │   └── chat-panel/
    │   │   │       ├── chat-panel.ts
    │   │   │       ├── chat-panel.html
    │   │   │       └── chat-panel.scss
    │   │   ├── chat.ts (Chat & ChatStartResponse models)
    │   │   └── chat-message.ts (ChatMessage & ChatType)
    │   ├── shared/
    │   │   └── markdown-to-html.pipe.ts
    │   └── app.ts
    ├── proxy.conf.js
    ├── angular.json
    └── package.json
Key directories:
api-ai/: Spring Boot backend with Spring AI integrationmemory/: Memory chat functionality (controller, service, repository, models)chat/: Simple chat functionality from the previous tutorial
angular-ai/: Angular frontend applicationchat/memory-chat/: Memory chat components and servicechat/: Shared chat models (Chat, ChatMessage, ChatType)shared/: Reusable utilities (markdown pipe)
We’ll create a Spring Boot project and an Angular CLI project and place both in the spring-ai-angular folder.
Setting up the Spring AI Backend: In Memory Chat
Create a new Spring Boot project using Spring Initializr or your IDE.
Selections:
- Project: Maven
- Language: Java
- Spring Boot: 3.5.x (select the latest version)
- Enter your project metadata (package name, artifact name) as desired
- Java: 21 (or latest available)
Dependencies:
Spring Web: For creating REST endpoints.Vertex AI Gemini: For integrating with Google’s language models.PostgreSQL Driver: Allows to connect to PostgreSQL database.Spring Data JDBC: For persisting data in a SQL database.Docker Compose Support: Provides docker compose support - we’ll use it for PostgreSQL.
Or select the AI dependency of your preference.
There is one dependency still missing, and we’ll add it after we go through the basics of Spring AI Memory support.
Step 1: Configure Your Environment
There are two main configurations for this project: the SQL details needed to connect to the database and the AI model key.
When using Google’s AI in a Spring AI project, we need to configure two properties in the application.properties (or yaml) file:
spring.ai.vertex.ai.gemini.projectId=${GEMINI_PROJECT_ID}
spring.ai.vertex.ai.gemini.location=us-east4
And since we’ve added PostgreSQL and Spring Data JDBC dependencies, we also need to provide the data source details:
# PostgreSQL Configuration
spring.datasource.url=jdbc:postgresql://localhost:5432/mydatabase
spring.datasource.username=myuser
spring.datasource.password=secret
spring.datasource.driver-class-name=org.postgresql.Driver
You’ll also find a compose.yaml file created with PostgreSQL image. I always like to enhance it with the volume so I can persist the data locally:
services:
  postgres:
    image: 'postgres:latest'
    environment:
      - 'POSTGRES_DB=mydatabase'
      - 'POSTGRES_PASSWORD=secret'
      - 'POSTGRES_USER=myuser'
    volumes:
      - postgres-data:/var/lib/postgresql/data
    ports:
      - '5432'
volumes:
  postgres-data:
To build, create, start and attach to containers for a service defined in
docker-compose.ymlyou can use the commanddocker compose up.
Setting Up Environment Variables
For security, never hardcode your API keys in application.properties. Instead, use environment variables:
Option 1: Create a .env file (recommended for local development)
Create .env in your project root:
GEMINI_PROJECT_ID=your-actual-project-id-here
Add to your .gitignore:
.env
application-local.properties
Option 2: Export in your terminal
export GEMINI_PROJECT_ID=your-actual-project-id-here
Option 3: IDE Configuration
- IntelliJ IDEA: Run → Edit Configurations → Environment Variables
- VS Code: Add to
.vscode/launch.json:{ "env": { "GEMINI_PROJECT_ID": "your-project-id" } }
⚠️ Security tip: Never commit API keys to version control! Always use environment variables or secret management tools in production.
Understanding Spring AI Memory
Spring AI provides built-in memory capabilities that allow our chat application to:
- Maintain conversation context across multiple messages
- Store chat history in a persistent database
- Manage multiple conversations with separate memory contexts
- Limit memory window to control how much history to retain
The key components are:
ChatMemory- Core memory interfaceMessageWindowChatMemory- Memory with configurable message windowJdbcChatMemoryRepository- Database-backed memory storageMessageChatMemoryAdvisor- Advisor that injects memory context
Tip: The “memory window” balances cost and context length. For this tutorial, we’ll use the last 10 messages for context.
Step 2: Using the InMemory Chat
For a quick win, we can modify the SimpleChatService to add in-memory capability for a quick test.
💡 Quick Test: We’ve built this
SimpleChatServiceduring the first tutorial of this series: Building a Simple AI Chat Application with Spring AI and Angular.Try adding memory to it and see how the AI remembers context!
Spring AI automatically provides a ChatMemory bean that we can inject directly into our service:
@Service
public class SimpleChatService {

  private final ChatClient chatClient;

  public SimpleChatService(ChatClient.Builder chatClientBuilder, ChatMemory chatMemory) {
    this.chatClient = chatClientBuilder
      .defaultAdvisors(MessageChatMemoryAdvisor.builder(chatMemory).build())
      .build();
  }

  public String chat(String message) {
    return this.chatClient.prompt()
            .user(message)
            .call()
            .content();
  }
}
What’s happening here:
ChatMemory chatMemory: Spring AI auto-configures an in-memoryChatMemorybean for us. Ao additional setup required!MessageChatMemoryAdvisor: This advisor automatically injects conversation history into each AI request.- In-memory storage: All conversation history is stored in memory (lost when the app restarts).
- Single conversation: By default, all messages share the same conversation context.
What is an Advisor in Spring AI?
Think of an Advisor as an interceptor that can modify requests and responses in your AI conversations. Advisors follow the Chain of Responsibility pattern and can:
- Intercept requests before they’re sent to the AI model
- Modify the prompt by adding context, instructions, or conversation history
- Process responses after receiving them from the AI
- Chain together multiple advisors for complex behaviors
In our example, MessageChatMemoryAdvisor automatically:
- Retrieves previous messages from
ChatMemory - Injects them into the current prompt context
- Stores the new user message and AI response
- All of this happens transparently without you writing any code!
💡 Pro tip: You can chain multiple advisors together using
.defaultAdvisors()to create sophisticated AI behaviors. For example: memory + RAG + content filtering all in one ChatClient!
Testing the memory:
- Start your application
- Send: “My name is Loiane”
- Then send: “What’s my name?”
- The AI should remember and respond with “Loiane”
Limitations of this approach:
- Memory is lost when the application restarts
- All users share the same conversation context
- Cannot manage multiple separate conversations
- No conversation history persistence
For production applications with multiple users and persistent conversations, we’ll need to add database persistence and that’s what we’ll build next!
Moving to Production: Adding Persistence
The in-memory chat works great for learning, but has serious limitations:
- ❌ Lost on restart
- ❌ Shared context between all users
- ❌ No conversation organization
- ❌ Can’t switch between multiple chats
Let’s upgrade to a production-ready solution that:
- ✅ Persists conversations to PostgreSQL
- ✅ Maintains separate memory for each chat
- ✅ Supports multiple concurrent conversations
- ✅ Provides friendly chat descriptions
Here’s what we’ll build:
Our architecture will have:
- REST API - Four endpoints to manage chats
- Data Models - Simple Java records for data transfer
- REST Controller - Exposes the API to Angular
- Service Layer - Orchestrates AI and memory
- Repository Layer - Manages chat metadata
- Database - Two tables working together
Let’s dive in!
API Endpoints Overview
To do so, the API needs to provide a few endpoints:
| Endpoint | Method | Description |
|---|---|---|
/api/chat-memory | GET | List all chats (sidebar list) |
/api/chat-memory/{chatId} | GET | Get messages for a selected chat |
/api/chat-memory/start | POST | Start a new chat |
/api/chat-memory/{chatId} | POST | Continue an existing chat |
Let’s go step by step.
Step 1: Create the Data Models
Let’s define our data structures:
// Chat metadata
public record Chat(String id, String description) {}

// Individual chat messages
public record ChatMessage(String content, String type) {}

// Request payload for chat messages
public record ChatRequest(String message) {}

// Response when starting a new chat
public record ChatStartResponse(String chatId, String message, String description) {}
Step 2: Create the REST Controller
Now we’ll create the REST API that ties everything together. This controller exposes endpoints for the Angular frontend to:
- List all available chats (for the sidebar)
- Load message history when switching conversations
- Start new chat sessions
- Continue existing conversations
@RestController
@RequestMapping("/api/chat-memory")
public class MemoryChatController {

    private final MemoryChatService memoryChatService;

    public MemoryChatController(MemoryChatService memoryChatService) {
        this.memoryChatService = memoryChatService;
    }

    /**
     * GET /api/chat-memory
     *
     * Returns all chat sessions for display in the sidebar.
     * This powers the chat list that users see when they open the app.
     *
     * Response: [
     *   { "id": "uuid-1", "description": "Trip planning to Japan" },
     *   { "id": "uuid-2", "description": "Recipe ideas for dinner" }
     * ]
     */
    @GetMapping
    public List<Chat> getAllChats() {
        return this.memoryChatService.getAllChats();
    }

    /**
     * GET /api/chat-memory/{chatId}
     *
     * Loads the complete message history for a specific chat.
     * Called when user clicks on a chat in the sidebar.
     *
     * @param chatId The UUID of the conversation to load
     * @return List of messages in chronological order (both USER and ASSISTANT)
     *
     * Example response: [
     *   { "content": "What's the weather?", "type": "USER" },
     *   { "content": "I can help you check the weather...", "type": "ASSISTANT" }
     * ]
     */
    @GetMapping("/{chatId}")
    public List<ChatMessage> getChatMessages(@PathVariable String chatId) {
        return this.memoryChatService.getChatMessages(chatId);
    }

    /**
     * POST /api/chat-memory/start
     *
     * Creates a new chat session with the user's first message.
     * This endpoint:
     * 1. Generates a descriptive chat title using AI
     * 2. Creates a new conversation_id in the database
     * 3. Sends the message to AI and gets response
     * 4. Returns everything the UI needs to start chatting
     *
     * Request body: { "message": "Plan a trip to Japan" }
     *
     * Response: {
     *   "chatId": "new-uuid",
     *   "message": "I'd be happy to help you plan...",
     *   "description": "Trip planning to Japan"
     * }
     */
    @PostMapping("/start")
    public ChatStartResponse startNewChat(@RequestBody ChatRequest request) {
        return this.memoryChatService.createChatWithResponse(request.message());
    }

    /**
     * POST /api/chat-memory/{chatId}
     *
     * Continues an existing conversation by adding a new message.
     * The AI will have access to previous messages through Spring AI's memory.
     *
     * @param chatId The UUID of the existing conversation
     * @param request Contains the new user message
     * @return The AI's response wrapped in a ChatMessage
     *
     * Request body: { "message": "What about hotels?" }
     * Response: { "content": "For hotels in Tokyo...", "type": "ASSISTANT" }
     *
     * Note: We wrap the response in ChatMessage to match the frontend's expectation.
     * The service returns just the string content, so we construct the full object here.
     */
    @PostMapping("/{chatId}")
    public ChatMessage chatMemory(@PathVariable String chatId, @RequestBody ChatRequest request) {
        return new ChatMessage(this.memoryChatService.chat(chatId, request.message()), "ASSISTANT");
    }
}
Step 3: Create the Persistent Memory Chat Service
Now we upgrade from in-memory to persistent storage using JdbcChatMemoryRepository. This service is the heart of our memory-enabled chat application, coordinating between the AI model, memory storage, and our custom chat metadata repository.
What this service does:
- Manages the lifecycle of chat conversations (create, retrieve, continue)
- Configures persistent memory with database storage
- Generates AI-powered chat descriptions automatically
- Ensures each conversation maintains isolated memory context
- Validates chat existence before processing messages
@Service
public class MemoryChatService {

    private final ChatClient chatClient;
    private final ChatMemoryIDRepository chatMemoryRepository;

    private static final String DEFAULT_USER_ID = "Loiane";
    private static final String DESCRIPTION_PROMPT =
        "Generate a chat description based on the message, limiting the description to 30 characters: ";

    /**
     * Constructor: Sets up the ChatClient with persistent memory
     *
     * This is where the magic happens! We configure Spring AI's memory system to:
     * 1. Store conversations in PostgreSQL (not just RAM)
     * 2. Keep a sliding window of recent messages for context
     * 3. Automatically inject conversation history into AI requests
     *
     * @param chatClientBuilder Spring AI's fluent builder for ChatClient
     * @param jdbcChatMemoryRepository Spring AI's JDBC repository (auto-configured)
     * @param chatMemoryRepository Our custom repository for chat metadata
     */
    public MemoryChatService(ChatClient.Builder chatClientBuilder,
                             JdbcChatMemoryRepository jdbcChatMemoryRepository,
                             ChatMemoryIDRepository chatMemoryRepository) {

        this.chatMemoryRepository = chatMemoryRepository;

        // Configure memory with database persistence and 10-message window
        ChatMemory chatMemory = MessageWindowChatMemory.builder()
                .chatMemoryRepository(jdbcChatMemoryRepository)  // 👈 Database persistence!
                .maxMessages(10)  // Keep last 10 messages per conversation
                .build();

        // Build ChatClient with memory advisor
        // The advisor will automatically inject conversation history before each AI call
        this.chatClient = chatClientBuilder
                .defaultAdvisors(
                    MessageChatMemoryAdvisor.builder(chatMemory).build()
                )
                .build();
    }

    /**
     * Creates a new chat conversation with the user's first message
     *
     * This orchestrates multiple operations:
     * 1. Uses AI to generate a descriptive title from the user's message
     * 2. Creates a new chat entry in our database with that description
     * 3. Sends the message to AI and gets the response
     * 4. Returns everything the frontend needs (chatId, response, description)
     *
     * Why generate descriptions?
     * - Users can easily identify conversations in the sidebar
     * - Better than "Chat 1", "Chat 2", etc.
     * - The AI creates meaningful titles like "Recipe for chocolate cake"
     *
     * @param message The user's first message
     * @return ChatStartResponse with chatId, AI response, and generated description
     */
    public ChatStartResponse createChatWithResponse(String message) {
        String description = this.generateDescription(message);
        String chatId = this.chatMemoryRepository.generateChatId(DEFAULT_USER_ID, description);
        String response = this.chat(chatId, message);
        return new ChatStartResponse(chatId, response, description);
    }

    /**
     * Retrieves all chat conversations for display in the sidebar
     *
     * @return List of Chat objects with id and description
     */
    public List<Chat> getAllChats() {
        return this.chatMemoryRepository.getAllChatsForUser(DEFAULT_USER_ID);
    }

    /**
     * Loads the complete message history for a specific chat
     *
     * Called when user clicks on a chat in the sidebar.
     * Retrieves all USER and ASSISTANT messages in chronological order.
     *
     * @param chatId The conversation_id to load
     * @return List of ChatMessage objects
     */
    public List<ChatMessage> getChatMessages(String chatId) {
        return this.chatMemoryRepository.getChatMessages(chatId);
    }

    /**
     * Continues an existing conversation with a new message
     *
     * This is the core chat method that:
     * 1. Validates the chat exists (security + error prevention)
     * 2. Sends the message to AI with conversation context
     * 3. The MessageChatMemoryAdvisor automatically:
     *    - Retrieves previous messages from database
     *    - Injects them into the AI prompt
     *    - Stores the new user message
     *    - Stores the AI response
     *
     * The critical part: .advisors(a -> a.param(ChatMemory.CONVERSATION_ID, chatId))
     * This tells Spring AI which conversation this message belongs to,
     * ensuring isolated memory contexts between different chats.
     *
     * @param chatId The UUID of the existing conversation
     * @param message The new user message
     * @return The AI's response as a String
     */
    public String chat(String chatId, String message) {
        if (!this.chatMemoryRepository.chatIdExists(chatId)) {
            throw new IllegalArgumentException("Chat ID does not exist: " + chatId);
        }

        // The key: passing conversation ID to memory advisor
        // This isolates memory context per conversation
        return this.chatClient.prompt()
                .user(message)
                .advisors(a -> a.param(ChatMemory.CONVERSATION_ID, chatId))
                .call()
                .content();
    }

    /**
     * Uses AI to generate a descriptive title for the chat
     *
     * Called when starting a new conversation.
     * Example: User message "I want to plan a trip to Japan"
     *          Generated description: "Trip planning to Japan"
     *
     * Note: This is a separate AI call without memory context.
     * We limit to 30 characters to fit nicely in the sidebar.
     *
     * @param message The user's first message
     * @return A short descriptive title (max 30 chars)
     */
    private String generateDescription(String message) {
        return this.chatClient.prompt()
                .user(DESCRIPTION_PROMPT + message)
                .call()
                .content();
    }
}
Adding the Required Dependency
To use the JdbcChatMemoryRepository we also need to add to our pom.xml:
<dependency>
    <groupId>org.springframework.ai</groupId>
    <artifactId>spring-ai-starter-model-chat-memory-repository-jdbc</artifactId>
</dependency>
This dependency provides:
JdbcChatMemoryRepository- Database-backed message storage- Automatic schema creation for
spring_ai_chat_memorytable - Thread-safe message persistence operations
- Support for multiple concurrent conversations
Key Architecture Insights:
Key differences from the simple in-memory example:
- Persistence: Uses
JdbcChatMemoryRepositoryinstead of the default in-memory implementation - Memory Window:
MessageWindowChatMemorywraps the JDBC repository with a 10-message sliding window - Durability: All conversation history is now persisted to PostgreSQL
- Reliability: Conversations survive application restarts, server crashes, and deployments
How the memory window works:
- Keeps only the last 10 messages in context - This is what gets sent to the AI with each request
- Older messages are stored but not sent - They remain in the database but don’t consume tokens
- Balances context quality with API costs - More messages = better context but higher costs
- Sliding window behavior - As new messages arrive, the oldest ones slide out of the active window
Example scenario:
Messages 1-10: All sent to AI (within window)
Message 11 arrives: Messages 2-11 sent to AI (message 1 slides out)
Message 12 arrives: Messages 3-12 sent to AI (message 2 slides out)
💡 Pro tip: Adjust
maxMessages(10)based on your use case. Longer conversations need larger windows, but watch your token costs!
Step 4: Adding Database Persistence
Now let’s enhance this with database persistence so conversations survive restarts. We’ll create a custom repository to manage chat metadata:
Step 4.1: Creating the tables
The JdbcChatMemoryRepository currently supports the following databases at the time this tutorial is being written:
- PostgreSQL
- MySQL / MariaDB
- SQL Server
- HSQLDB
From the documentation:
The correct dialect can be auto-detected from the JDBC URL when using JdbcChatMemoryRepositoryDialect.from(DataSource). You can extend support for other databases by implementing the JdbcChatMemoryRepositoryDialect interface.
Spring AI’s Automatic Table (spring_ai_chat_memory)
The following details are from the Spring AI documentation.
The auto-configuration will automatically create the SPRING_AI_CHAT_MEMORY table on startup, using a vendor-specific SQL script for your database. By default, schema initialization runs only for embedded databases (H2, HSQL, Derby, etc.).
You can control schema initialization using the spring.ai.chat.memory.repository.jdbc.initialize-schema property:
spring.ai.chat.memory.repository.jdbc.initialize-schema=embedded # Only for embedded DBs (default)
spring.ai.chat.memory.repository.jdbc.initialize-schema=always   # Always initialize
spring.ai.chat.memory.repository.jdbc.initialize-schema=never    # Never initialize (useful with Flyway/Liquibase)
💡 Pro tip: In case you would like to initialize the database creation yourself, you can find the schema.sql in the Spring AI Github repository.
For PostgreSQL, this is the schema Spring AI will create:
CREATE TABLE IF NOT EXISTS SPRING_AI_CHAT_MEMORY (
    conversation_id VARCHAR(36) NOT NULL,
    content TEXT NOT NULL,
    type VARCHAR(10) NOT NULL CHECK (type IN ('USER', 'ASSISTANT', 'SYSTEM', 'TOOL')),
    "timestamp" TIMESTAMP NOT NULL
);

CREATE INDEX IF NOT EXISTS SPRING_AI_CHAT_MEMORY_CONVERSATION_ID_TIMESTAMP_IDX
ON SPRING_AI_CHAT_MEMORY(conversation_id, "timestamp");
Our Custom Table (chat_memory)
Now we need to create our own table to manage chat metadata - think of it as the “table of contents” for your conversations. Spring AI automatically handles the actual message storage in the spring_ai_chat_memory table, but we need our own table to organize and describe those conversations.
Why do we need this?
- Spring AI’s
JdbcChatMemoryRepositorystores messages but doesn’t provide chat organization - We need to display a list of conversations in the sidebar
- Users need descriptive names for each chat (not just a UUID)
- We want to associate chats with specific users
Create this table manually or add to src/main/resources/schema.sql:
CREATE TABLE IF NOT EXISTS CHAT_MEMORY (
    conversation_id UUID PRIMARY KEY DEFAULT gen_random_uuid(),
    user_id VARCHAR(256),
    description VARCHAR(256)
);

CREATE INDEX IF NOT EXISTS idx_chat_memory_user_id ON CHAT_MEMORY(user_id);
Where to run this:
Option 1: Manual execution Connect to your PostgreSQL database and run the script directly:
psql -U myuser -d mydatabase -f schema.sql
Option 2: Spring Boot auto-initialization Create src/main/resources/schema.sql with the above script, then set:
spring.sql.init.mode=always
Option 3: Use Docker Compose Add an initialization script to your compose.yaml:
services:
  postgres:
    image: 'postgres:latest'
    environment:
      - 'POSTGRES_DB=mydatabase'
      - 'POSTGRES_PASSWORD=secret'
      - 'POSTGRES_USER=myuser'
    volumes:
      - postgres-data:/var/lib/postgresql/data
      - ./init.sql:/docker-entrypoint-initdb.d/init.sql  # 👈 Add this
    ports:
      - '5432'
volumes:
  postgres-data:
Step 4.2: Create the Chat Memory Repository
@Repository
public class ChatMemoryIDRepository {

    private final JdbcTemplate jdbcTemplate;

    public ChatMemoryIDRepository(JdbcTemplate jdbcTemplate) {
        this.jdbcTemplate = jdbcTemplate;
    }

    /**
     * Creates a new chat session with metadata
     *
     * @param userId The user who owns this chat
     * @param description A friendly name for the chat (e.g., "Trip planning to Japan")
     * @return The generated conversation_id (UUID) for this chat
     *
     * Why we need this:
     * - Creates a new entry in our chat_memory table
     * - Generates a unique UUID that Spring AI will use to store messages
     * - Links the chat to a user and gives it a descriptive name
     * - PostgreSQL's RETURNING clause gives us the generated UUID immediately
     */
    public String generateChatId(String userId, String description) {
        String sql = "INSERT INTO chat_memory (user_id, description) VALUES (?, ?) RETURNING conversation_id";
        return jdbcTemplate.queryForObject(sql, String.class, userId, description);
    }

    /**
     * Validates if a chat exists before using it
     *
     * @param chatId The conversation_id to check
     * @return true if the chat exists, false otherwise
     *
     * Why we need this:
     * - Prevents errors when continuing non-existent conversations
     * - Security check to ensure valid chat IDs
     * - Used before loading messages or sending new messages
     * - The ?::uuid cast ensures PostgreSQL treats the parameter as a UUID type
     */
    public boolean chatIdExists(String chatId) {
        String sql = "SELECT COUNT(*) FROM chat_memory WHERE conversation_id = ?::uuid";
        Integer count = jdbcTemplate.queryForObject(sql, Integer.class, chatId);
        return count != null && count == 1;
    }

    /**
     * Retrieves all chats for a specific user (for the sidebar)
     *
     * @param userId The user whose chats to retrieve
     * @return List of Chat objects with id and description
     *
     * Why we need this:
     * - Powers the chat list in the Angular sidebar
     * - Shows most recent chats first (ORDER BY DESC)
     * - Provides the friendly description for each chat
     * - Maps database rows to our Chat record using a lambda
     */
    public List<Chat> getAllChatsForUser(String userId) {
        String sql = "SELECT conversation_id, description FROM chat_memory WHERE user_id = ? ORDER BY conversation_id DESC";
        return jdbcTemplate.query(sql, (rs, _) ->
            new Chat(rs.getString("conversation_id"), rs.getString("description")), userId);
    }

    /**
     * Retrieves message history for a specific chat
     *
     * @param chatId The conversation_id to get messages for
     * @return List of ChatMessage objects in chronological order
     *
     * Why we need this:
     * - Displays conversation history when switching between chats
     * - Queries Spring AI's spring_ai_chat_memory table directly
     * - Orders by timestamp to show messages in the correct sequence
     * - Extracts both USER and ASSISTANT messages
     *
     * Note: This reads from Spring AI's managed table, not our custom table!
     */
    public List<ChatMessage> getChatMessages(String chatId) {
        String sql = "SELECT content, type FROM spring_ai_chat_memory WHERE conversation_id = ? ORDER BY timestamp ASC";
        return jdbcTemplate.query(sql, (rs, _) ->
            new ChatMessage(rs.getString("content"), rs.getString("type")), chatId);
    }
}
Key Insight: Notice how we have two tables working together:
chat_memory(our custom table): Stores chat metadata - who owns it, what it’s aboutspring_ai_chat_memory(Spring AI’s table): Stores the actual message content automatically
This separation of concerns lets Spring AI handle the complex message storage while we maintain simple chat organization!
Checkpoint: Backend Complete!
At this point, you should have:
- ✅ PostgreSQL database running with two tables (
chat_memoryandspring_ai_chat_memory) - ✅ Spring Boot application with Spring AI configured
- ✅ REST API with four endpoints working (
GET /api/chat-memory,GET /api/chat-memory/{chatId},POST /api/chat-memory/start,POST /api/chat-memory/{chatId}) - ✅ Memory service that persists conversations to database
- ✅ Chat descriptions generated automatically by AI
- ✅ 10-message memory window configured
Test your backend with curl:
# Start a new chat
curl -X POST http://localhost:8080/api/chat-memory/start \
  -H "Content-Type: application/json" \
  -d '{"message":"Hello, I want to learn about Spring AI"}'

# Response should include chatId, message, and description
# Copy the chatId from the response

# Continue the conversation (replace {chatId} with actual UUID)
curl -X POST http://localhost:8080/api/chat-memory/{chatId} \
  -H "Content-Type: application/json" \
  -d '{"message":"What are the main features?"}'

# List all chats
curl http://localhost:8080/api/chat-memory

# Get messages for a specific chat
curl http://localhost:8080/api/chat-memory/{chatId}
Now let’s build the Angular frontend!
Creating the Angular Frontend
First, create a new Angular project with the required dependencies.
Create the Angular project:
ng new angular-ai --standalone --routing --style=scss
cd angular-ai
Install Angular Material:
ng add @angular/material
Choose your preferred theme, typography, and animations when prompted.
Install Markdown Library:
npm install marked @types/marked
Configure Proxy for Backend API:
Angular’s development server needs to proxy API requests to avoid CORS issues.
Create proxy.conf.js in the project root:
module.exports = {
  '/api': {
    target: 'http://localhost:8080',
    secure: false,
    logLevel: 'debug',
    changeOrigin: true
  }
};
Update angular.json to Use Proxy:
In angular.json, update the serve configuration:
{
  "projects": {
    "angular-ai": {
      "architect": {
        "serve": {
          "options": {
            "proxyConfig": "proxy.conf.js"
          }
        }
      }
    }
  }
}
Now out Angular app will forward /api/* requests to http://localhost:8080.
💡 Important: The proxy only works during development with
ng serve. For production, you’ll need to configure CORS on your Spring Boot backend or deploy both on the same domain.
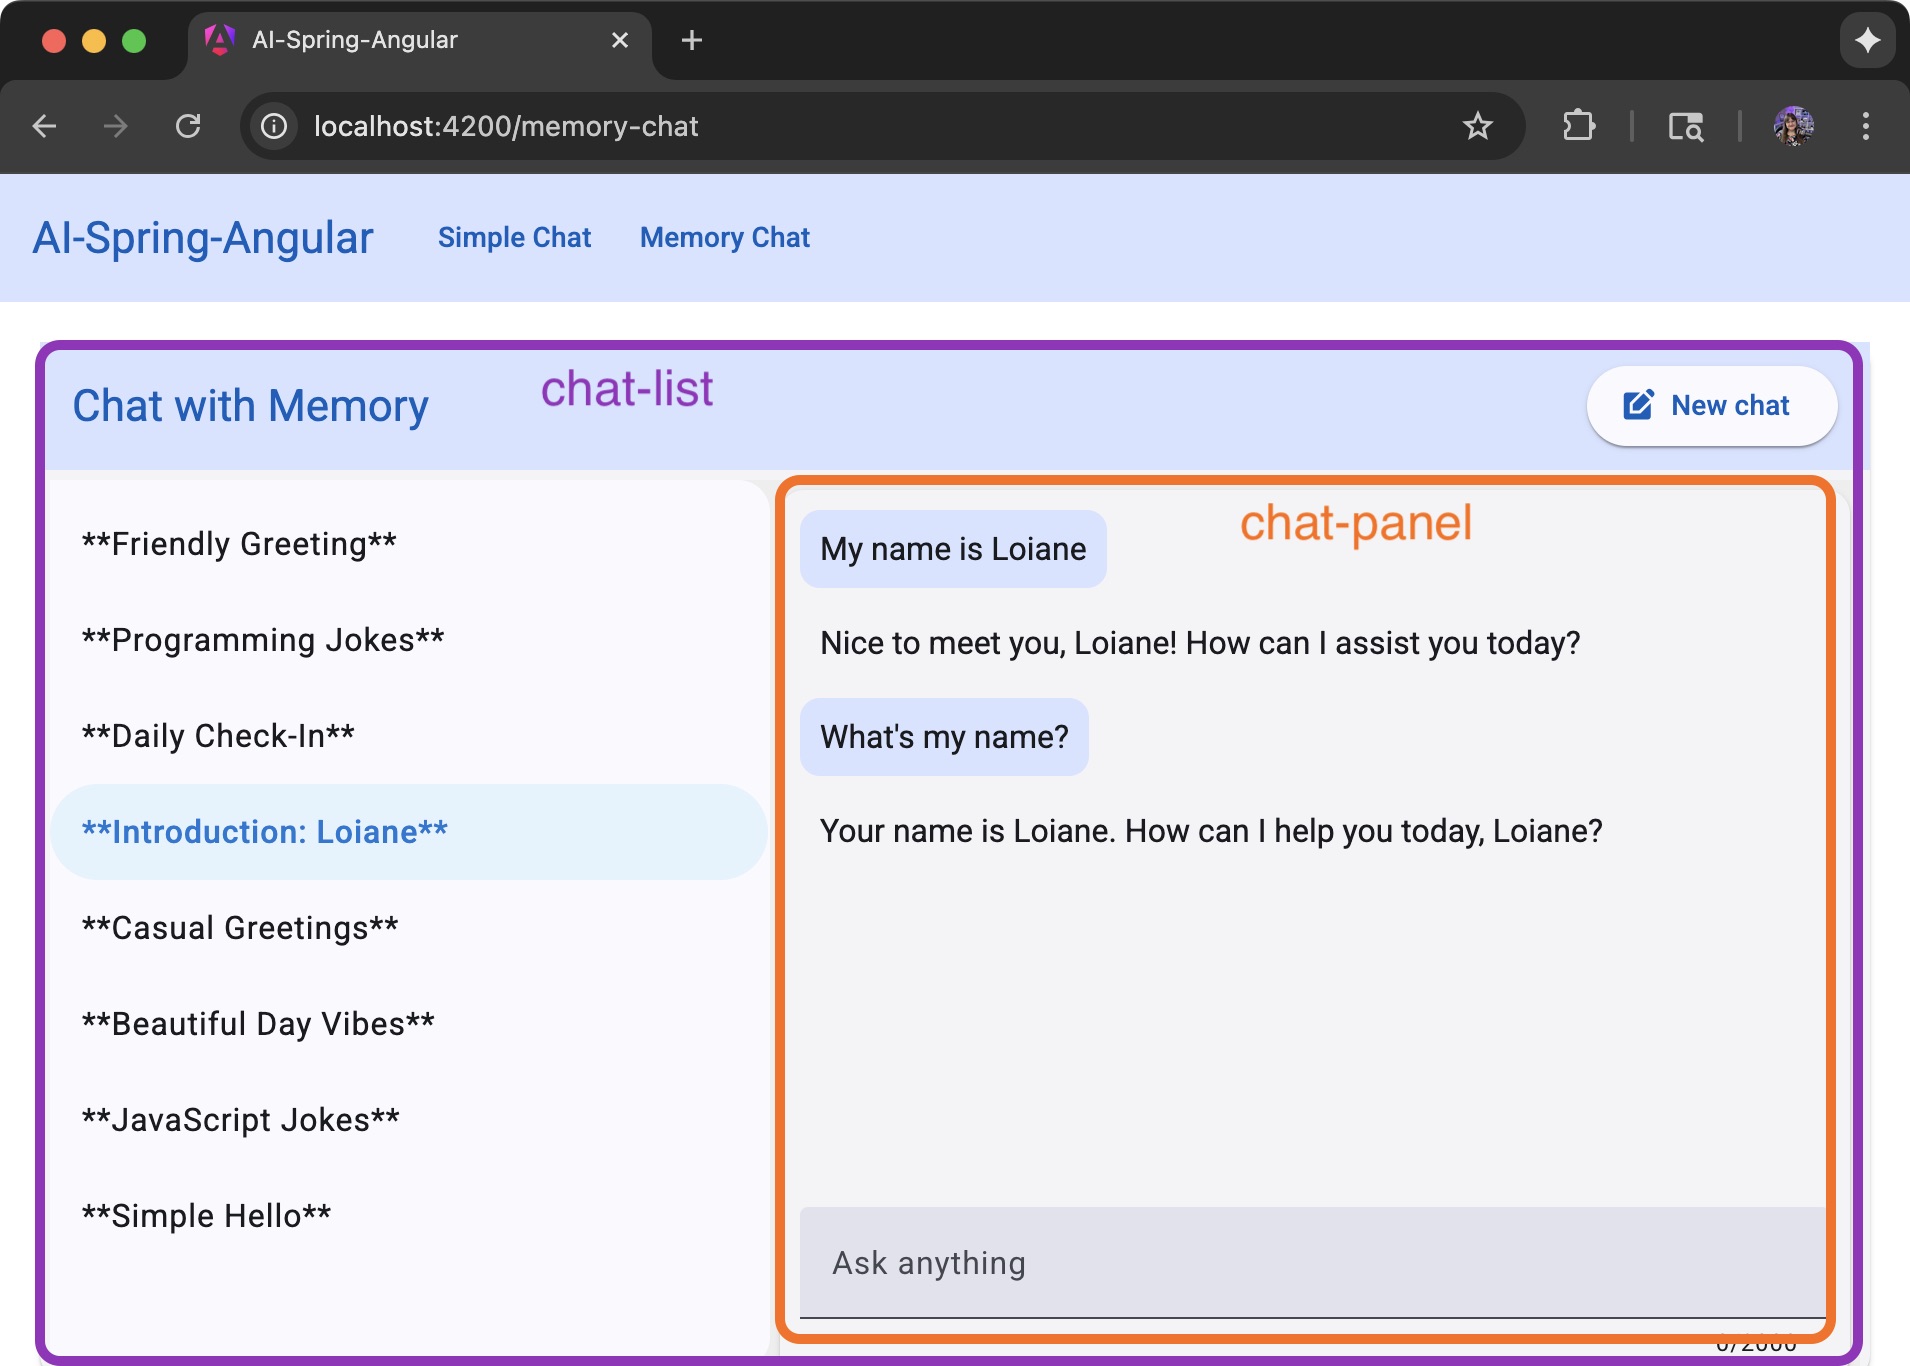
Building the Components
We will organize the UI with two main components:
Step 1: Define TypeScript Models
First, let’s define our data models that match the backend DTOs.
Create src/app/chat/chat.ts:
export interface Chat {
  id: string;
  description: string;
}

export interface ChatStartResponse {
  chatId: string;
  message: string;
  description: string;
}
Create src/app/chat/chat-message.ts:
export interface ChatMessage {
  content: string;
  type: ChatType;
}

export enum ChatType {
  USER = 'USER',
  ASSISTANT = 'ASSISTANT'
}
These models ensure type safety and match the backend’s Java records.
Step 2: Create the Markdown Pipe
Our chat will support markdown formatting for better AI responses. Let’s create a pipe to convert markdown to HTML.
Create src/app/shared/markdown-to-html.pipe.ts:
import { Pipe, PipeTransform } from '@angular/core';
import { marked, Tokens } from 'marked';
import { DomSanitizer, SafeHtml } from '@angular/platform-browser';

@Pipe({
  name: 'markdownToHtml',
  standalone: true
})
export class MarkdownToHtmlPipe implements PipeTransform {

  readonly sanitizer = inject(DomSanitizer);

  transform(value: string): any {
    if (!value) {
      return value;
    }

    try {
      const html = marked.parse(value) as string;
      return this.sanitizer.sanitize(SecurityContext.HTML, html);
    } catch (error) {
      // Fallback to original value if parsing fails
      console.error('Markdown parsing error:', error);
      return this.sanitizer.sanitize(SecurityContext.HTML, value);
    }
  }
}
This pipe allows the AI’s responses to include formatted text, code blocks, lists, and more.
Step 3: Create the Memory Chat Service
@Injectable({
  providedIn: 'root'
})
export class MemoryChatService {

  private readonly API_MEMORY = '/api/chat-memory';
  private readonly http = inject(HttpClient);

  selectedChatId = signal<string | undefined>(undefined);

  /**
   * List all chats: GET /api/chat-memory
   */
  chatsResource = httpResource<Chat[]>(() => this.API_MEMORY);

  /**
   * Get chat history: GET /api/chat-memory/{chatId}
   */
  chatMessagesResource = httpResource<ChatMessage[]>(() => {
    const chatId = this.selectedChatId();
    return chatId ? `${this.API_MEMORY}/${chatId}` : undefined;
  });

  /**
   * Start new chat: POST /api/chat-memory/start with first message
   */
  startNewChat(message: string) {
    return this.http.post<ChatStartResponse>(`${this.API_MEMORY}/start`, { message });
  }

  /**
   * Continue chat: POST /api/chat-memory/{chatId} with subsequent messages
   */
  continueChat(chatId: string, message: string) {
    return this.http.post<ChatMessage>(`${this.API_MEMORY}/${chatId}`, { message });
  }

  /**
   * Set the selected chat and reload messages
   */
  selectChat(chatId: string) {
    this.selectedChatId.set(chatId);
  }

  /**
   * Clear selected chat
   */
  clearSelection() {
    this.selectedChatId.set(undefined);
  }
}
We’re using Angular’s new httpResource API for reactive data loading and signals for state management.
Required imports:
import { Injectable, signal, inject } from '@angular/core';
import { HttpClient } from '@angular/common/http';
import { httpResource } from '@angular/core';
import { Chat, ChatMessage, ChatStartResponse } from '../chat/chat';
import { ChatType } from '../chat/chat-message';
Step 4: Create the Chat List Component
The Chat List component displays all available conversations in a sidebar and handles chat selection. Think of it as your conversation history drawer.
Create src/app/chat/memory-chat/chat-list/chat-list.ts:
@Component({
  selector: 'app-chat-list',
  imports: [MatSidenavModule, MatCardModule, MatToolbarModule, MatListModule, MatIconModule, MatButtonModule, ChatPanel],
  templateUrl: './chat-list.html',
  styleUrl: './chat-list.scss'
})
export class ChatList {

  readonly memoryChatService = inject(MemoryChatService);
  chats = this.memoryChatService.chatsResource;  // Reactive resource that loads all chats

  /**
   * Selects a chat from the list
   * This triggers the service to load that chat's messages
   */
  selectChat(chatId: string) {
    this.memoryChatService.selectChat(chatId);
  }

  /**
   * Clears the selection to start a new chat
   * When no chat is selected, the panel shows a welcome message
   */
  createNewChat() {
    this.memoryChatService.clearSelection();
  }

  /**
   * Deletes a chat (placeholder implementation)
   * event.stopPropagation() prevents the chat from being selected when clicking delete
   */
  deleteChat(chatId: string, event: Event) {
    event.stopPropagation();
    console.log('Delete chat:', chatId);
  }
}
What’s happening here:
memoryChatService: Injected service that manages all chat state and API callschats: Reactive resource that automatically loads the chat list on component initializationselectChat(): Updates the selected chat ID, which triggers the message history to loadcreateNewChat(): Clears selection so the panel shows the “new chat” statedeleteChat(): Placeholder for deletion functionality (you can implement the backend endpoint later)
Required Angular Material imports:
import { Component, inject } from '@angular/core';
import { MatSidenavModule } from '@angular/material/sidenav';
import { MatCardModule } from '@angular/material/card';
import { MatToolbarModule } from '@angular/material/toolbar';
import { MatListModule } from '@angular/material/list';
import { MatIconModule } from '@angular/material/icon';
import { MatButtonModule } from '@angular/material/button';
import { MemoryChatService } from '../memory-chat.service';
import { ChatPanel } from '../chat-panel/chat-panel';
Step 5: Create the Chat List Template
Create src/app/chat/memory-chat/chat-list/chat-list.html:
<mat-card class="chat-container">
  <div class="chat-header">
    <mat-toolbar>
      <span>Chat with Memory</span>
      <span class="spacer"></span>
      <button mat-button="elevated" (click)="createNewChat()" aria-label="Create new chat">
        <mat-icon>edit_square</mat-icon>
        New chat
      </button>
    </mat-toolbar>
  </div>

  <mat-drawer-container class="example-container">
    <mat-drawer mode="side" opened>
      <mat-nav-list>
        @if (chats.status() === 'loading') {
          <mat-list-item>
            <span>Loading chats...</span>
          </mat-list-item>
        }

        @if (chats.status() === 'error') {
          <mat-list-item>
            <span>Error loading chats</span>
            <button mat-icon-button matListItemMeta (click)="chats.reload()">
              <mat-icon>refresh</mat-icon>
            </button>
          </mat-list-item>
        }

        @if (chats.status() === 'resolved' && chats.value()) {
          @for (chat of chats.value(); track chat.id) {
            <mat-list-item
              [class.selected]="memoryChatService.selectedChatId() === chat.id"
              (click)="selectChat(chat.id)">
              <a>{{ chat.description || 'New Chat' }}</a>
              <button mat-icon-button matListItemMeta (click)="deleteChat(chat.id, $event)">
                <mat-icon>close_small</mat-icon>
              </button>
            </mat-list-item>
          } @empty {
            <mat-list-item>
              <span>No chats available</span>
            </mat-list-item>
          }
        }
      </mat-nav-list>
    </mat-drawer>

    <mat-drawer-content>
      <app-chat-panel/>
    </mat-drawer-content>
  </mat-drawer-container>
</mat-card>
Step 6: Add Chat List Styles
Create src/app/chat/memory-chat/chat-list/chat-list.scss:
.chat-container {
  height: 100vh;
  display: flex;
  flex-direction: column;

  .chat-header {
    flex-shrink: 0;

    mat-toolbar {
      display: flex;
      align-items: center;

      .spacer {
        flex: 1 1 auto;
      }
    }
  }

  .example-container {
    flex: 1;

    mat-drawer {
      width: 280px;
      border-right: 1px solid #e0e0e0;

      mat-list-item {
        cursor: pointer;

        &.selected {
          background-color: #e3f2fd;
        }

        &:hover {
          background-color: #f5f5f5;
        }
      }
    }
  }
}
Step 7: Create the Chat Panel Component
The Chat Panel is where the magic happens. It’s the main conversation area where users send messages and see AI responses. This component handles message display, user input, and communication with the backend.
Create src/app/chat/memory-chat/chat-panel/chat-panel.ts:
@Component({
  selector: 'app-chat-panel',
  imports: [MatCardModule, MatInputModule, MatButtonModule, FormsModule, MatIconModule, MarkdownToHtmlPipe],
  templateUrl: './chat-panel.html',
  styleUrl: './chat-panel.scss'
})
export class ChatPanel {

  private readonly chatHistory = viewChild.required<ElementRef>('chatHistory');
  private readonly memoryChatService = inject(MemoryChatService);

  userInput = '';
  isLoading = false;
  messages = signal<ChatMessage[]>([]);

  /**
   * Effect: Sync messages from service resource
   *
   * When a user selects a chat from the list, the service loads that chat's messages.
   * This effect automatically updates our local messages signal with the loaded data.
   *
   * Why? Keeps the UI in sync with the service's data without manual subscriptions.
   */
  private readonly syncMessagesEffect = effect(() => {
    const resourceMessages = this.memoryChatService.chatMessagesResource.value();
    if (resourceMessages) {
      this.messages.set(resourceMessages);
    }
  });

  /**
   * Effect: Auto-scroll to bottom when messages change
   *
   * Whenever new messages are added, we want to scroll to show the latest one.
   * setTimeout ensures the DOM has updated before we scroll.
   *
   * Why? Better UX - users always see the newest message without manual scrolling.
   */
  private readonly autoScrollEffect = effect(() => {
    this.messages(); // Read the signal to track changes
    setTimeout(() => this.scrollToBottom(), 0);
  });

  /**
   * Effect: Clear messages when switching chats
   *
   * When the user clicks "New chat" or switches to a different conversation,
   * we clear the current messages to avoid showing the wrong history.
   *
   * Why? Prevents visual glitches where old messages briefly appear.
   */
  private readonly clearMessagesEffect = effect(() => {
    this.memoryChatService.selectedChatId();
    this.messages.set([]);
  });

  /**
   * Sends a user message to the AI
   *
   * Flow:
   * 1. Validates and trims input
   * 2. Adds user message to UI immediately (optimistic update)
   * 3. Sets loading state
   * 4. Calls sendChatMessage() to handle the API request
   */
  sendMessage(): void {
    this.trimUserMessage();
    if (this.userInput !== '' && !this.isLoading) {
      this.updateMessages(this.userInput);
      this.isLoading = true;
      this.sendChatMessage();
    }
  }

  /**
   * Handles the API call for sending messages
   *
   * Two scenarios:
   * 1. If a chat is selected: Continue existing conversation (POST /api/chat-memory/{chatId})
   * 2. If no chat selected: Start new conversation (POST /api/chat-memory/start)
   *
   * After response: Updates messages and refreshes chat list (for new chats)
   */
  private sendChatMessage() {
    const currentChatId = this.memoryChatService.selectedChatId();
    const message = this.userInput;

    if (currentChatId) {
      // Continue existing chat
      this.memoryChatService.continueChat(currentChatId, message)
        .pipe(catchError(() => this.handleError()))
        .subscribe((response: ChatMessage) => {
          if (response) {
            this.updateMessages(response.content, ChatType.ASSISTANT);
          }
          this.finishMessage();
        });
    } else {
      // Start new chat
      this.memoryChatService.startNewChat(message)
        .pipe(catchError(() => this.handleError()))
        .subscribe((response: ChatStartResponse) => {
          if (response) {
            this.memoryChatService.selectChat(response.chatId);
            this.memoryChatService.chatsResource.reload();  // Refresh sidebar to show new chat
          }
          this.finishMessage();
        });
    }
  }

  /**
   * Handles API errors gracefully
   *
   * Instead of crashing, we show user-friendly error messages based on HTTP status:
   * - 0: Network/connection issues
   * - 404: Chat not found (possibly deleted)
   * - 500: Server error
   * - Default: Generic error message
   *
   * Returns an empty Observable to complete the stream gracefully.
   */
  private handleError(error?: any) {
    console.error('Chat error:', error);

    let errorMessage = 'Sorry, I am unable to process your request at the moment.';

    if (error?.status === 0) {
      errorMessage = 'Unable to connect to the server. Please check your connection.';
    } else if (error?.status === 404) {
      errorMessage = 'Chat not found. Please start a new conversation.';
    } else if (error?.status === 500) {
      errorMessage = 'Server error. Please try again later.';
    }

    this.updateMessages(errorMessage, ChatType.ASSISTANT);
    this.isLoading = false;
    return of();
  }

  /**
   * Cleans up after sending a message
   * Clears the input field and resets loading state
   */
  private finishMessage() {
    this.userInput = '';
    this.isLoading = false;
  }

  /**
   * Adds a message to the conversation
   * Uses signal.update() for immutable updates - creates new array with added message
   *
   * @param content - The message text
   * @param type - USER or ASSISTANT (defaults to USER)
   */
  private updateMessages(content: string, type: ChatType = ChatType.USER) {
    this.messages.update((messages: ChatMessage[]) => [...messages, { content, type }]);
  }

  /**
   * Removes whitespace from user input
   * Prevents sending messages that are only spaces
   */
  private trimUserMessage(): void {
    this.userInput = this.userInput.trim();
  }

  /**
   * Handles Enter key to send messages
   * Enter alone: Send message
   * Shift+Enter: New line (default textarea behavior)
   */
  onKeyPress(event: KeyboardEvent): void {
    if (event.key === 'Enter' && !event.shiftKey) {
      event.preventDefault();
      this.sendMessage();
    }
  }

  /**
   * Scrolls the chat container to the bottom
   *
   * Called by the autoScrollEffect whenever messages change.
   * Uses scrollHeight (total content height) to scroll to the very bottom.
   *
   * Why the try/catch? Prevents errors if the component is destroyed
   * while scrolling is in progress.
   */
  private scrollToBottom(): void {
    try {
      const chatElement = this.chatHistory();
      if (chatElement?.nativeElement) {
        chatElement.nativeElement.scrollTop = chatElement.nativeElement.scrollHeight;
      }
    } catch (err) {
      console.error('Failed to scroll chat history:', err);
    }
  }
}
Key Concepts in ChatPanel:
- Reactive Effects:
- Three separate effects handle different concerns (sync, scroll, clear)
- Angular’s effect() API automatically tracks dependencies
- No manual subscriptions needed!
- Optimistic Updates:
- User message appears immediately in the UI
- Before the API responds
- Makes the app feel faster
- Error Handling:
- Specific messages for different error types
- Users see helpful feedback instead of crashes
- Returns empty Observable to complete the stream
- Signal-based State:
messagessignal holds the conversation history- Updates trigger automatic re-renders
- Immutable updates with spread operator
- Smart Enter Key:
- Enter sends message
- Shift+Enter adds new line
- preventDefault() stops form submission
Required imports:
import { Component, ElementRef, effect, inject, signal, viewChild } from '@angular/core';
import { FormsModule } from '@angular/forms';
import { catchError, of } from 'rxjs';
import { MatCardModule } from '@angular/material/card';
import { MatInputModule } from '@angular/material/input';
import { MatButtonModule } from '@angular/material/button';
import { MatIconModule } from '@angular/material/icon';
import { MemoryChatService } from '../memory-chat.service';
import { Chat, ChatStartResponse } from '../../chat';
import { ChatMessage, ChatType } from '../../chat-message';
import { MarkdownToHtmlPipe } from '../../../shared/markdown-to-html.pipe';
Step 8: Create the Chat Panel Template
Create src/app/chat/memory-chat/chat-panel/chat-panel.html:
<div class="chat-panel">
  @if (memoryChatService.selectedChatId()) {
    <div class="chat-messages" #chatHistory>
      @for (message of messages(); track $index) {
        <div class="message" [class.user-message]="message.type === 'USER'" [class.ai-message]="message.type === 'ASSISTANT'">
          <div class="message-content" [innerHTML]="message.content | markdownToHtml"></div>
        </div>
      }

      @if (isLoading) {
        <div class="loading-indicator">
          <mat-icon>psychology</mat-icon>
          <span>AI is thinking...</span>
        </div>
      }
    </div>
  } @else {
    <div class="welcome-message">
      <h3>Welcome to AI Chat with Memory</h3>
      <p>Start a new conversation or select an existing chat from the sidebar.</p>
    </div>
  }

  <div class="input-area">
    <mat-form-field class="message-input">
      <mat-label>Type your message...</mat-label>
      <textarea
        matInput
        [(ngModel)]="userInput"
        (keypress)="onKeyPress($event)"
        [disabled]="isLoading"
        rows="3">
      </textarea>
    </mat-form-field>

    <button
      mat-fab
      color="primary"
      (click)="sendMessage()"
      [disabled]="!userInput.trim() || isLoading"
      aria-label="Send message">
      <mat-icon>send</mat-icon>
    </button>
  </div>
</div>
Step 9: Add Chat Panel Styles
Create src/app/chat/memory-chat/chat-panel/chat-panel.scss:
.chat-panel {
  height: calc(100vh - 64px);
  display: flex;
  flex-direction: column;
  padding: 16px;

  .welcome-message {
    flex: 1;
    display: flex;
    flex-direction: column;
    justify-content: center;
    align-items: center;
    text-align: center;
    color: #666;
  }

  .chat-messages {
    flex: 1;
    overflow-y: auto;
    margin-bottom: 16px;
    padding: 16px;

    .message {
      margin-bottom: 16px;

      &.user-message {
        text-align: right;

        .message-content {
          display: inline-block;
          background-color: #e3f2fd;
          padding: 12px 16px;
          border-radius: 18px;
          max-width: 70%;
          text-align: left;
        }
      }

      &.ai-message {
        text-align: left;

        .message-content {
          display: inline-block;
          background-color: #f5f5f5;
          padding: 12px 16px;
          border-radius: 18px;
          max-width: 70%;
        }
      }
    }

    .loading-indicator {
      display: flex;
      align-items: center;
      gap: 8px;
      color: #666;
      font-style: italic;

      mat-icon {
        animation: pulse 1.5s ease-in-out infinite;
      }
    }
  }

  .input-area {
    display: flex;
    gap: 16px;
    align-items: flex-end;

    .message-input {
      flex: 1;
    }

    button {
      margin-bottom: 8px;
    }
  }
}

@keyframes pulse {
  0%, 100% { opacity: 1; }
  50% { opacity: 0.5; }
}
Step 10: Update Main App Component
Finally, update your main application component to use the ChatList.
Update src/app/app.ts:
import { Component } from '@angular/core';
import { RouterOutlet } from '@angular/router';
import { ChatList } from './components/chat-list/chat-list';

@Component({
  selector: 'app-root',
  standalone: true,
  imports: [RouterOutlet, ChatList],
  template: '<app-chat-list/>',
  styles: []
})
export class App {
  title = 'angular-ai';
}
This sets up the chat interface as your main application view.
Checkpoint: Frontend Complete!
At this point, you should have:
- ✅ Angular project with all dependencies installed
- ✅ Proxy configured to forward API requests to Spring Boot
- ✅ TypeScript models matching backend DTOs
- ✅ Markdown pipe for formatted AI responses
- ✅ Memory chat service with reactive data loading
- ✅ Chat list component showing all conversations
- ✅ Chat panel component for sending/receiving messages
- ✅ Complete styling for both components
- ✅ Main app component wired up
Now let’s test everything together!
Testing Our Memory Chat
Step 1: Start the Backend
Then start the Spring Boot application:
cd api-ai
./mvnw spring-boot:run
Step 2: Start the Frontend
cd angular-ai
npm start
Step 3: Test the Memory Features
Now let’s test that our memory system is working correctly with specific scenarios:
Scenario 1: Basic Memory Test
👤 You: "My name is Loiane and I'm learning Spring AI"
🤖 AI: "Hello Loiane! That's great that you're learning Spring AI..."

👤 You: "What's my name?"
🤖 AI: "Your name is Loiane."  ✅ Memory works!
Scenario 2: Context Retention
👤 You: "I'm planning a trip to Japan in April"
🤖 AI: "April is an excellent time to visit Japan! Cherry blossoms..."

👤 You: "What should I pack?"
🤖 AI: "For your April trip to Japan, I recommend..."  ✅ Remembers context!
Scenario 3: Conversation Isolation
Chat 1:
👤 You: "My favorite color is blue"
🤖 AI: "That's nice! Blue is a calming color..."

[Click "New chat" button]

Chat 2:
👤 You: "What's my favorite color?"
🤖 AI: "I don't have information about your favorite color."  ✅ Isolated memory!
Scenario 4: Persistence Test
1. Start a conversation about travel
2. Stop the Spring Boot application (Ctrl+C)
3. Restart the application (./mvnw spring-boot:run)
4. Check if your chat still appears in the sidebar  ✅ Persisted!
5. Open the chat and verify message history is intact  ✅ All messages saved!
Scenario 5: Memory Window Test (if you want to test the 10-message limit)
1. Send 12 messages in the same conversation
2. Ask: "What was my first message?"
3. AI might not remember (message 1 is outside the window)
4. Ask: "What was my third message?"
5. AI should remember (message 3 is within the 10-message window)  ✅ Window works!
Key Takeaways
Building a memory-enabled AI chat taught us several important concepts:
Spring AI Memory Architecture:
MessageWindowChatMemoryprovides configurable context windowsJdbcChatMemoryRepositoryhandles persistent storageMessageChatMemoryAdvisorautomatically injects conversation context- Each chat session maintains isolated memory through
conversation_id
Angular Reactive Patterns:
httpResourceprovides reactive data loading with automatic status tracking (loading, resolved, error)signalsandeffectsmanage component state with fine-grained reactivity- Automatic resource reloading on state changes without manual subscriptions
- Standalone components reduce boilerplate and improve tree-shaking
Angular Best Practices Used:
- Standalone components: Modern Angular architecture without NgModules
- Signals: New reactivity primitive for better performance
- Effects: Reactive side effects that auto-track dependencies
- ViewChild with signals: Type-safe template references
- HttpResource: Declarative data fetching with built-in loading states
- Markdown pipe: Safe HTML rendering with DomSanitizer
Database Design:
- Separate tables for chat metadata and message history
- Spring AI manages the memory table structure
- UUID-based chat identifiers for scalability
Security Considerations
⚠️ Before going to production:
- Remove Hardcoded User ID
// ❌ Current (for demo only)
private static final String DEFAULT_USER_ID = "Loiane";

// ✅ Production: Get from Spring Security
String userId = SecurityContextHolder.getContext()
    .getAuthentication()
    .getName();
- Add Authentication
- Implement Spring Security
- Use JWT tokens or OAuth2
- Validate chat ownership (users can only access their chats)
- Input Validation
@PostMapping("/start")
public ChatStartResponse startNewChat(@RequestBody @Valid ChatRequest request) {
    // Add @NotBlank, @Size validations to ChatRequest - omitted to focus on the Spring AI capabilities
}
Performance and Cost Optimization
💰 Token Management: Every message in the memory window consumes tokens and costs money. With maxMessages(10) and average messages of 100 tokens each, you’re sending ~1000 tokens of context per request.
Optimization strategies:
- Adjust
maxMessagesbased on conversation complexity - Consider summarizing old messages instead of full history
- Monitor token usage in production
- Implement rate limiting per user
Example cost calculation (approximate):
- Gemini Pro: $0.50 per 1M input tokens
- 10-message window: ~1000 tokens per request
- 1000 requests: ~1M tokens = $0.50
Database optimization:
- Index on
conversation_idandtimestamp(already included in schema) - Consider archiving old conversations
- Monitor database growth and implement cleanup strategies
What’s Next?
Now that you have a solid foundation with memory-enabled conversations, consider adding proper user management with Spring Security instead of hardcoded user ID, or take the next step by implementing RAG (Retrieval-Augmented Generation) to ground AI responses in your own documents.
Want the code? Go straight to GitHub: spring-ai-angular
Conclusion
References
- Spring AI Documentation
- Spring AI Memory Documentation
- Spring AI Memory Github
- Angular Signals Guide
- Angular Material Components
- PostgreSQL Documentation
All tutorials from this series
This tutorial is part of a series of articles. Read them all below:
- 1: Building a Simple AI Chat Application with Spring AI and Angular
- 2: Building an AI Chat with Memory using Spring AI and Angular (this tutorial)
- 3: Coming soon!
Happy coding!