Building a Simple AI Chat Application with Spring AI and Angular

In this tutorial, we’ll build a simple AI-powered chat application using Spring AI on the backend and Angular on the frontend. This is a great starting point for anyone looking to integrate AI capabilities into their web applications.
What We’ll Build
We’ll create a simple chat interface where users can:
- Send messages to an AI assistant
- Receive intelligent responses powered by Gemini
The application will consist of:
- A Spring Boot backend with Spring AI integration
- An Angular frontend with a responsive chat interface
- Real-time communication between frontend and backend
Prerequisites
Before we start, make sure you have:
- Java 21 or higher
- Node.js and npm
- Angular CLI (
npm install -g @angular/cli) - A Gemini Project ID (check how to create one here Gemini)
- Your favorite IDE (I’ll be using VS Code and IntelliJ)
💡 Get 3 months free of IntelliJ Ultimate with the coupon:
LoianeGroner.
Project Structure
Here’s how our project is organized:
1
2
3
4
5
6
7
8
9
10
11
12
13
14
15
16
spring-ai-angular/
├── api-ai/                          # Spring Boot backend
│   └── src/main/java/com/loiane/api_ai/
│       └── chat/
│           ├── SimpleChatService.java
│           ├── ChatController.java
│           └── ChatResponse.java
└── angular-ai/                      # Angular frontend
    └── src/app/
        └── chat/
            ├── chat-service.ts
            ├── chat-response.ts
            └── simple-chat/
                ├── simple-chat.ts
                ├── simple-chat.html
                └── simple-chat.scss
We’ll create an Spring Boot project and an Angular CLI project and place both in the spring-ai-angular folder.
Setting up the Spring AI Backend
Create a new Spring Boot project using Spring Initializr or your IDE.
Selections:
- Project: Maven
- Language: Java
- Spring Boot: 3.5.3 (select the latest version)
- Enter your project metadata (package name, artifact name) as desired
- Java: 24 (or latest available)
Dependencies:
Spring Web: For creating REST endpoints.Vertex AI Gemini: For integrating with Google’s language models.
Or select the AI dependency of your preference.
Check the pom.xml file
Ensure your pom.xml includes the necessary dependencies for Google Gemini integration:
1
2
3
4
5
6
7
8
9
10
<dependencies>
  <dependency>
    <groupId>org.springframework.boot</groupId>
    <artifactId>spring-boot-starter-web</artifactId>
  </dependency>
  <dependency>
    <groupId>org.springframework.ai</groupId>
    <artifactId>spring-ai-vertex-ai-gemini-spring-boot-starter</artifactId>
  </dependency>
</dependencies>
The dependency spring-ai-vertex-ai-gemini-spring-boot-starter provides the necessary components and auto-configuration for using Gemini’s API within a Spring Boot application, similar to what spring-ai-openai-spring-boot-starter provides for OpenAI.
Step 1: Configure Your Environment
When using Google’s AI in a Spring AI project, we need to configure two properties in the application.properties (or yaml) file:
1
2
spring.ai.vertex.ai.gemini.projectId=${GEMINI_PROJECT_ID}
spring.ai.vertex.ai.gemini.location=us-east4
Although the project Id can be shared, it is a good practice to also pass this value as an environment variable in case you are using different projects for different environments (DEV, QA, PROD).
Step 2: Create the Chat Service
Let’s create our SimpleChatService that handles the AI interactions:
1
2
3
4
5
6
7
8
9
10
11
12
13
14
15
16
17
18
19
20
21
22
// filepath: api-ai/src/main/java/com/loiane/api_ai/chat/SimpleChatService.java
package com.loiane.api_ai.chat;

import org.springframework.ai.chat.client.ChatClient;
import org.springframework.stereotype.Service;

@Service
public class SimpleChatService {

    private final ChatClient chatClient;

    public SimpleChatService(ChatClient.Builder chatClientBuilder) {
        this.chatClient = chatClientBuilder.build();
    }

    public String chat(String message) {
        return chatClient.prompt()
                .user(message)
                .call()
                .content();
    }
}
Where:
- The
ChatClientoffers an API for communicating with an AI Model. It supports both a synchronous and streaming programming model. - The
ChatClientis created using aChatClient.Builderobject. You can obtain an autoconfiguredChatClient.Builderinstance for any ChatModel Spring Boot autoconfiguration or create one programmatically. - The
chat methodreceives amessage. We’ll use thePromptobject from theChatClientand set the user input, passing the received message. Thecall()method sends a request to the AI model, and thecontent()method returns the AI model’s response as a String.
And what’s happening here?
- We’re using Spring AI’s
ChatClientto interact with OpenAI. - The service is annotated with
@Servicefor dependency injection. - The
chatmethod takes a user message and returns the AI’s response.
Step 3: Create the REST Controller
Now let’s create the controller that exposes our chat functionality:
1
2
3
4
5
6
7
8
9
10
11
12
13
14
15
16
17
18
19
20
21
22
23
// filepath: api-ai/src/main/java/com/loiane/api_ai/chat/ChatController.java
package com.loiane.api_ai.chat;

import org.springframework.web.bind.annotation.PostMapping;
import org.springframework.web.bind.annotation.RequestBody;
import org.springframework.web.bind.annotation.RequestMapping;
import org.springframework.web.bind.annotation.RestController;

@RestController
@RequestMapping("/api/chat")
public class ChatController {

    private final SimpleChatService chatService;

    public ChatController(SimpleChatService chatService) {
        this.chatService = chatService;
    }

    @PostMapping
    public ChatResponse chat(@RequestBody String message) {
        return new ChatResponse(this.simpleChatService.chat(message));
    }
}
Key points:
- We’re using constructor injection for the service dependency as a best practice (and not the
@Autowiredannotation). - This controller handles POST requests to the
/api/chatendpoint, extracting the message from the request body.
The ChatResponse is a record so we can format the output:
1
public record ChatResponse(String message) {}
Step 4: Testing via HTTP request
If you are using IntelliJ IDEA Ultimate, you can create a file api.http with the following content (this is very convenient for HTTP request testing):
1
2
3
4
5
6
POST http://localhost:8080/api/chat
Content-Type: application/json

{
    "message": "Tell me a joke"
}
Alternatively, you can also use PostMan or similar tools to simulate the HTTP request.
If we submit the request, we might get something like the following output:
1
2
3
{
  "message": "Why don't scientists trust atoms? \n\nBecause they make up everything! \n \nLet me know if you'd like to hear another one! 😄  \n"
}
Creating the Angular Frontend
Generate a new Angular project using Angular CLI:
1
ng new angular-ai --routing
Step 1: Add Angular Material to the project
Before we start adding components and services, let’s install Angular Material as our component library:
1
ng add @angular/material
Follow the prompts by selecting your preferred theme (I’m using Azure and Blue) and if you’d like to add the typography.
All the steps are also documented here: https://material.angular.dev/guide/getting-started
Step 2: Create the Chat Service
First, let’s create a service to handle API communication:
1
ng generate service chat/chat-service
Note that since Angular v20, the naming convention has changed, and instead of a chat-service.ts file, we are not suffixing the
servicename with an hiffen.
1
2
3
4
5
6
7
8
9
10
11
12
13
14
15
16
17
18
// filepath: angular-ai/src/app/chat/chat-service.ts
import { HttpClient } from '@angular/common/http';
import { inject, Injectable } from '@angular/core';
import { Observable } from 'rxjs';
import { ChatResponse } from './chat-response';

@Injectable({
  providedIn: 'root'
})
export class ChatService {

  private readonly API = '/api/chat';
  private readonly http = inject(HttpClient);

  sendChatMessage(message: string): Observable<ChatResponse> {
    return this.http.post<ChatResponse>(this.API, { message });
  }
}
What’s happening here?
private readonly API = '/api/chat': We define a constant for our API endpoint. Usingreadonlyensures this value can’t be changed after initialization, which is a good practice for configuration values.private readonly http = inject(HttpClient): This is Angular’s modern dependency injection syntax using theinject()function. It’s an alternative to constructor injection and is particularly useful in services. TheHttpClientis injected to handle HTTP requests.sendChatMessage(message: string): Observable<ChatResponse>: This method takes a user message as a string parameter and returns anObservable<ChatResponse>. The Observable allows us to handle asynchronous HTTP responses in a reactive way.return this.http.post<ChatResponse>(this.API, { message }): We make a POST request to our Spring Boot backend. The type<ChatResponse>tells TypeScript what type of response to expect. The second parameter{ message }creates a JSON object with the user’s message that matches what our Spring Boot controller expects.
Key points:
- We’re using Angular’s modern
inject()function for dependency injection instead of constructor injection. - The service handles the HTTP communication with our Spring Boot backend.
- The method returns an Observable, as at this time,
httpResourceis not recommended for POST requests, so we continue usingHttpClient. - The
{ message }syntax creates a JSON payload that our Spring Boot@RequestBodycan deserialize.
Next, let’s create the ChatResponse interface, which matches the ChatResponse record. Use the following command to create the file:
1
ng generate interface chat/chat-response
With the followig content:
1
2
3
4
// filepath: angular-ai/src/app/chat/chat-response.ts
export interface ChatMessage {
  message: string;
}
Step 3: Generate the Chat Component
Let’s create our simple chat component:
1
ng generate component chat/simple-chat
Checkout the new Angular style v2025+: https://angular.dev/style-guide. Note the name is no longer
simple-chat.componentts, butsimple-chat.tsfor a cleaner naming convention!
Now let’s implement our chat component:
1
2
3
4
5
6
7
8
9
10
11
12
13
14
15
16
17
18
19
20
21
22
23
24
25
26
27
28
29
30
31
32
33
34
35
36
37
38
39
40
41
42
43
44
45
46
47
48
49
50
51
52
53
54
55
56
57
58
59
60
61
62
63
64
65
66
67
68
69
70
71
72
73
74
75
76
77
78
79
80
81
82
83
84
85
86
87
88
89
90
91
92
93
94
95
96
97
98
99
100
// filepath: angular-ai/src/app/chat/simple-chat/simple-chat.ts
import { Component, effect, ElementRef, inject, signal, viewChild } from '@angular/core';
import { FormsModule } from '@angular/forms';
import { MatButtonModule } from '@angular/material/button';
import { MatCardModule } from '@angular/material/card';
import { MatIconModule } from '@angular/material/icon';
import { MatInputModule } from '@angular/material/input';
import { MatToolbar } from '@angular/material/toolbar';
import { catchError, of } from 'rxjs';
import { ChatResponse } from '../chat-response';
import { ChatService } from '../chat-service';

@Component({
  selector: 'app-simple-chat',
  imports: [MatCardModule, MatInputModule, MatButtonModule, FormsModule, MatToolbar, MatIconModule],
  templateUrl: './simple-chat.html',
  styleUrl: './simple-chat.scss'
})
export class SimpleChat {

  private readonly chatHistory = viewChild.required<ElementRef>('chatHistory');
  private readonly chatService = inject(ChatService);
  private readonly local = true;

  userInput = '';
  isLoading = false;

  messages = signal<ChatResponse[]>([
    { message: 'Hello, how can I help you today?', isBot: true },
  ]);

  // Effect to auto-scroll when messages change
  private readonly autoScrollEffect = effect(() => {
    this.messages(); // Read the signal to track changes
    setTimeout(() => this.scrollToBottom(), 0); // Use setTimeout to ensure DOM is updated
  });

  sendMessage(): void {
    this.trimUserMessage();
    if (this.userInput !== '' && !this.isLoading) {
      this.updateMessages(this.userInput);
      this.isLoading = true;
      if (this.local) {
        this.simulateResponse();
      } else {
        this.sendChatMessage();
      }
    }
  }

  private trimUserMessage() {
    this.userInput = this.userInput.trim();
  }

  private updateMessages(message: string, isBot = false) {
    this.messages.update(messages => [...messages, { message, isBot }]);
  }

  private getResponse() {
    setTimeout(() => {
      const response = 'This is a simulated response from the AI model.';
      this.updateMessages(response, true);
      this.isLoading = false;
    }, 2000);
  }

  private simulateResponse() {
    this.getResponse();
    this.userInput = '';
  }

  private scrollToBottom(): void {
    try {
      const chatElement = this.chatHistory();
      if (chatElement?.nativeElement) {
        chatElement.nativeElement.scrollTop = chatElement.nativeElement.scrollHeight;
      }
    } catch (err) {
      console.error('Failed to scroll chat history:', err);
    }
  }

  private sendChatMessage() {
    this.chatService.sendChatMessage(this.userInput)
    .pipe(
      catchError(() => {
        this.updateMessages('Sorry, I am unable to process your request at the moment.', true);
        this.isLoading = false;
        return of();
      })
    )
    .subscribe((response: ChatResponse) => {
      if (response) {
        this.updateMessages(response.message, true);
      }
      this.userInput = '';
      this.isLoading = false;
    });
  }
}
What’s happening here?
private readonly chatHistory = viewChild.required<ElementRef>('chatHistory'): This uses Angular’s modernviewChildsignal to get a reference to the chat history DOM element. Therequiredmethod ensures the element exists, and we’ll use this reference for auto-scrolling functionality.private readonly chatService = inject(ChatService): We’re injecting our chat service using Angular’s moderninject()function instead of constructor injection. This is the recommended approach in modern Angular applications.private readonly local = true: This is a toggle flag that allows us to switch between local simulation mode (for testing) and actual API calls. Whentrue, it simulates responses; whenfalse, it calls the real Spring Boot backend.messages = signal<ChatResponse[]>([...]): We’re using Angular signals to manage our chat messages state. Signals are Angular’s new reactive primitive that automatically track changes and update the UI efficiently. We initialize it with a welcome message from the bot.private readonly autoScrollEffect = effect(() => {...}): This creates an effect that automatically scrolls to the bottom of the chat whenever new messages are added. Effects in Angular run whenever their dependencies (in this case, themessagessignal) change. This is one of my favorite use cases to useeffectsrather than forconsole.log.sendMessage(): This is the main method that handles sending messages. It validates the input, adds the user message to the chat, and either simulates a response or calls the actual API based on thelocalflag.private updateMessages(message: string, isBot = false): A utility method that updates the messages signal by creating a new array with the additional message. TheisBotparameter determines whether the message is from the user or the AI assistant.private sendChatMessage(): This method handles the actual HTTP request to our Spring Boot backend. It uses RxJS operators likecatchErrorto handle errors gracefully andsubscribeto process the response.
Key Angular concepts used:
- Signals: For reactive state management (
messagessignal). - Effects: For automatic side effects like scrolling (
autoScrollEffect). - ViewChild: For DOM element references (
chatHistory). - Modern dependency injection: Using
inject()function. - Standalone components: No need for NgModule declarations.
- RxJS: For handling asynchronous HTTP operations for the POST call to the Spring API.
This component demonstrates modern Angular patterns and provides a clean, reactive chat interface that can work both in simulation mode for testing and with the real Spring Boot backend.
Step 4: Create the Chat Template
Here is the HTML that connects to our component:
1
2
3
4
5
6
7
8
9
10
11
12
13
14
15
16
17
18
19
20
21
22
23
24
25
26
27
28
29
30
31
32
33
34
35
36
37
38
<!-- filepath: angular-ai/src/app/chat/simple-chat/simple-chat.html -->
<mat-card class="chat-container">
  <div class="chat-header">
    <mat-toolbar>
      <span>Simple Chat</span>
    </mat-toolbar>
  </div>
  <div class="chat-history" #chatHistory>
    <div class="messages">
    @for (message of messages(); track message) {
      <div class="message">
        <div class="message-bubble" [class.user]="!message.isBot">

        </div>
      </div>
    }
    @if (isLoading) {
      <div class="message">
        <div class="message-bubble">
          <span class="typing">...</span>
        </div>
      </div>
    }
  </div>
  </div>

  <div class="chat-input">
    <mat-form-field class="full-width">
      <mat-label>Ask anything</mat-label>
      <input matInput [(ngModel)]="userInput" (keyup.enter)="sendMessage()">
      @if (userInput) {
        <button matSuffix mat-icon-button aria-label="Send" (click)="sendMessage()" [disabled]="isLoading">
          <mat-icon>send</mat-icon>
        </button>
     }
    </mat-form-field>
  </div>
</mat-card>
What’s happening here?
<mat-card class="chat-container">: We’re using Angular Material’s card component as the main container for our chat interface.<div class="chat-header">with<mat-toolbar>: Creates a header section using Angular Material’s toolbar component.<div class="chat-history" #chatHistory>: This is our scrollable message container. The#chatHistorytemplate reference variable allows us to access this DOM element from our component usingviewChildfor auto-scrolling functionality.@for (message of messages(); track message; let system = $even): This is Angular’s new control flow syntax (introduced in Angular v17). We’re iterating over ourmessages()signal, using thetrackclause for performance optimization.[class.user]="!message.isBot": This is a class binding that conditionally applies theuserCSS class when the message is NOT from the bot. This allows us to style user messages differently from bot messages (typically aligned to the right vs left) and a preffered way instead ofNgClassdirective.@if (isLoading): Another example of Angular’s new control flow syntax. This conditionally shows a loading indicator with typing dots (...) when the AI is processing a response.<mat-form-field class="full-width">: Angular Material’s form field component that provides the input styling and label functionality. Thefull-widthclass ensures it takes up the available space.[(ngModel)]="userInput": Two-way data binding that connects the input field to our component’suserInputproperty. When the user types, it updates the property; when the property changes, it updates the input. Since we only have one field, no need for complex forms here.(keyup.enter)="sendMessage()": Event binding that calls oursendMessage()method when the user presses the Enter key. This provides a convenient way to send messages without clicking the button.@if (userInput): Only shows the send button when there’s text in the input field. This is a nice UX touch that prevents sending empty messages.[disabled]="isLoading": Property binding that disables the send button while a request is in progress, preventing multiple submissions.
Key Angular concepts used:
- New Control Flow Syntax:
@forand@ifinstead of*ngForand*ngIf - Template Reference Variables:
#chatHistoryfor DOM access - Class Binding:
[class.user]for conditional styling - Event Binding:
(click)and(keyup.enter)for user interactions - Property Binding:
[disabled]for dynamic button states - Two-way Data Binding:
[(ngModel)]for form input - Angular Material Components:
mat-card,mat-toolbar,mat-form-field, etc.
Step 5: Style the Chat Interface
Now let’s add some style to our HTML:
1
2
3
4
5
6
7
8
9
10
11
12
13
14
15
16
17
18
19
20
21
22
23
24
25
26
27
28
29
30
31
32
33
34
35
36
37
38
39
40
41
42
43
44
45
46
47
48
49
50
51
52
53
54
55
56
57
58
59
60
61
62
63
64
65
66
67
68
// filepath: angular-ai/src/app/chat/simple-chat/simple-chat.component.scss
.chat-container {
  display: flex;
  flex-direction: column;
  height: 80vh;
  margin: 36px;
}

.chat-header {
  flex: 0 0 auto; /* Header doesn't grow or shrink */
}

.chat-history {
  flex: 1 1 auto; /* Chat history takes up available space */
  overflow-y: auto; /* Add scrollbar if content overflows */
  padding: 10px;
}

.messages {
  flex: 1;
  margin-bottom: 16px;
  overflow-y: auto;
  padding-right: 8px;
}

.message {
  margin-bottom: 8px;
}

.message-bubble {
  padding: 10px;
  border-radius: 10px;
  max-width: 80%;
  display: inline-block;
}

.user {
  background-color: #d7e3ff; /* Light blue for user messages */
  border-radius: 10px;
  align-self: flex-end; /* Align to the right */
  margin-left: auto;
}


.chat-input {
  flex: 0 0 auto; /* Input bar doesn't grow or shrink */
  padding: 10px;
}

.full-width {
  width: 100%;
}

.typing {
  display: inline-block;
  overflow: hidden;
  white-space: nowrap;
  animation: typing 1s steps(10) infinite alternate; // changed from 2s to 1s
}

@keyframes typing {
  from {
    width: 0;
  }
  to {
    width: 100%;
  }
}
What’s happening here?
.chat-container: This is our main container using CSS Flexbox. We set it toflex-direction: columnto stack elements vertically, with a fixed height of80vh(80% of the viewport height) and consistent margin. This creates the foundation for our chat layout..chat-header: Usesflex: 0 0 autowhich means it won’t grow or shrink - it maintains its natural size. This ensures our header stays at the top with consistent height regardless of content changes..chat-history: This is the scrollable message area. We useflex: 1 1 autoso it takes up all available space between the header and input. Theoverflow-y: autoadds a scrollbar when messages exceed the container height..messages: Additional styling for the message container with proper spacing and padding. Thepadding-right: 8pxaccounts for the scrollbar space..message: Simple spacing between individual messages usingmargin-bottom: 8pxto create visual separation..message-bubble: This styles each message bubble with rounded corners, padding, and a max-width of 80% to prevent messages from taking up the full width. Thedisplay: inline-blockallows proper alignment..user: This class is conditionally applied to user messages (remember our[class.user]="!message.isBot"from the template). It uses a light blue background andmargin-left: autoto push user messages to the right side of the chat, creating the typical chat alignment pattern..chat-input: Similar to the header, this usesflex: 0 0 autoto maintain its size at the bottom of the container. The padding ensures proper spacing from the edges..full-width: A utility class that makes the input field take up the full available width within its container..typing: This creates the animated typing indicator. We useoverflow: hiddenandwhite-space: nowrapto control text display, then apply a custom animation that creates the typing effect.@keyframes typing: This defines the animation that makes the typing dots appear to “type” by animating the width from 0 to 100%. Thesteps(10) infinite alternatecreates a smooth, continuous typing effect.
Step 6: Update the App component
Now that our chat interface is ready, let’s go back to the main component and add the remaing code.
1
2
3
4
5
6
7
8
9
10
11
12
13
14
15
16
// filepath: angular-ai/src/app/app.ts
import { Component } from '@angular/core';
import { MatButtonModule } from '@angular/material/button';
import { MatIconModule } from '@angular/material/icon';
import { MatToolbarModule } from '@angular/material/toolbar';
import { RouterLink, RouterOutlet } from '@angular/router';

@Component({
  selector: 'app-root',
  imports: [RouterOutlet, MatToolbarModule, MatButtonModule, MatIconModule, RouterLink],
  templateUrl: './app.html',
  styleUrl: './app.scss'
})
export class App {
  readonly title = 'AI-Spring-Angular';
}
This App component serves as our application shell, providing the main navigation toolbar and a router outlet where our chat component will be displayed.
The app.html file:
1
2
3
4
5
<mat-toolbar>
  <span class="title"></span>
  <button mat-button aria-label="Simple Chat" routerLink="/simple-chat">Simple Chat</button>
</mat-toolbar>
<router-outlet></router-outlet>
And finally, the SCSS file:
1
2
3
.title {
  margin-right: 20px;
}
Step 7: Routes and the main configuration
If an app.routes file was not created during the project creation, go ahead and create one with the following content:
1
2
3
4
5
6
7
8
9
import { Routes } from '@angular/router';

export const routes: Routes = [
  { path: '', redirectTo: 'simple-chat', pathMatch: 'full' },
  { path: 'simple-chat',
    loadComponent: () => import('./chat/simple-chat/simple-chat').then(c => c.SimpleChat)
  },
  { path: '**', redirectTo: 'simple-chat' }
];
What’s happening here?
{ path: '', redirectTo: 'simple-chat', pathMatch: 'full' }: This is the default route configuration. When users visit the root URL (/), they’ll be automatically redirected to/simple-chat. ThepathMatch: 'full'ensures this redirect only happens when the path is exactly empty (not just when it starts with empty).{ path: 'simple-chat', loadComponent: () => import('./chat/simple-chat/simple-chat').then(c => c.SimpleChat) }: This defines our chat route using lazy loading.loadComponent: Uses dynamic imports for standalone components.import('./chat/simple-chat/simple-chat'): Dynamically imports our chat component.then(c => c.SimpleChat): Extracts theSimpleChatclass from the imported module
{ path: '**', redirectTo: 'simple-chat' }: This is the wildcard route that catches any unmatched URLs. If someone tries to access a route that doesn’t exist, they’ll be redirected to our chat component. This is a good UX practice for handling 404-like scenarios.
And finally, let’s review the app.config.ts file:
1
2
3
4
5
6
7
8
9
10
11
12
13
14
import { ApplicationConfig, provideBrowserGlobalErrorListeners, provideZonelessChangeDetection } from '@angular/core';
import { provideRouter } from '@angular/router';

import { provideHttpClient } from '@angular/common/http';
import { routes } from './app.routes';

export const appConfig: ApplicationConfig = {
  providers: [
    provideBrowserGlobalErrorListeners(),
    provideZonelessChangeDetection(),
    provideRouter(routes),
    provideHttpClient()
  ]
};
What’s happening here?
import { provideHttpClient } from '@angular/common/http': This imports the HTTP client provider that we need for making API calls to our Spring Boot backend.provideZonelessChangeDetection(): This is Angular’s new experimental change detection strategy that doesn’t rely on Zone.js. It’s more performant and works particularly well with signals, which we’re using throughout our chat component.provideRouter(routes): This configures Angular’s routing system with our route definitions. It takes ourroutesarray and sets up the navigation system for our application.provideHttpClient(): This sets up Angular’s HTTP client for making API requests. We need this to communicate with our Spring Boot backend when sending chat messages.
This configuration represents modern Angular’s approach to application setup. It’s more explicit, tree-shakeable, and performant than the traditional NgModule approach. The provideZonelessChangeDetection() is particularly interesting as it works seamlessly with our signal-based chat component, providing better performance without the overhead of Zone.js.
Step 8: Proxy to the API
I’m personally not a big fan of using CORS if not needed. For local development, this is definetely not needed and I consider a good practice not using CORS locally. For this reason, I prefer to always create a proxy.conf.js file in the project’s root folder:
1
2
3
4
5
6
7
8
9
10
// file path: angular-ai/proxy.conf.js
const PROXY_CONFIG = [
  {
    context: ["/api"],
    target: "http://localhost:8080/",
    secure: false,
    logLevel: "debug",
  },
];
module.exports = PROXY_CONFIG;
What’s happening here?
const PROXY_CONFIG = [...]: This creates a proxy configuration array that tells Angular’s development server how to handle API requests during development.context: ["/api"]: This specifies which URL paths should be proxied. Any request starting with/apiwill be intercepted and forwarded to our Spring Boot backend. This matches the endpoint we defined in ourChatService(private readonly API = '/api/chat').target: "http://localhost:8080/": This is the destination where proxied requests will be forwarded. Since our Spring Boot application runs on port 8080 by default, any/apirequests from our Angular app (running on port 4200) will be sent tohttp://localhost:8080/api.secure: false: This disables SSL certificate verification. Since we’re working with HTTP (not HTTPS) in local development, we set this tofalseto avoid SSL-related issues.logLevel: "debug": This enables detailed logging of proxy operations in the console. It’s helpful for debugging proxy issues during development - you’ll see exactly which requests are being proxied and where they’re going.module.exports = PROXY_CONFIG: This exports the configuration so Angular CLI can use it when starting the development server.
Why use a proxy instead of CORS?
- Cleaner Development: No need to configure CORS headers in your Spring Boot application for local development.
- Production-like Environment: Your frontend makes requests to the same origin, which is more similar to production setup.
- Security: Avoids the complexity and potential security issues of CORS configuration.
- Simplicity: Single configuration file handles all API routing.
To use this proxy, you’ll need to start your Angular development server with (package.json):
1
"start": "ng serve --proxy-config proxy.conf.js -o"
Use npm run start instead of ng serve directly.
Or add it to your angular.json file in the serve configuration:
1
2
3
4
5
6
"serve": {
  "builder": "@angular-devkit/build-angular:dev-server",
  "options": {
    "proxyConfig": "proxy.conf.js"
  }
}
This setup ensures that when your Angular app makes a request to /api/chat, it gets automatically forwarded to http://localhost:8080/api/chat where our Spring Boot backend is listening.
Testing the Application
Step 1: Start the Backend
Navigate to the api-ai directory and run:
1
./mvnw spring-boot:run
The backend should start on port 8080.
Step 2: Start the Frontend
In the angular-ai directory, run:
1
npm start
The Angular app will start on port 4200 and automatically open in your browser (-o parameter we added to the start script).
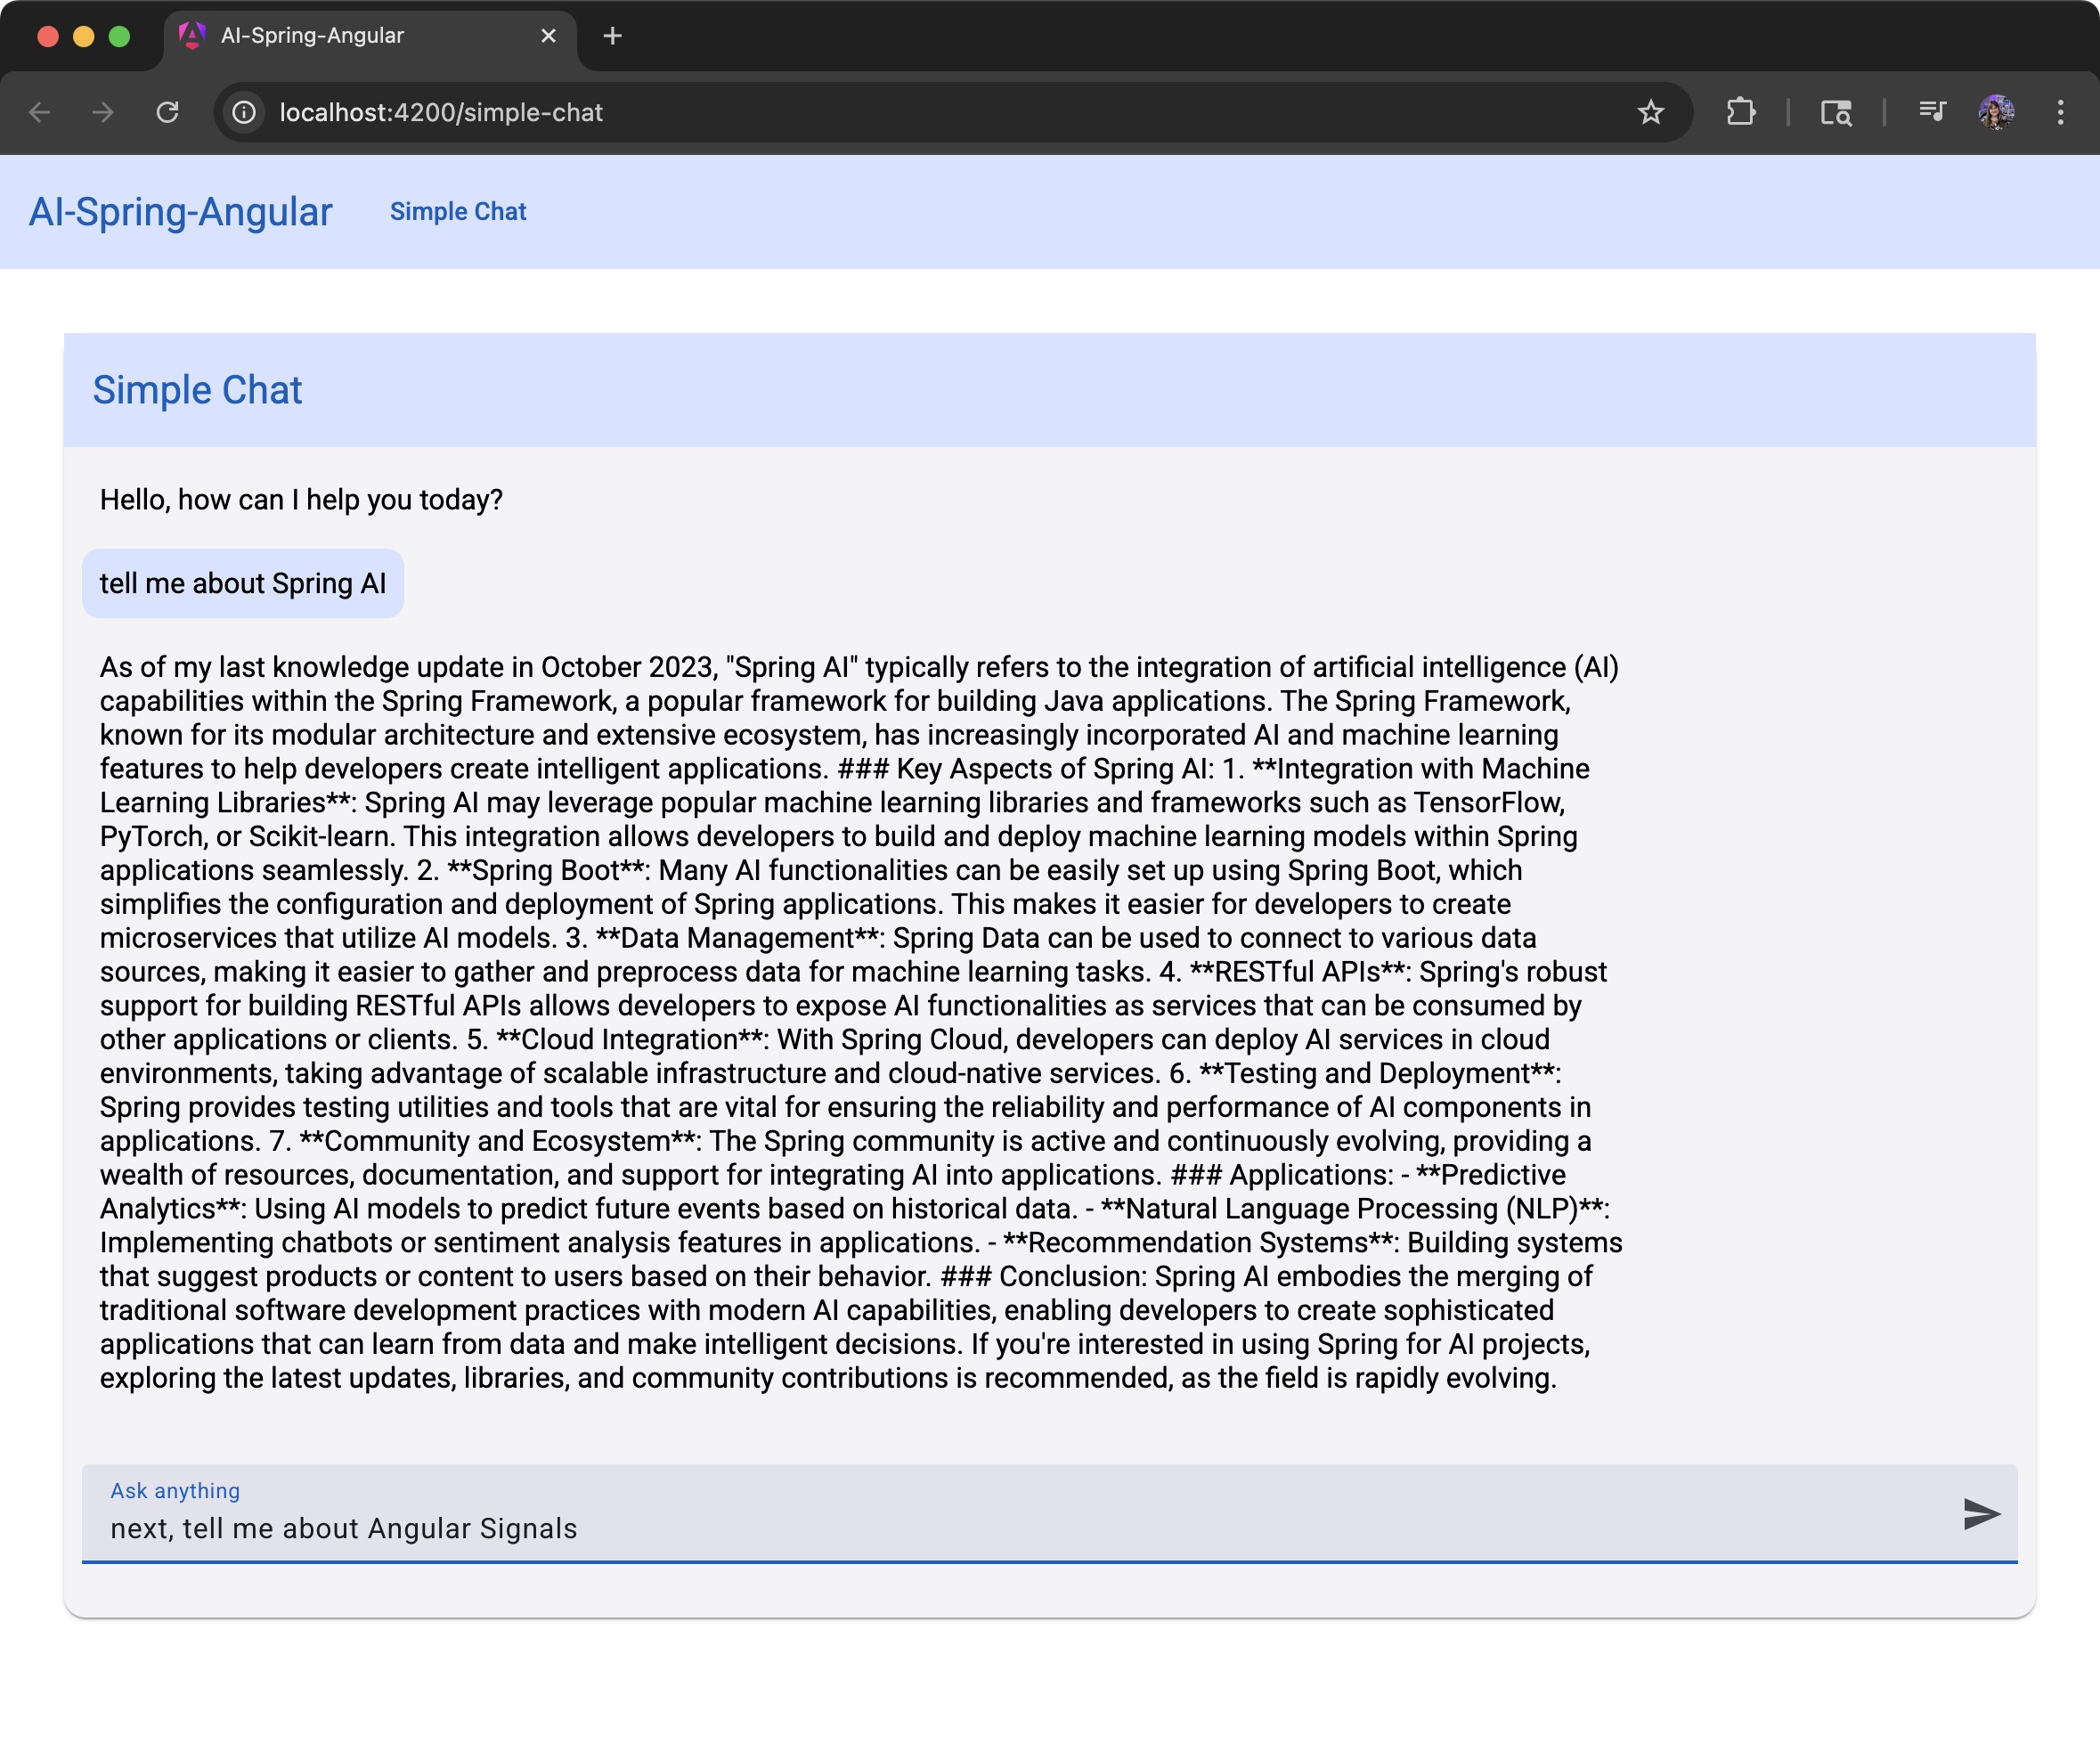
Step 3: Test the Chat
- Open your browser and go to
http://localhost:4200 - Navigate to the Simple Chat section
- Type a message and press Enter or click Send
- You should see the AI’s response appear in the chat
Tip: Try asking questions like “What is Spring AI?” or “Explain dependency injection in Spring” to test the AI’s knowledge.
Conclusion
Congratulations! 🎉 You’ve successfully built a simple AI chat application using Spring AI and Angular. This foundation gives you everything you need to create more sophisticated AI-powered applications.
In this tutorial, we covered:
- Setting up Spring AI with Gemini integration
- Creating a RESTful API for chat functionality
- Building a responsive Angular chat interface
- Connecting the frontend and backend
- Handling real-time user interactions
What’s Next?
- Add chat memory to maintain conversation context
- Implement different AI models or providers
- Add user authentication
- Store chat history in a database
Happy coding! 🚀
Want the code? Go straight to GitHub: https://github.com/loiane/spring-ai-angular
References
All tutorials from this series
This tutorial is part of a series of articles. Read them all below:
- 1: Building a Simple AI Chat Application with Spring AI and Angular (this tutorial)
- 2: Building an AI Chat with Memory using Spring AI and Angular
- 3: Coming soon!
Found this tutorial helpful? Share it with your fellow developers and let me know what you’d like to see next!