Getting Starting with Intelligent Java Applications using Spring AI
In this tutorial, we will develop a simple Chat Client application using Spring AI without coupling with the actual LLM Model. Since many Java developers are already familiar with the Spring framework, choosing Spring AI to transform Java projects into intelligent applications is a natural choice.
Spring AI offers a significant advantage by providing an abstraction layer over various AI providers. This means you can work with different AI models (like those from OpenAI, Google, or Azure) through a consistent API. This abstraction brings several benefits:
- Simplified Development: You don’t need to learn the specific APIs and nuances of each AI provider. Spring AI handles the underlying complexities, allowing you to focus on your application logic.
- Easier Switching: If you decide to change AI providers in the future, you can do so with minimal code changes. Simply swap out the Spring AI starter dependency and adjust your configuration.
- Reduced Vendor Lock-in: The abstraction layer helps prevent your application from becoming tightly coupled to a specific AI provider, giving you more flexibility and control.
Think of it like using a database abstraction layer like JPA/Hibernate. You can interact with different database systems (MySQL, PostgreSQL, Oracle) through a common interface, making your code more portable and maintainable. Spring AI provides a similar benefit for working with AI models.
Want the code? Go straight to GitHub.
1: Create a new Spring Boot project
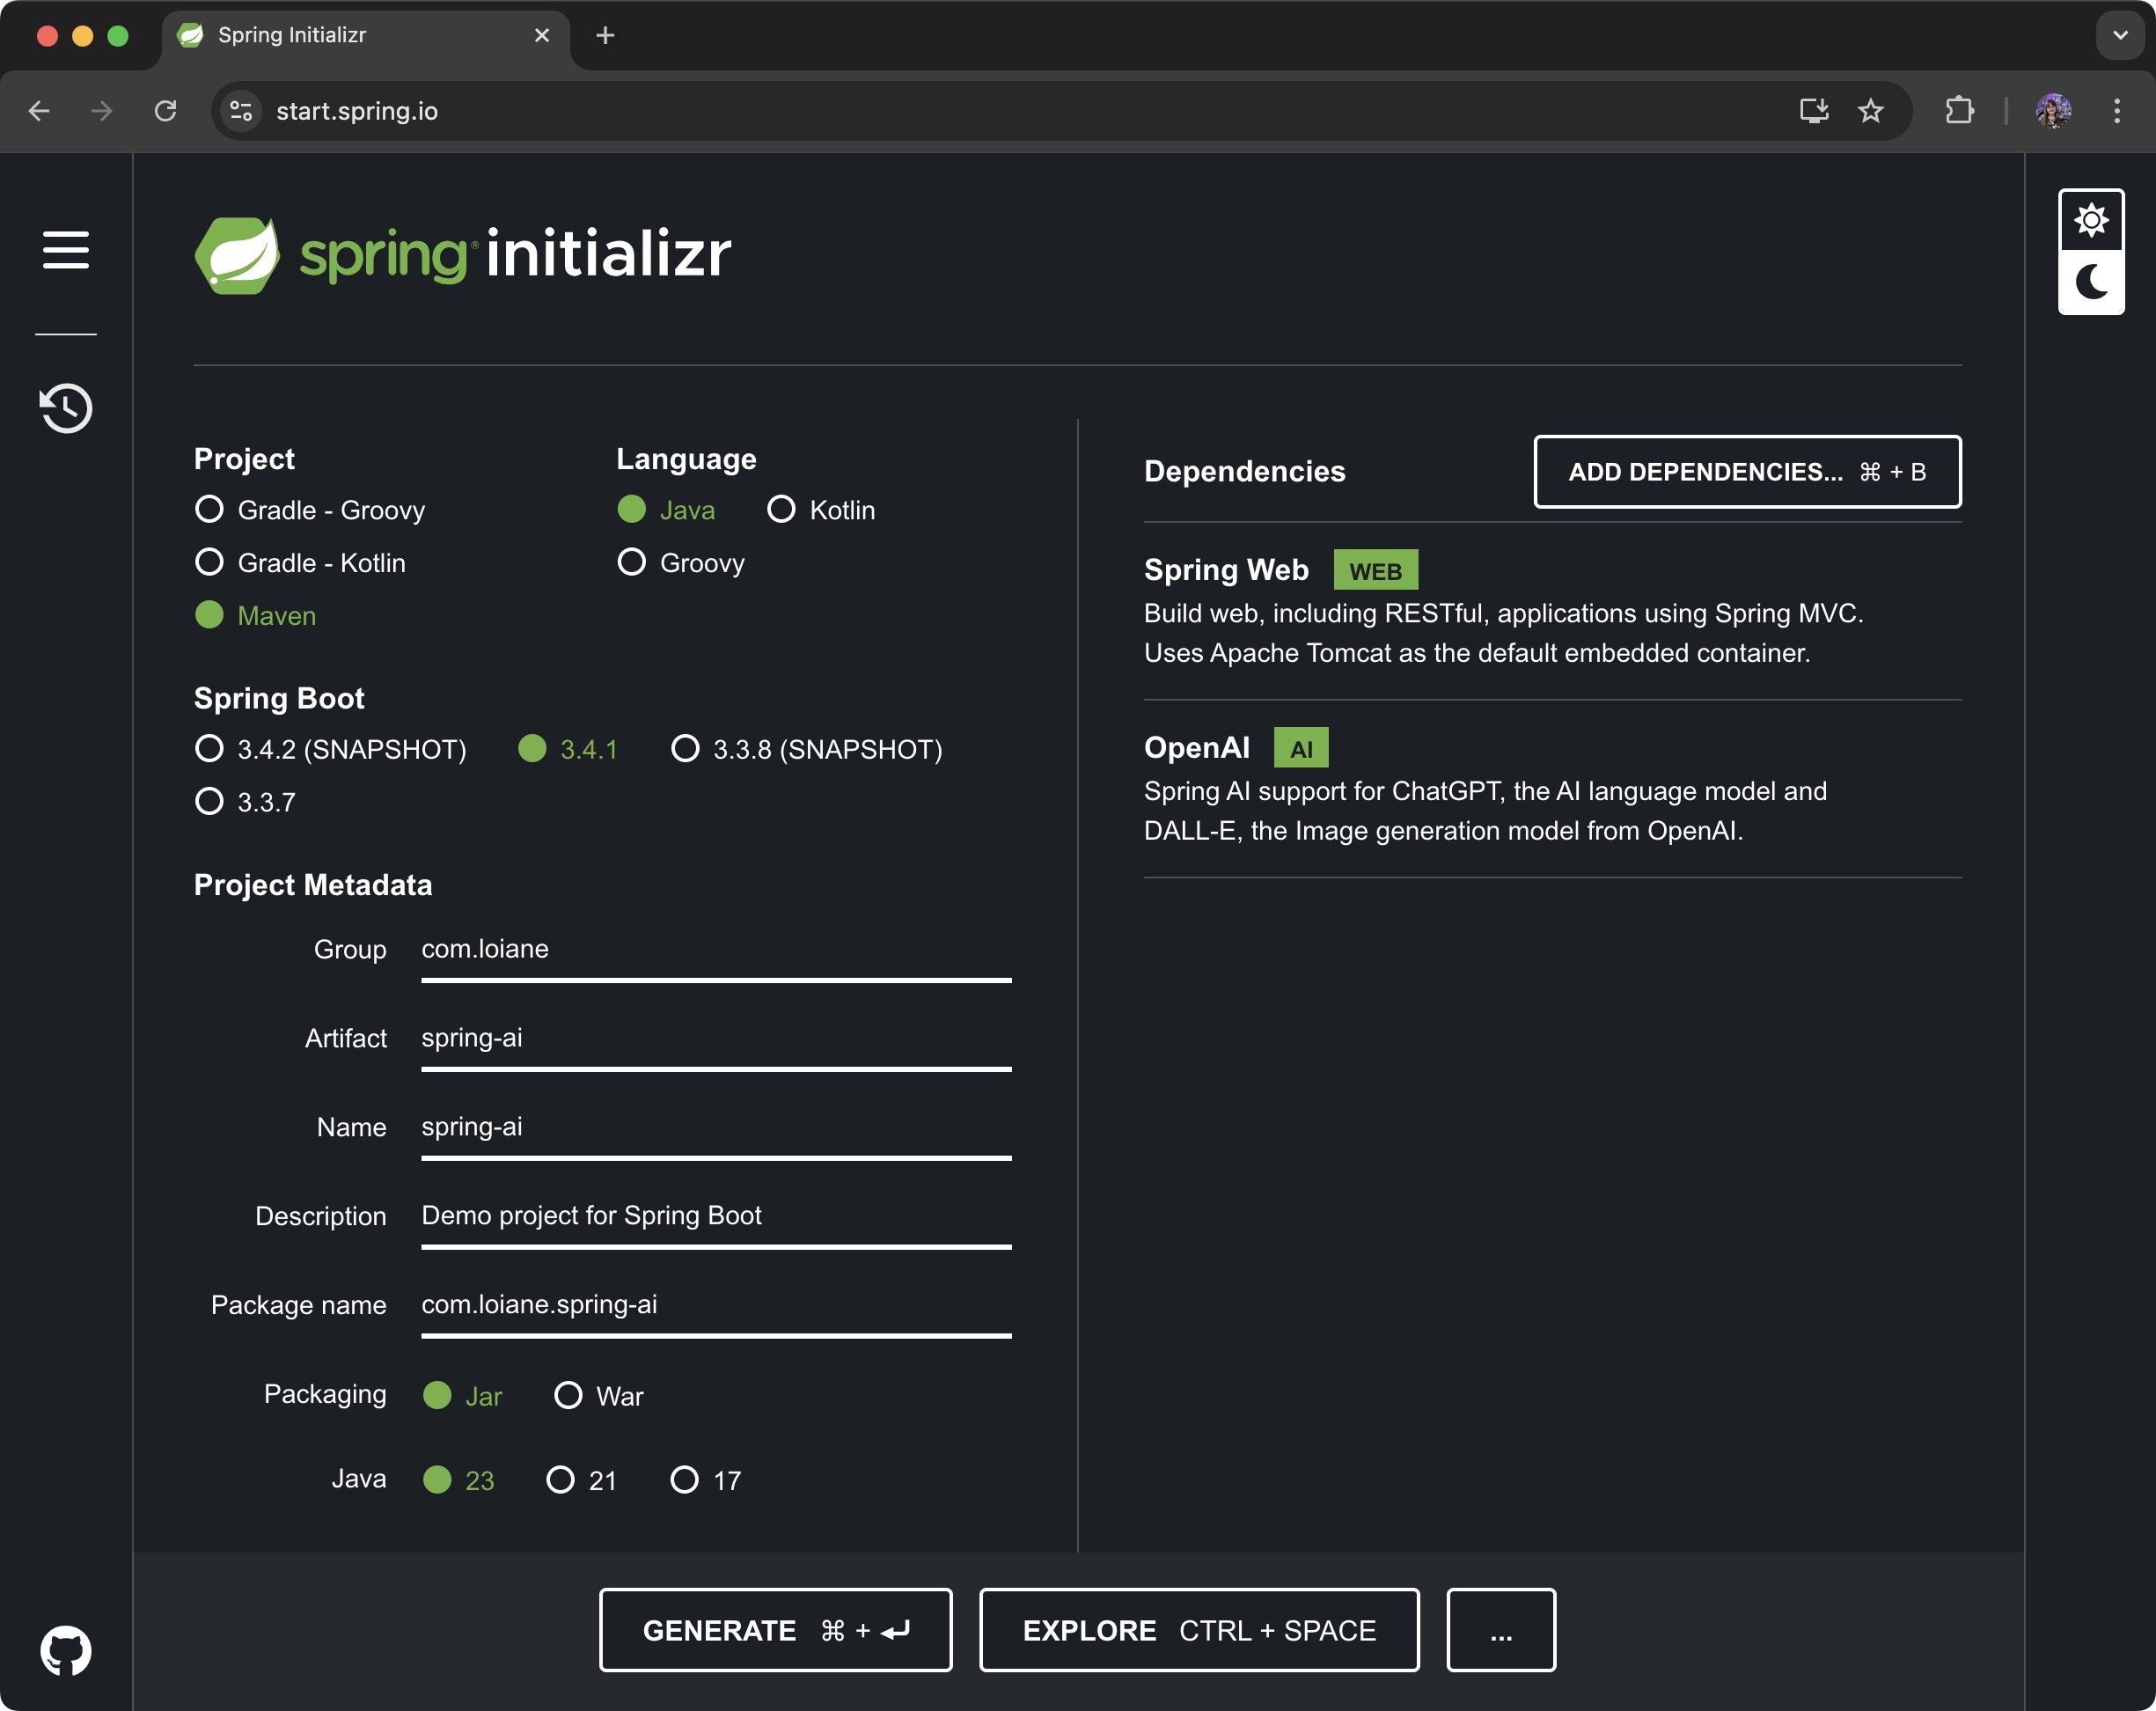
Create a new Spring Boot project using Spring Initializr (https://start.spring.io/) or the IDE of your preference.
For this example these are my selections:
- Project: Maven
- Language: Java
- Spring Boot: 3.4.1 (select the latest version)
- Enter your project metadata (package name, artifact name) as desired
- Java: 23 (or latest available)
For dependencies, we’ll need the following:
Spring Web: To create a REST controller for handling HTTP requests.Open AI: To integrate with OpenAI’s language models. We’ll explore other AI model providers in future posts.
2: Check the pom.xml file
Your pom.xml file should look like the following:
<?xml version="1.0" encoding="UTF-8"?>
<project xmlns="http://maven.apache.org/POM/4.0.0" xmlns:xsi="http://www.w3.org/2001/XMLSchema-instance"
	xsi:schemaLocation="http://maven.apache.org/POM/4.0.0 https://maven.apache.org/xsd/maven-4.0.0.xsd">
	<modelVersion>4.0.0</modelVersion>
	<parent>
		<groupId>org.springframework.boot</groupId>
		<artifactId>spring-boot-starter-parent</artifactId>
		<version>3.4.1</version>
		<relativePath/> <!-- lookup parent from repository -->
	</parent>
	<groupId>com.loiane</groupId>
	<artifactId>api-ai</artifactId>
	<version>0.0.1-SNAPSHOT</version>
	<name>api-ai</name>
	<description>Sample Spring AI project</description>

	<properties>
		<java.version>23</java.version>
		<spring-ai.version>1.0.0-M4</spring-ai.version>
	</properties>
	<dependencies>
		<dependency>
			<groupId>org.springframework.boot</groupId>
			<artifactId>spring-boot-starter-web</artifactId>
		</dependency>
		<dependency>
			<groupId>org.springframework.ai</groupId>
			<artifactId>spring-ai-openai-spring-boot-starter</artifactId>
		</dependency>

		<dependency>
			<groupId>org.springframework.boot</groupId>
			<artifactId>spring-boot-starter-test</artifactId>
			<scope>test</scope>
		</dependency>
	</dependencies>
	<dependencyManagement>
		<dependencies>
			<dependency>
				<groupId>org.springframework.ai</groupId>
				<artifactId>spring-ai-bom</artifactId>
				<version>${spring-ai.version}</version>
				<type>pom</type>
				<scope>import</scope>
			</dependency>
		</dependencies>
	</dependencyManagement>

	<build>
		<plugins>
			<plugin>
				<groupId>org.springframework.boot</groupId>
				<artifactId>spring-boot-maven-plugin</artifactId>
			</plugin>
		</plugins>
	</build>
	<repositories>
		<repository>
			<id>spring-milestones</id>
			<name>Spring Milestones</name>
			<url>https://repo.spring.io/milestone</url>
			<snapshots>
				<enabled>false</enabled>
			</snapshots>
		</repository>
	</repositories>

</project>
The dependency spring-ai-openai-spring-boot-starter provides the necessary components and auto-configuration for using OpenAI’s API within a Spring Boot application.
3: Configuring the Open AI key
One of the prerequisites to connect with ChatGPT models is to have an OpenAI API key.
Create an account at OpenAI signup page (https://platform.openai.com/signup). Once you have created an account, go to API Keys and Create a new secret key:
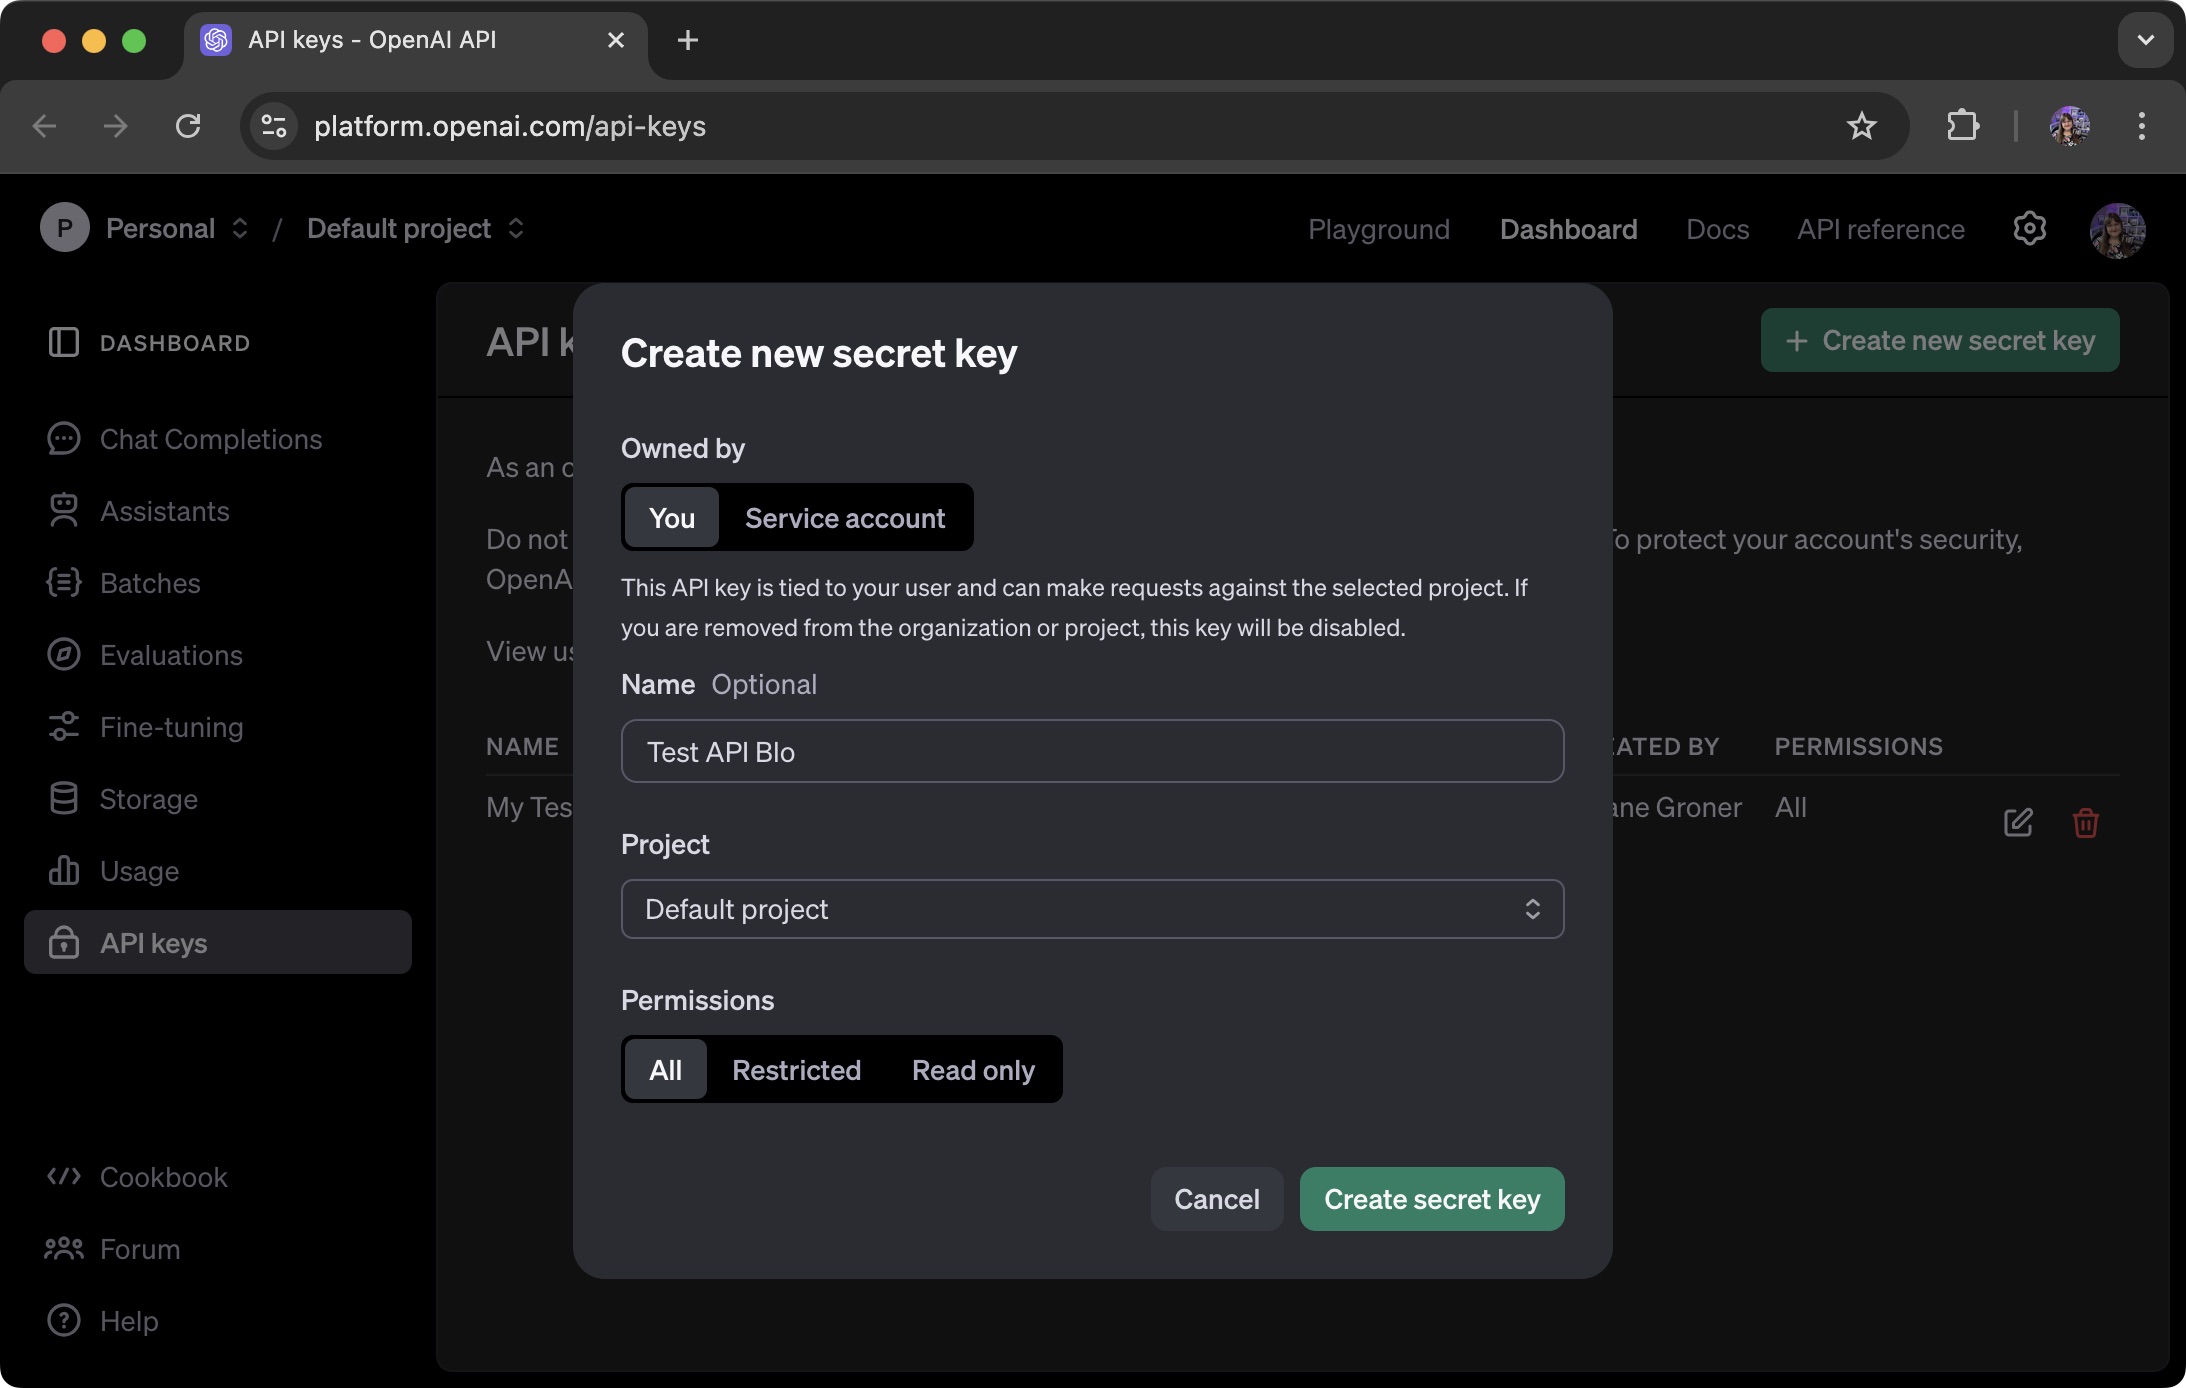
Copy your API Key to a safe place as we’ll use it in our project.
Before we can use the API Key, we also need to add some credits as the use of the API is not free. You can add your payment information and set a limit in this link: https://platform.openai.com/settings/organization/billing/overview.
I’ve added $5 dollars (the minimum), and it is more than enough for us to play around and create some applications. To check the usage and how much you are spending, you can access this link: https://platform.openai.com/settings/organization/usage.
3.1: Adding the OPENAI_API_KEY to the project
Now that the API key is generated we can add it to our Spring project. Open application.properties and add the following property:
spring.ai.openai.api-key=${OPENAI_API_KEY}
Treat your API key like a password; never share it publicly or commit it to version control. For safety, we will pass our OPENAI_API_KEY as an environment variable when running the project in the IDE.
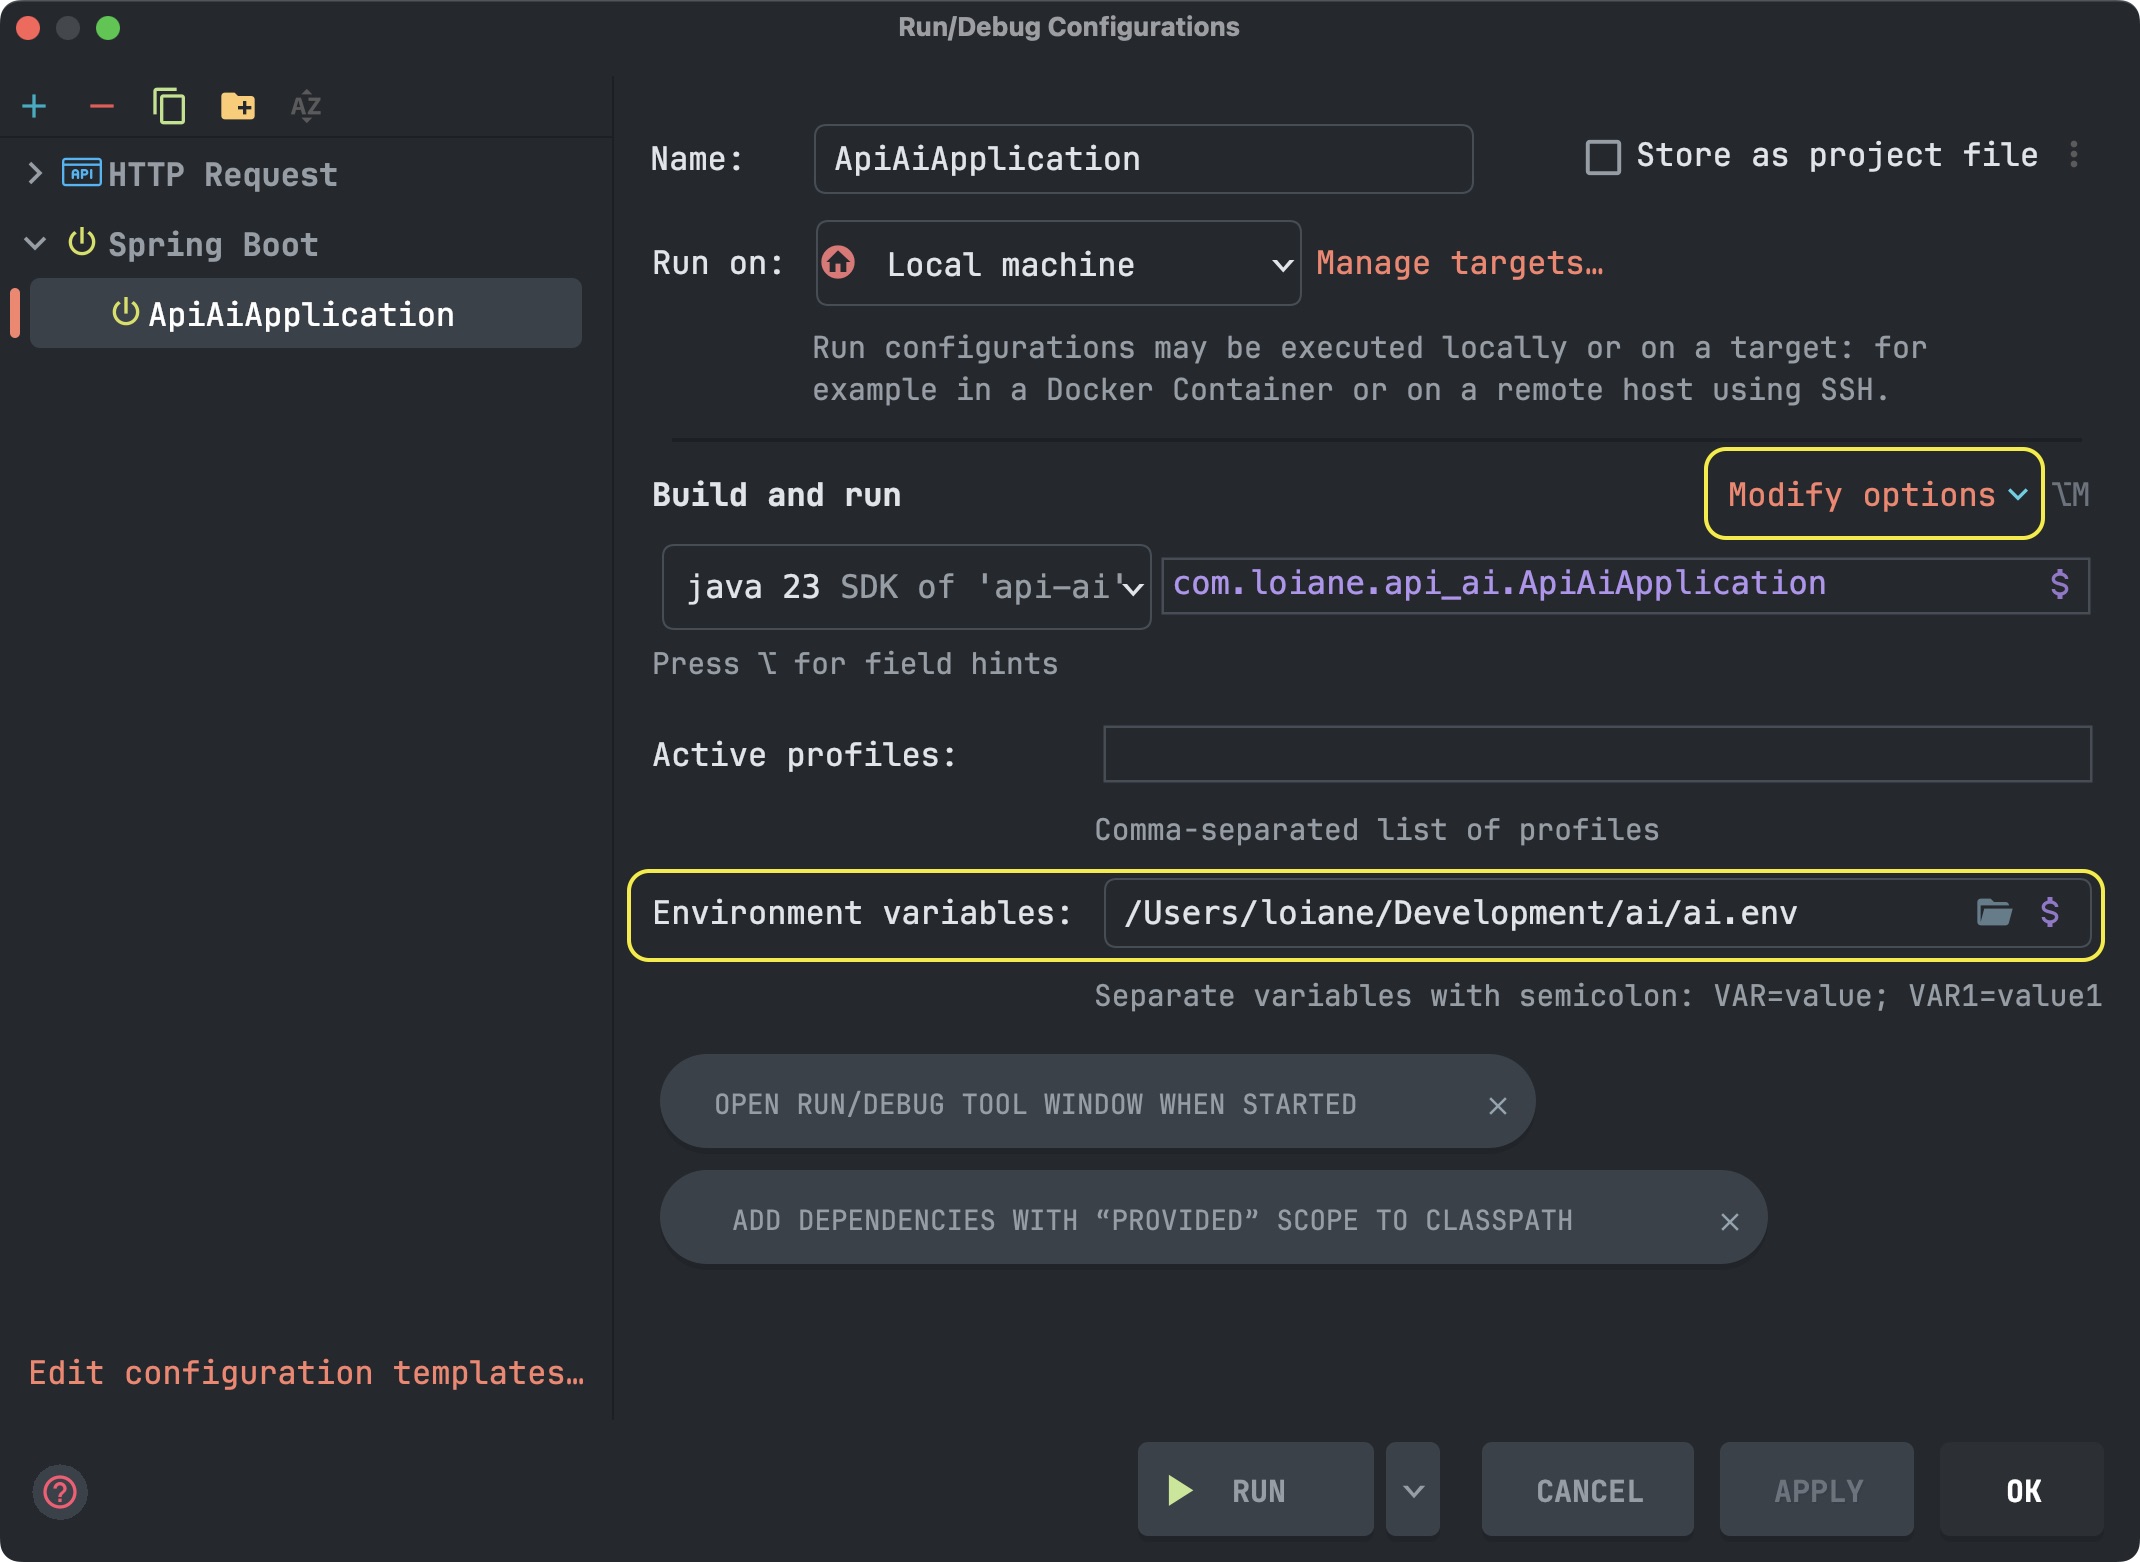
In case you are using Intellij IDEA, run the project for the first time, even if it fails. Click on the down arrow and select Edit Configurations:
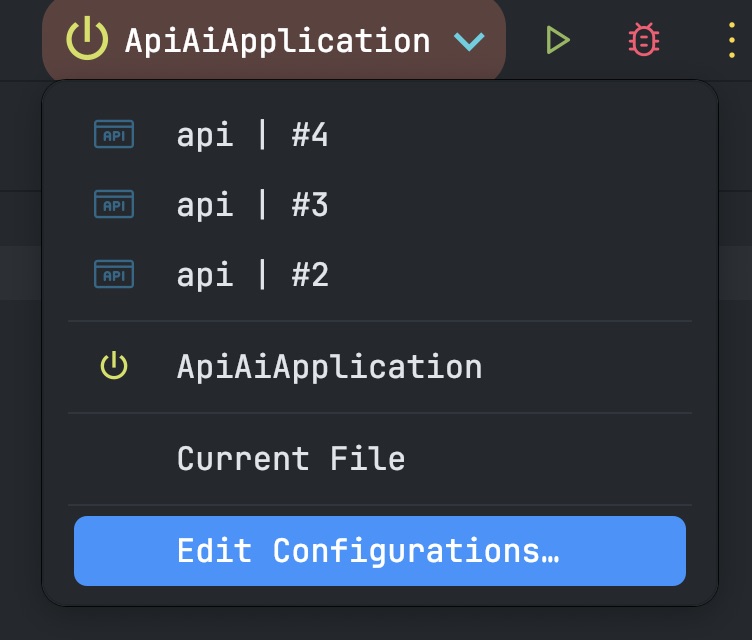
Select Modify Options and click on Environment Variables:
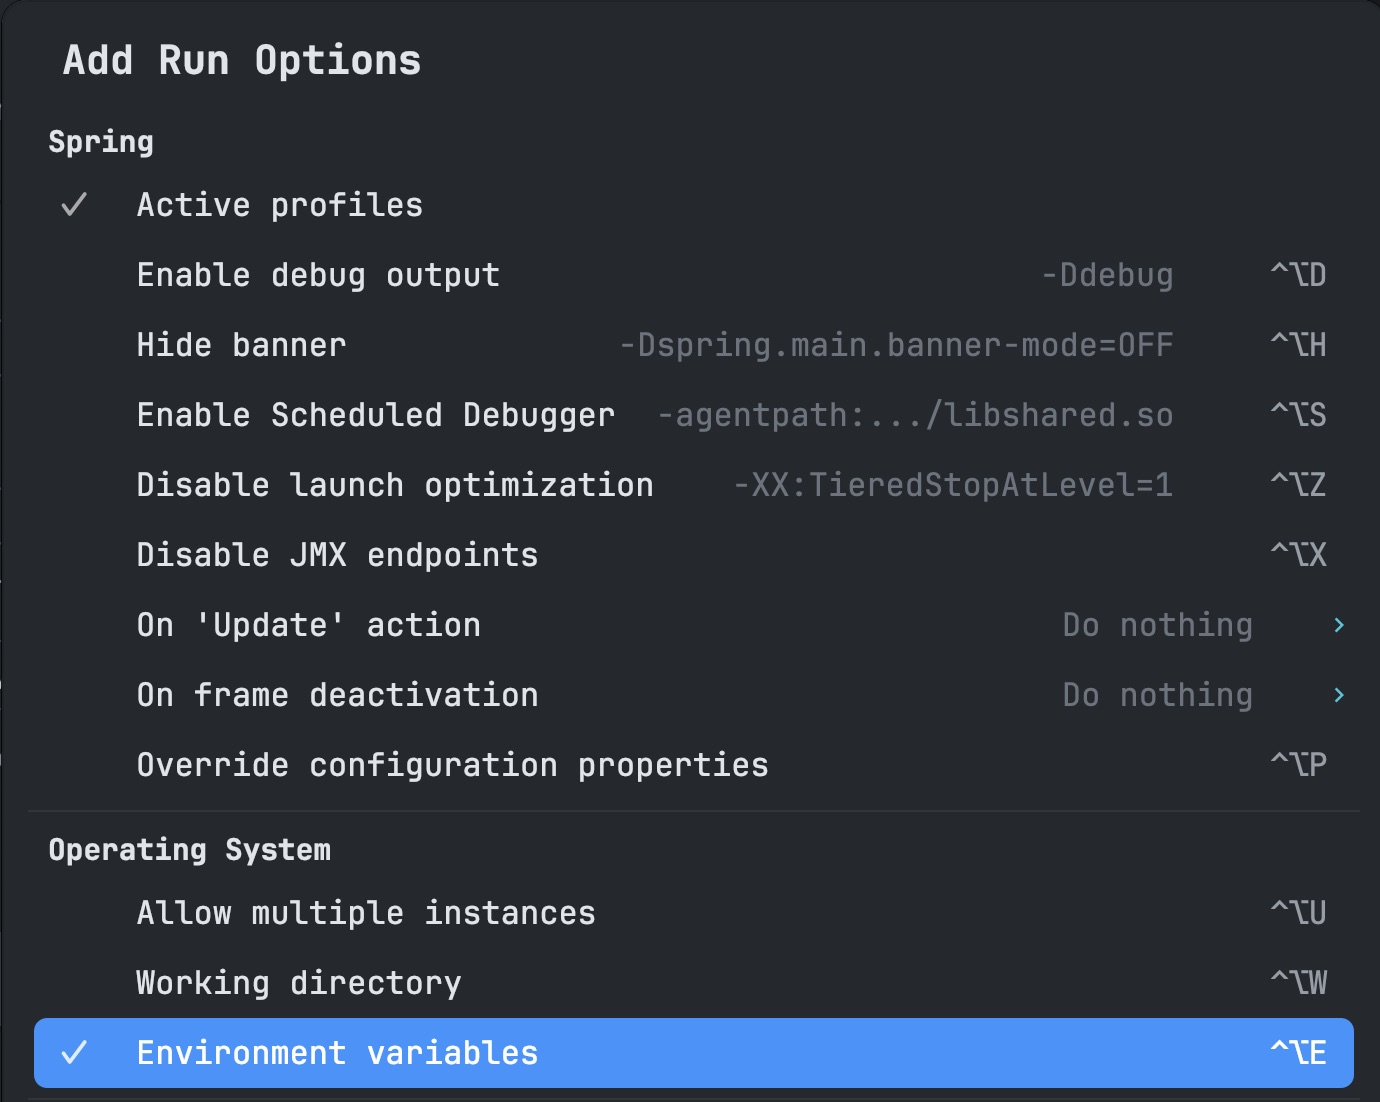
Add OPENAI_API_KEY=111111111111 (replacing 111111111111 with your key) and run the project again.
Alternatively, you can save the key in an .env file and select the file instead. I personally find this useful in case you are planning to create multiple local projects or have multiple keys (as we’ll use other AI model providers in future posts).
Now that we are all set, we can start coding!
4: Creating the SimpleChatService class
To get started, we’ll create a SimpleChatService that contains the ChatClient model and a method we can evoke from the controller:
import org.springframework.ai.chat.client.ChatClient;
import org.springframework.stereotype.Service;

@Service
public class SimpleChatService {

    private final ChatClient chatClient;

    public SimpleChatService(ChatClient.Builder chatClientBuilder) {
        this.chatClient = chatClientBuilder.build();
    }

    public String chat(String message) {
        return this.chatClient.prompt()
                .user(message)
                .call()
                .content();
    }
}
Where:
- The
ChatClientoffers an API for communicating with an AI Model. It supports both a synchronous and streaming programming model. - The
ChatClientis created using aChatClient.Builderobject. You can obtain an autoconfiguredChatClient.Builderinstance for any ChatModel Spring Boot autoconfiguration or create one programmatically. - The
chat methodreceives amessage. We’ll use thePromptobject from theChatClientand set the user input, passing the received message. Thecall()method sends a request to the AI model, and thecontent()method returns the AI model’s response as a String.
5: Creating the OpenAIChatController
Next, let’s create a OpenAIChatController so we can use the service as follows:
import org.springframework.web.bind.annotation.PostMapping;
import org.springframework.web.bind.annotation.RequestBody;
import org.springframework.web.bind.annotation.RequestMapping;
import org.springframework.web.bind.annotation.RestController;

@RestController
@RequestMapping("/api/openai")
public class OpenAIChatController {

    private final SimpleChatService simpleChatService;

    public OpenAIChatController(SimpleChatService simpleChatService) {
        this.simpleChatService = simpleChatService;
    }

    @PostMapping("/chat")
    public ChatResponse chat(@RequestBody String message) {
        return new ChatResponse(this.simpleChatService.chat(message));
    }
}
This controller handles POST requests to the /api/openai/chat endpoint, extracting the message from the request body.
The ChatResponse is a record so we can format the output:
public record ChatResponse(String message) {}
6: Testing via HTTP request
If you are using IntelliJ IDEA Ultimate, you can create a file api.http with the following content (this is very convenient for HTTP request testing):
POST http://localhost:8080/api/openai/chat
Content-Type: application/json

{
    "message": "Tell me a joke"
}
Alternatively, you can also use PostMan or similar tools to simulate the HTTP request.
If we submit the request, we might get something like the following output:
{
  "message": "Why don't skeletons fight each other?\n\nThey don't have the guts."
}
Summary
With this basic API, we are able to use our own ChatGPT and prompt the AI with any questions!
I highly recommend reading the official documentation to learn more about the ChatClient API and all the functionalities available. You can find the links below.
References:
- https://docs.spring.io/spring-ai/reference/
- https://docs.spring.io/spring-ai/reference/api/chat/openai-chat.html
View the full source code on GitHub.
Happy coding!
