Visual Studio Code for Java: The Complete Guide (Tips, Setup, and Extensions)
I’ve been using Visual Studio Code for JavaScript and TypeScript development for several years, and more recently, I’ve spent the past couple of years using it for professional Java projects. I was initially hesitant, but VSCode has proven itself with features comparable to those found in IDEs that have been in the market for a while.
While I still appreciate other popular Java IDEs, I enjoy exploring new tools. VSCode has become my preferred editor for new Java projects.
In this guide, we’ll configure Visual Studio Code for optimal Java development and explore how to maximize its potential for professional workflows. I’ll demonstrate how VSCode enhances your efficiency with powerful extensions, robust debugging tools, and excellent Spring framework support.
Setting up VS Code for Java development and JDK
The VSCode documentation has a comprehensive Getting started tutorial, that covers the basics. I highly recommend checking it out if you’re new to using VSCode for Java development. In this guide, we’ll delve into some fundamentals and also explore more advanced features.
If you haven’t installed Java or VSCode yet, the easiest way to get started is with the Coding Pack for Java. This bundle includes VS Code, the Java Development Kit (JDK), and a collection of essential extensions by Microsoft. Here are the links:
- Windows: (https://aka.ms/vscode-java-installer-win)[https://aka.ms/vscode-java-installer-win]
- Mac: (https://aka.ms/vscode-java-installer-mac)[https://aka.ms/vscode-java-installer-mac]
If you’re using Linux, you’ll need to set up Java and VSCode manually. Don’t worry, we’ll cover those steps in the next sections, and I’ll also provide guidance if you prefer a manual setup on other operating systems.
In addition to the editor, we also need to install the Java Development Kit (JDK). You can install it manually following the official guide this link. However, my preferred method is to use the SDKMAN - Software Development Kit Manager, which simplifies managing multiple JDK versions on your system.
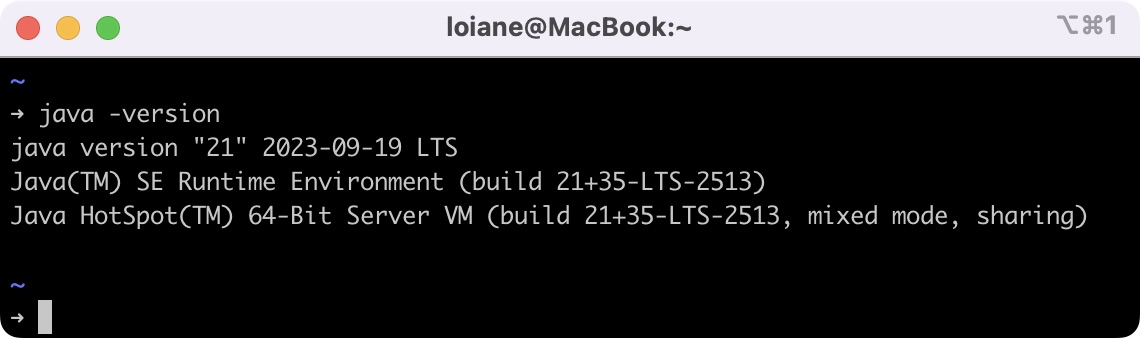
With Visual Code installed and the JDK ready, let’s verify your Java setup. Run the following command in your terminal:
1
java -version
And you should get a version as a result:
Install VSCode Extensions for Java: Basic Extensions
The first extension recommended to be installed is the Extension Pack for Java by Microsoft, which includes the following extensions:
- 📦 Language Support for Java™ by Red Hat: for code navigation, autocompletion, refactoring and code snippets.
- 📦 Debugger for Java: debugging support.
- 📦 Test Runner for Java: Run and Debug JUnit/TestNG Test Cases.
- 📦 Maven for Java: Maven support for project scaffolding and execution of Maven tasks/goals.
- 📦 Project Manager for Java: enables a project explorer view, facilitating creation of packages, classes and libraries depencies.
- 📦 Visual Studio IntelliCode: AI-assisted development.
Once the Extension Pack for Java is installed, open the Command Pallete in VSCode and search by Java Overview:
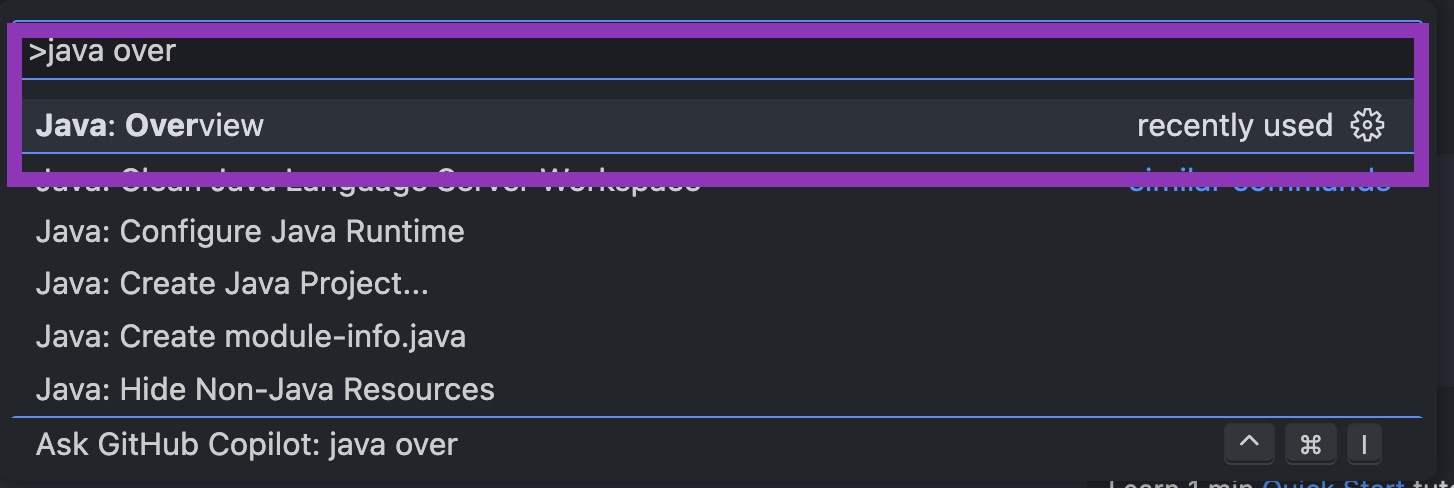
Open the view and you should see something like the screen below:
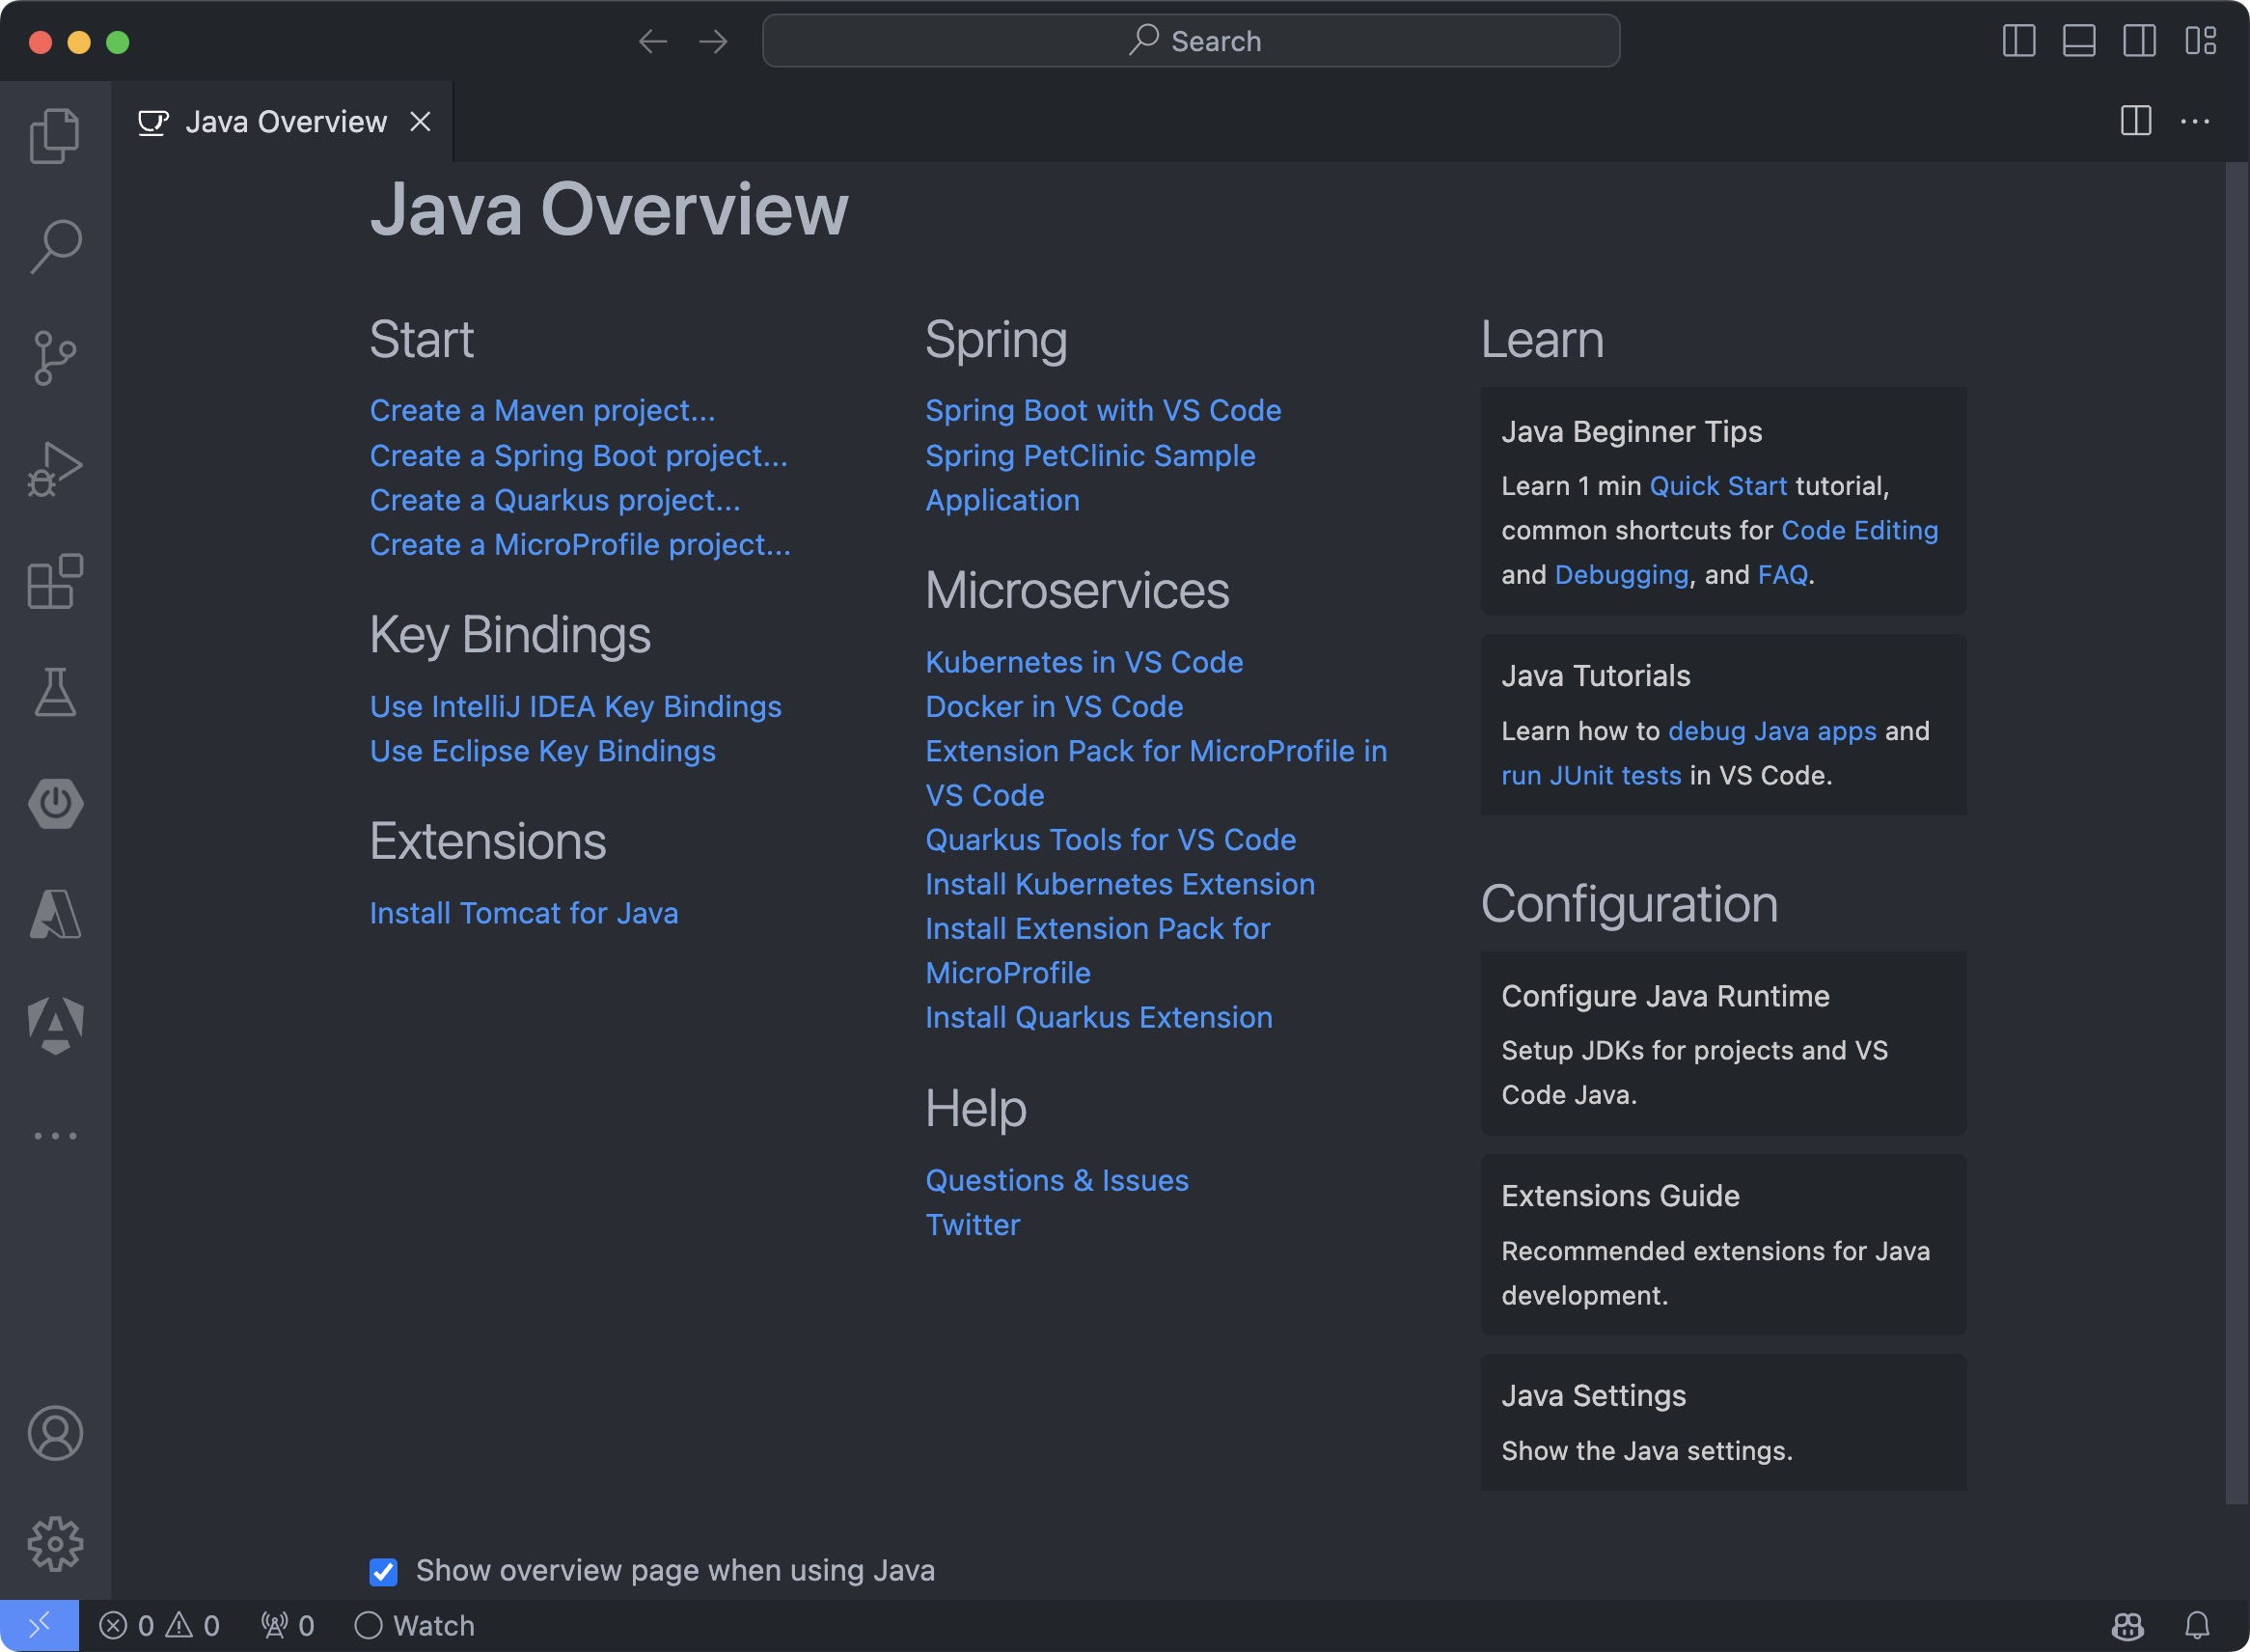
With this view, you can install additional Java extensions, configure shortcuts (even use the same shortcuts you’re used to from other Java IDEs), and also access tutorials.
Let’s review what each of these extensions provides us and how to use them.
Language Support for Java™ by Red Hat
This extension provides Java language support based on Eclipse, enabling us to create/open Java projects, refactoring, and code completion.
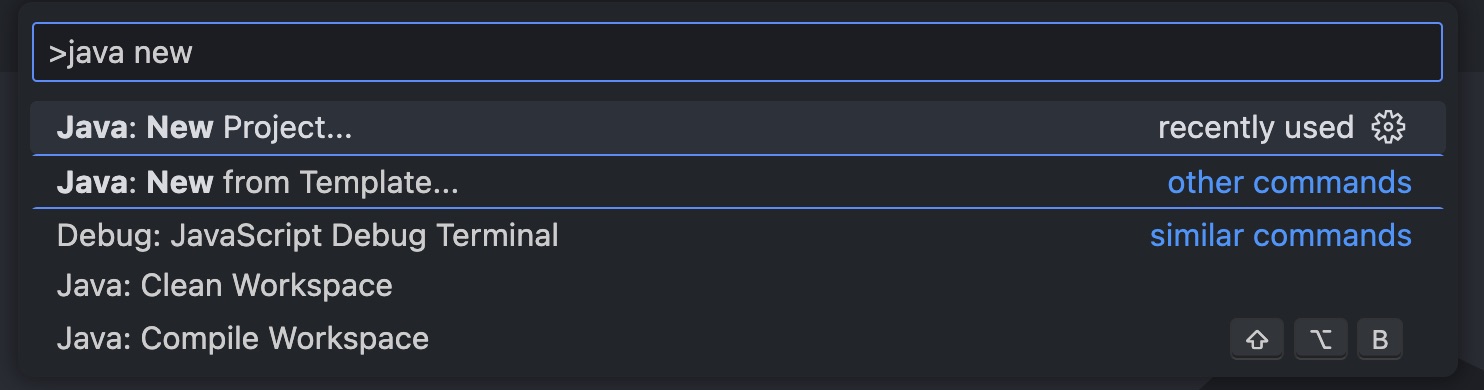
To try it out, we can create a project by opening the Command Pallete in VSCode and search by Java new:
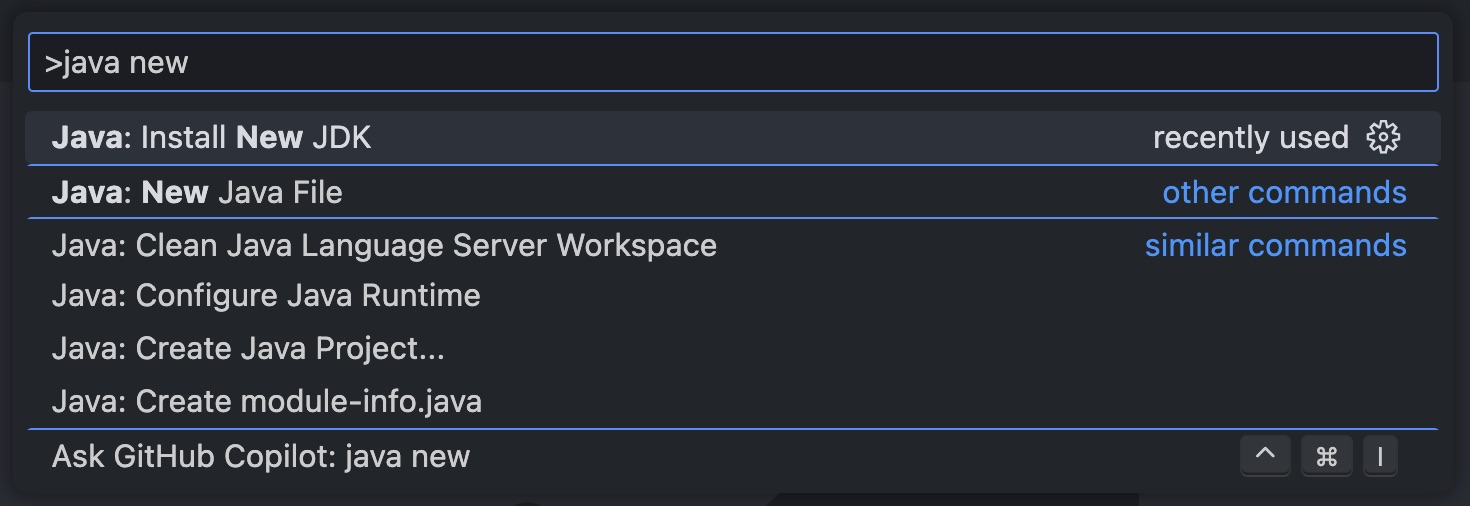
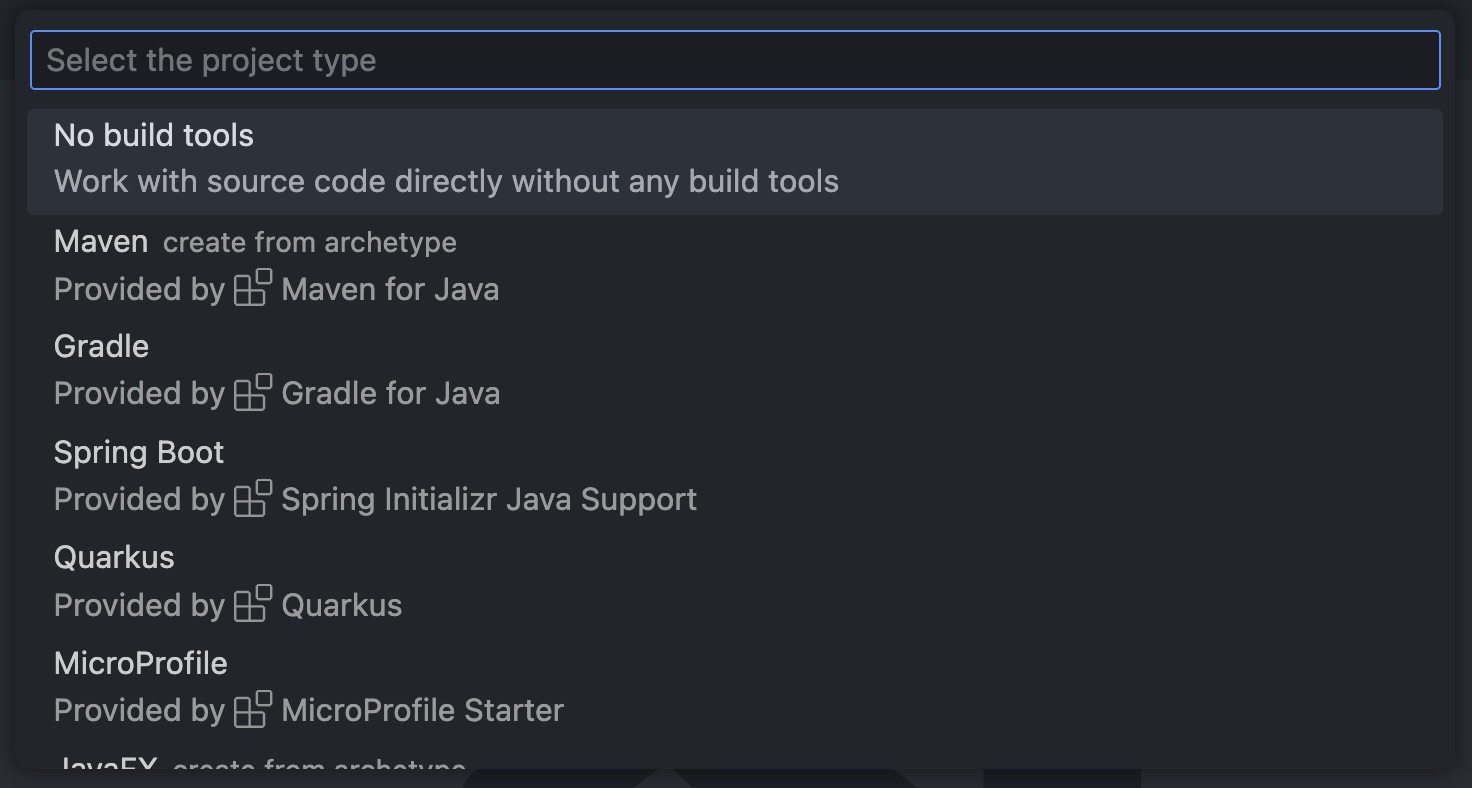
Select the option Java: Create New Project. You will be prompted on the type of project you want to create, let’s select No build tools, which is going to create a very similar project that we would also get by creating the project using Eclipse IDE:
Next, you will need to select where you would like the project to be created, so you can select a folder on your computer. This is similar to the workspace concept we have in Eclipse IDE. Then, provide the project name:

VSCode will create a folder with the given name and will open the project. You can open the App.java file.
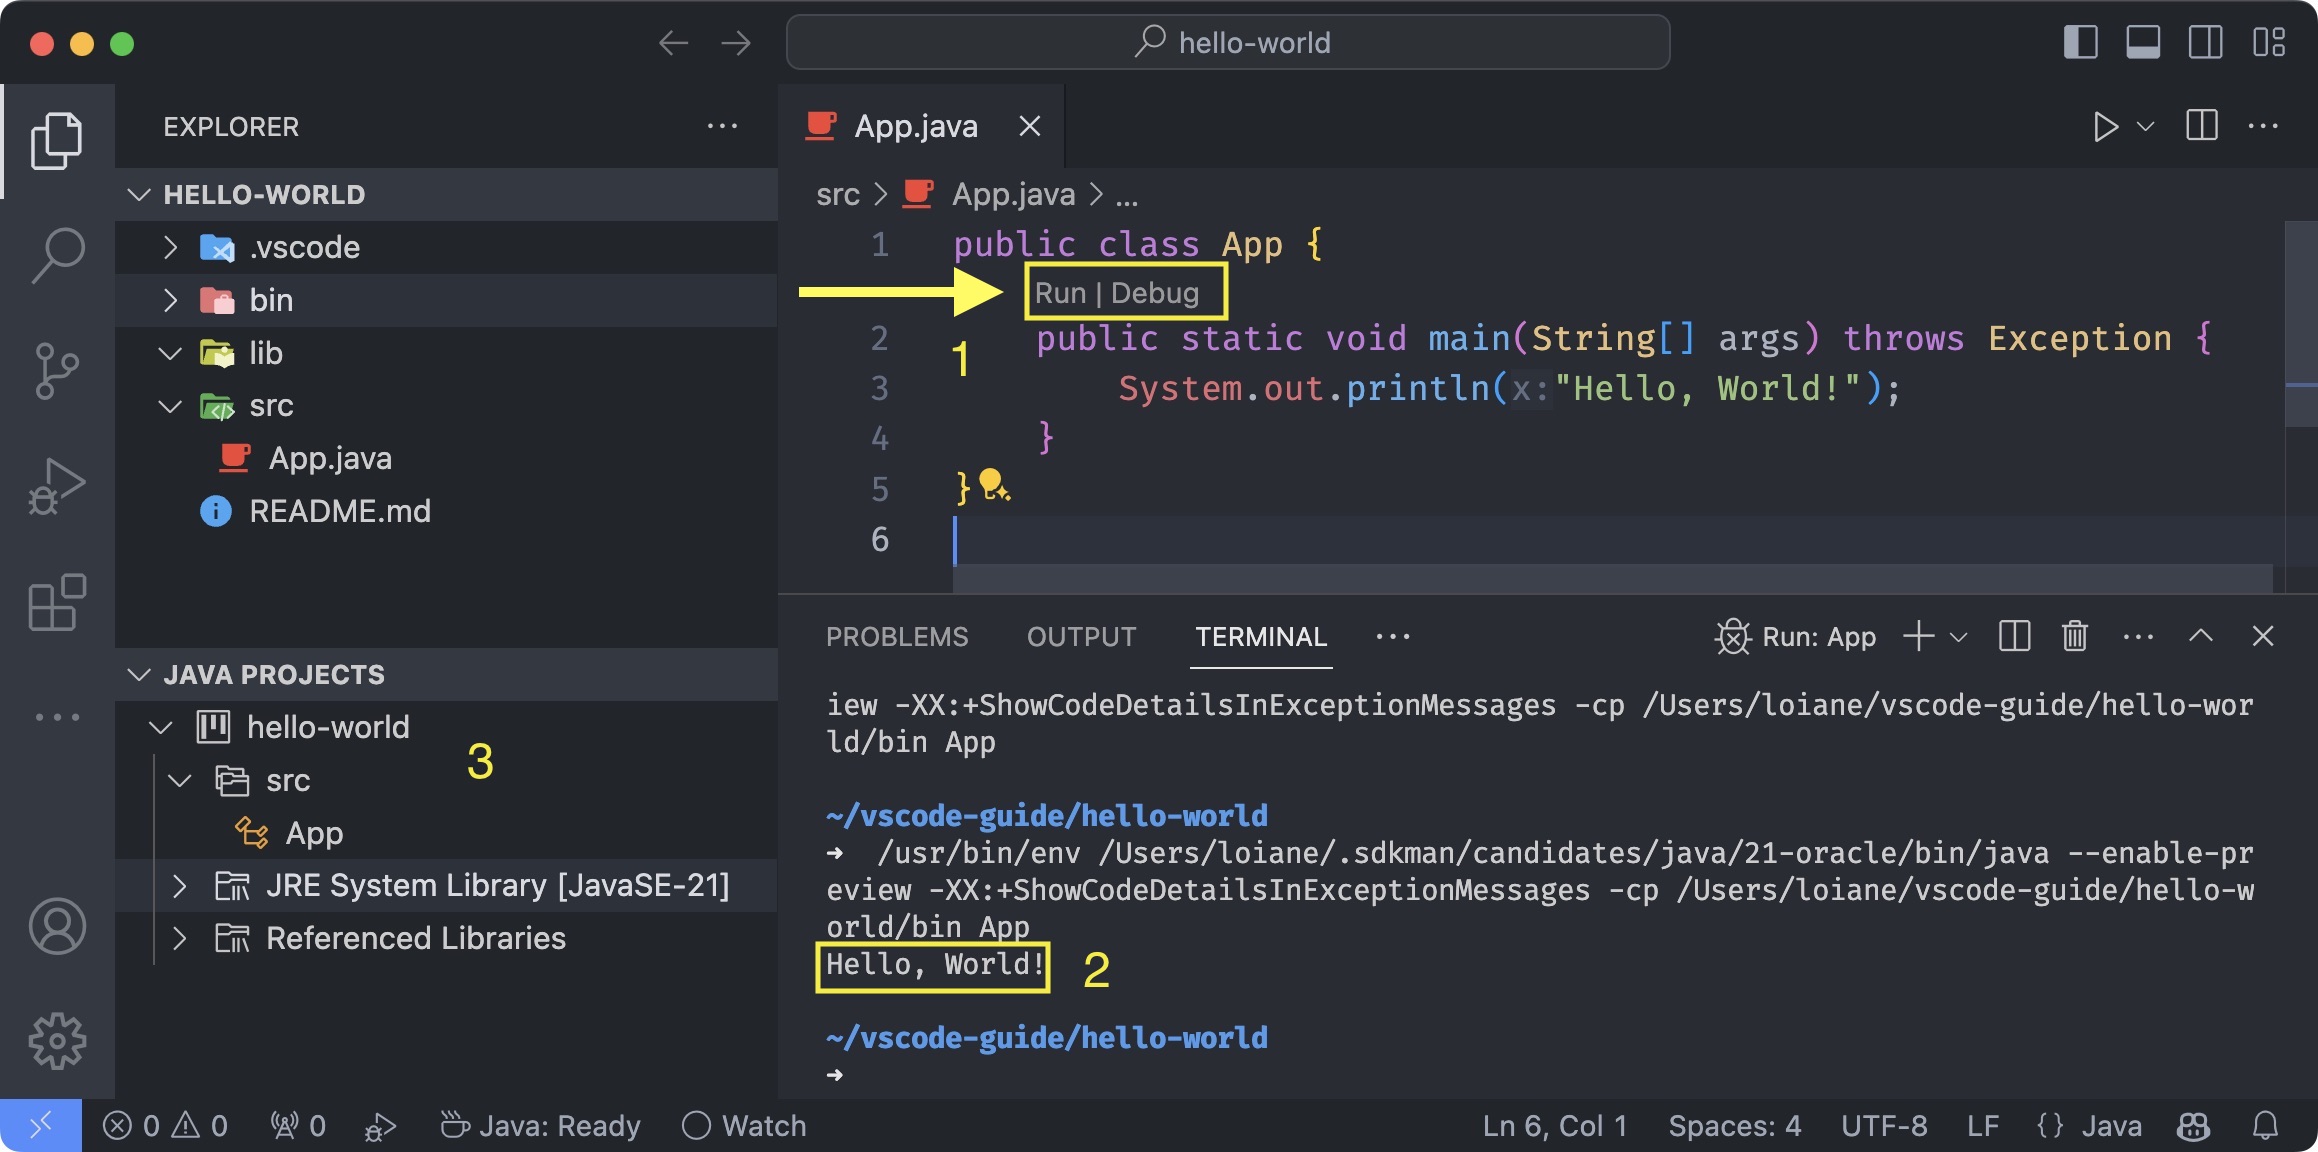
Note a few things:
- 1: When you open a class with a
public static void mainmethod, you will get a Run and Debug option so you can run your file. - 2: The output of the program will be shown in the Terminal. You can see that behind the scenes, VSCode is compiling and running the
Appclass, followed by the output of the program (Hello, World!). - 3: You can manage the project from the default VSCode explorer sidebar or the Java Projects section provided by the Project Manager for Java extension.
With this extension, you get very similar features as Eclipse IDE.
The only drawback that I’ve observed is sometimes it takes a few weeks after a Java release to add the new Java features. But if you’re not in a hurry to use the latest Java features, this won’t be an issue.
Setting up the JKD version
By default, the extension will use the Java version set in your JAVA_HOME environment variable. If for any reason you need to modify the JDK version for a particular project, you can configure a list of available JDKs so they can easily updated in your projects.
To do so, open the VSCode Settings, and search by jdk:
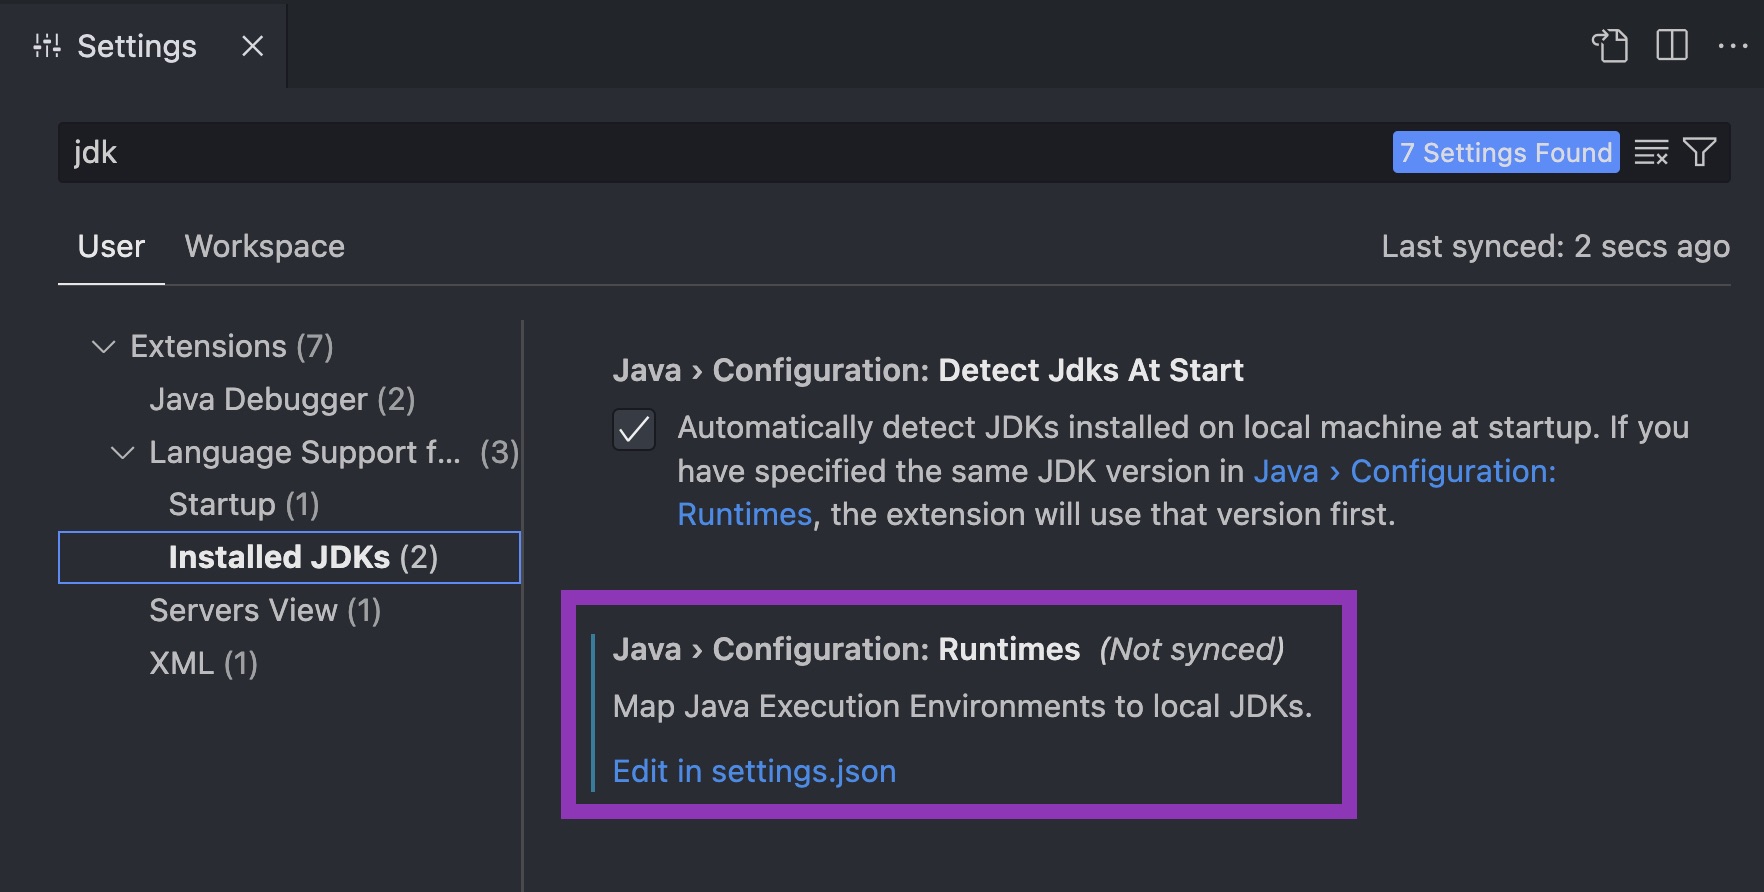
You will need to add the configuration directly to the settings.json. Below is what I have, and I have set Java 21 as the default version. You can set as many as you need.
1
2
3
4
5
6
7
8
9
10
11
"java.configuration.runtimes": [
  {
    "name": "JavaSE-17",
    "path": "/Users/loiane/.sdkman/candidates/java/17-open"
  },
  {
    "name": "JavaSE-21",
    "path": "/Users/loiane/.sdkman/candidates/java/21-oracle",
    "default": true
  }
]
To update the JDK for the project, open the Java Overview screen again (via Command Pallete), and select Configure Java Runtime. It will open the projects you have in your current VSCode workspace and a dropdown will be available to select from an existing version you have installed:
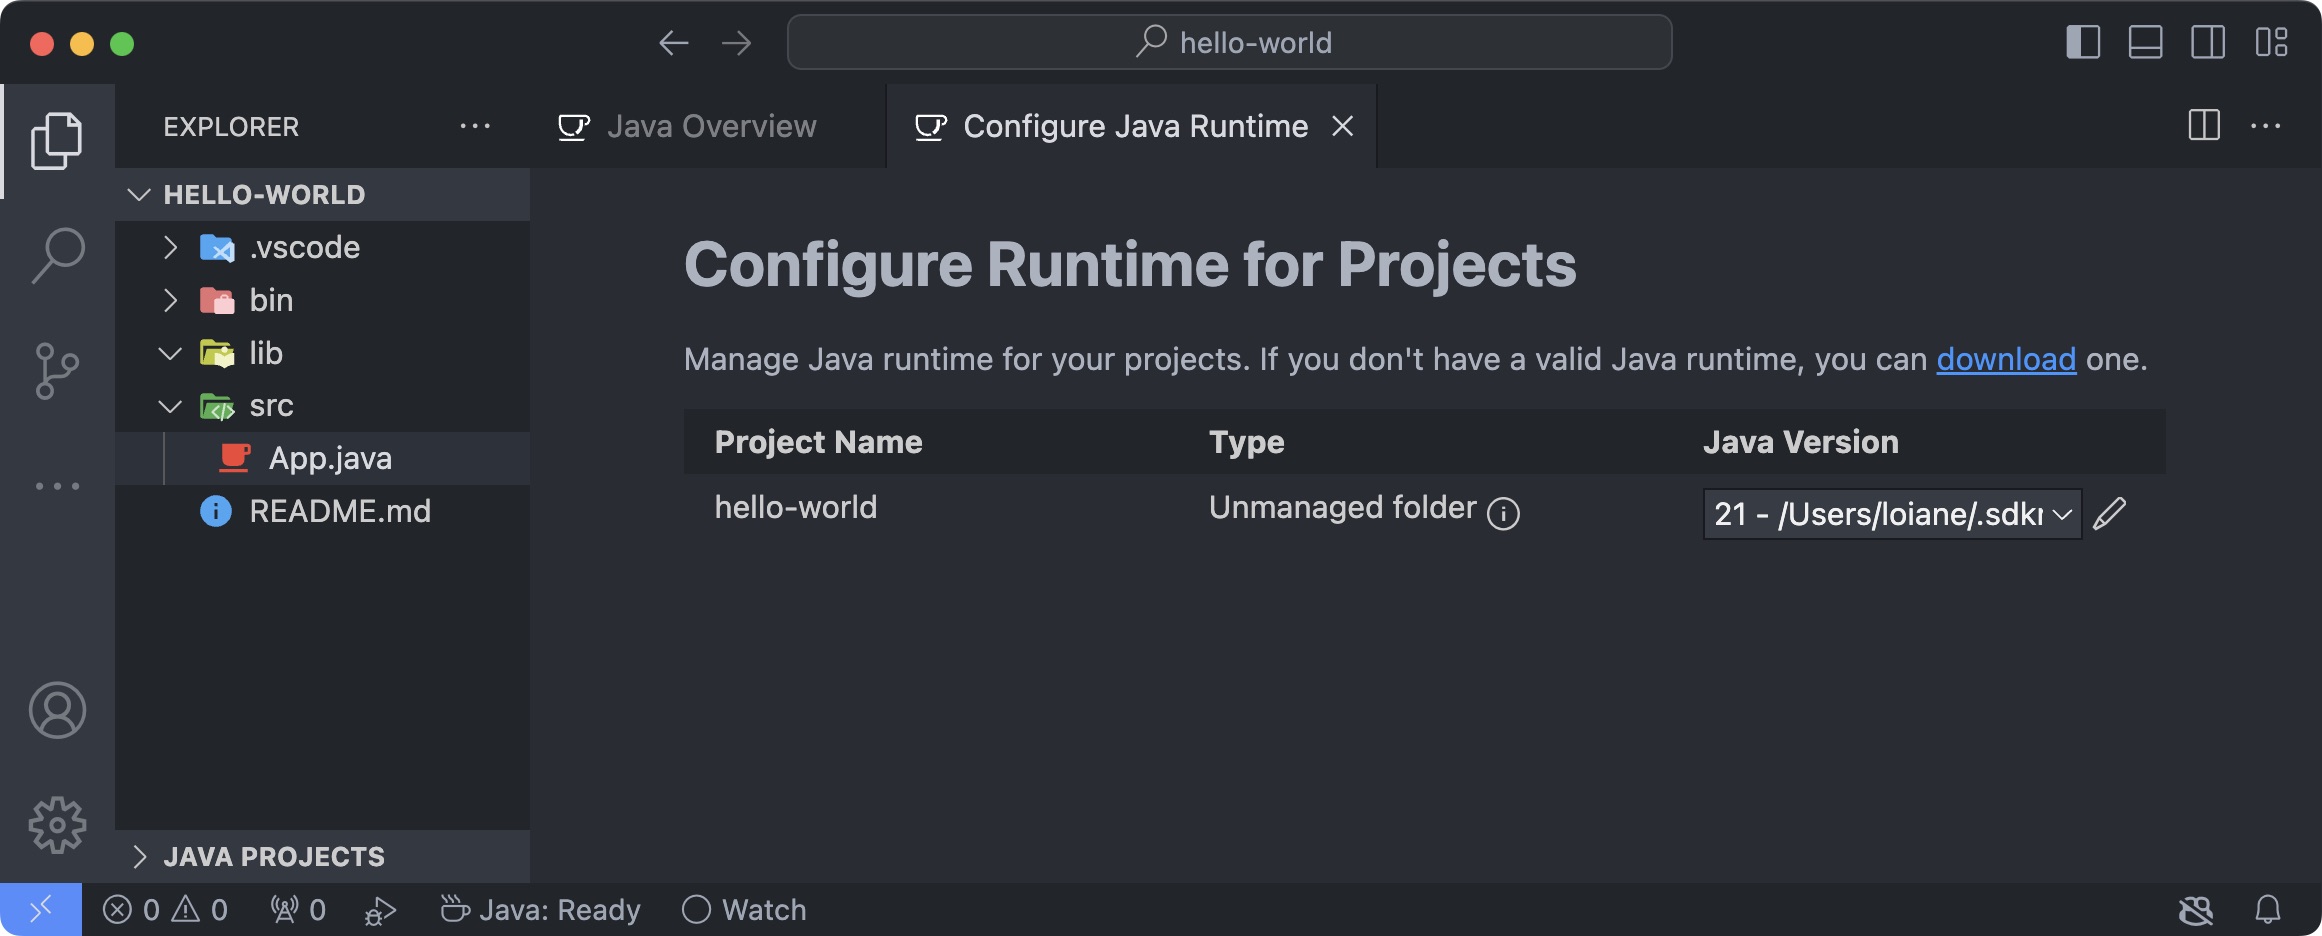
You also have the option to download a JDK directly from VSCode by clicking on the download link.
Debugger for Java
As per the extension description: “A lightweight Java Debugger based on Java Debug Server which extends the Language Support for Java by Red Hat. It allows users to debug Java code using Visual Studio Code (VS Code)”.
This debugger works very similar to other Java IDEs:
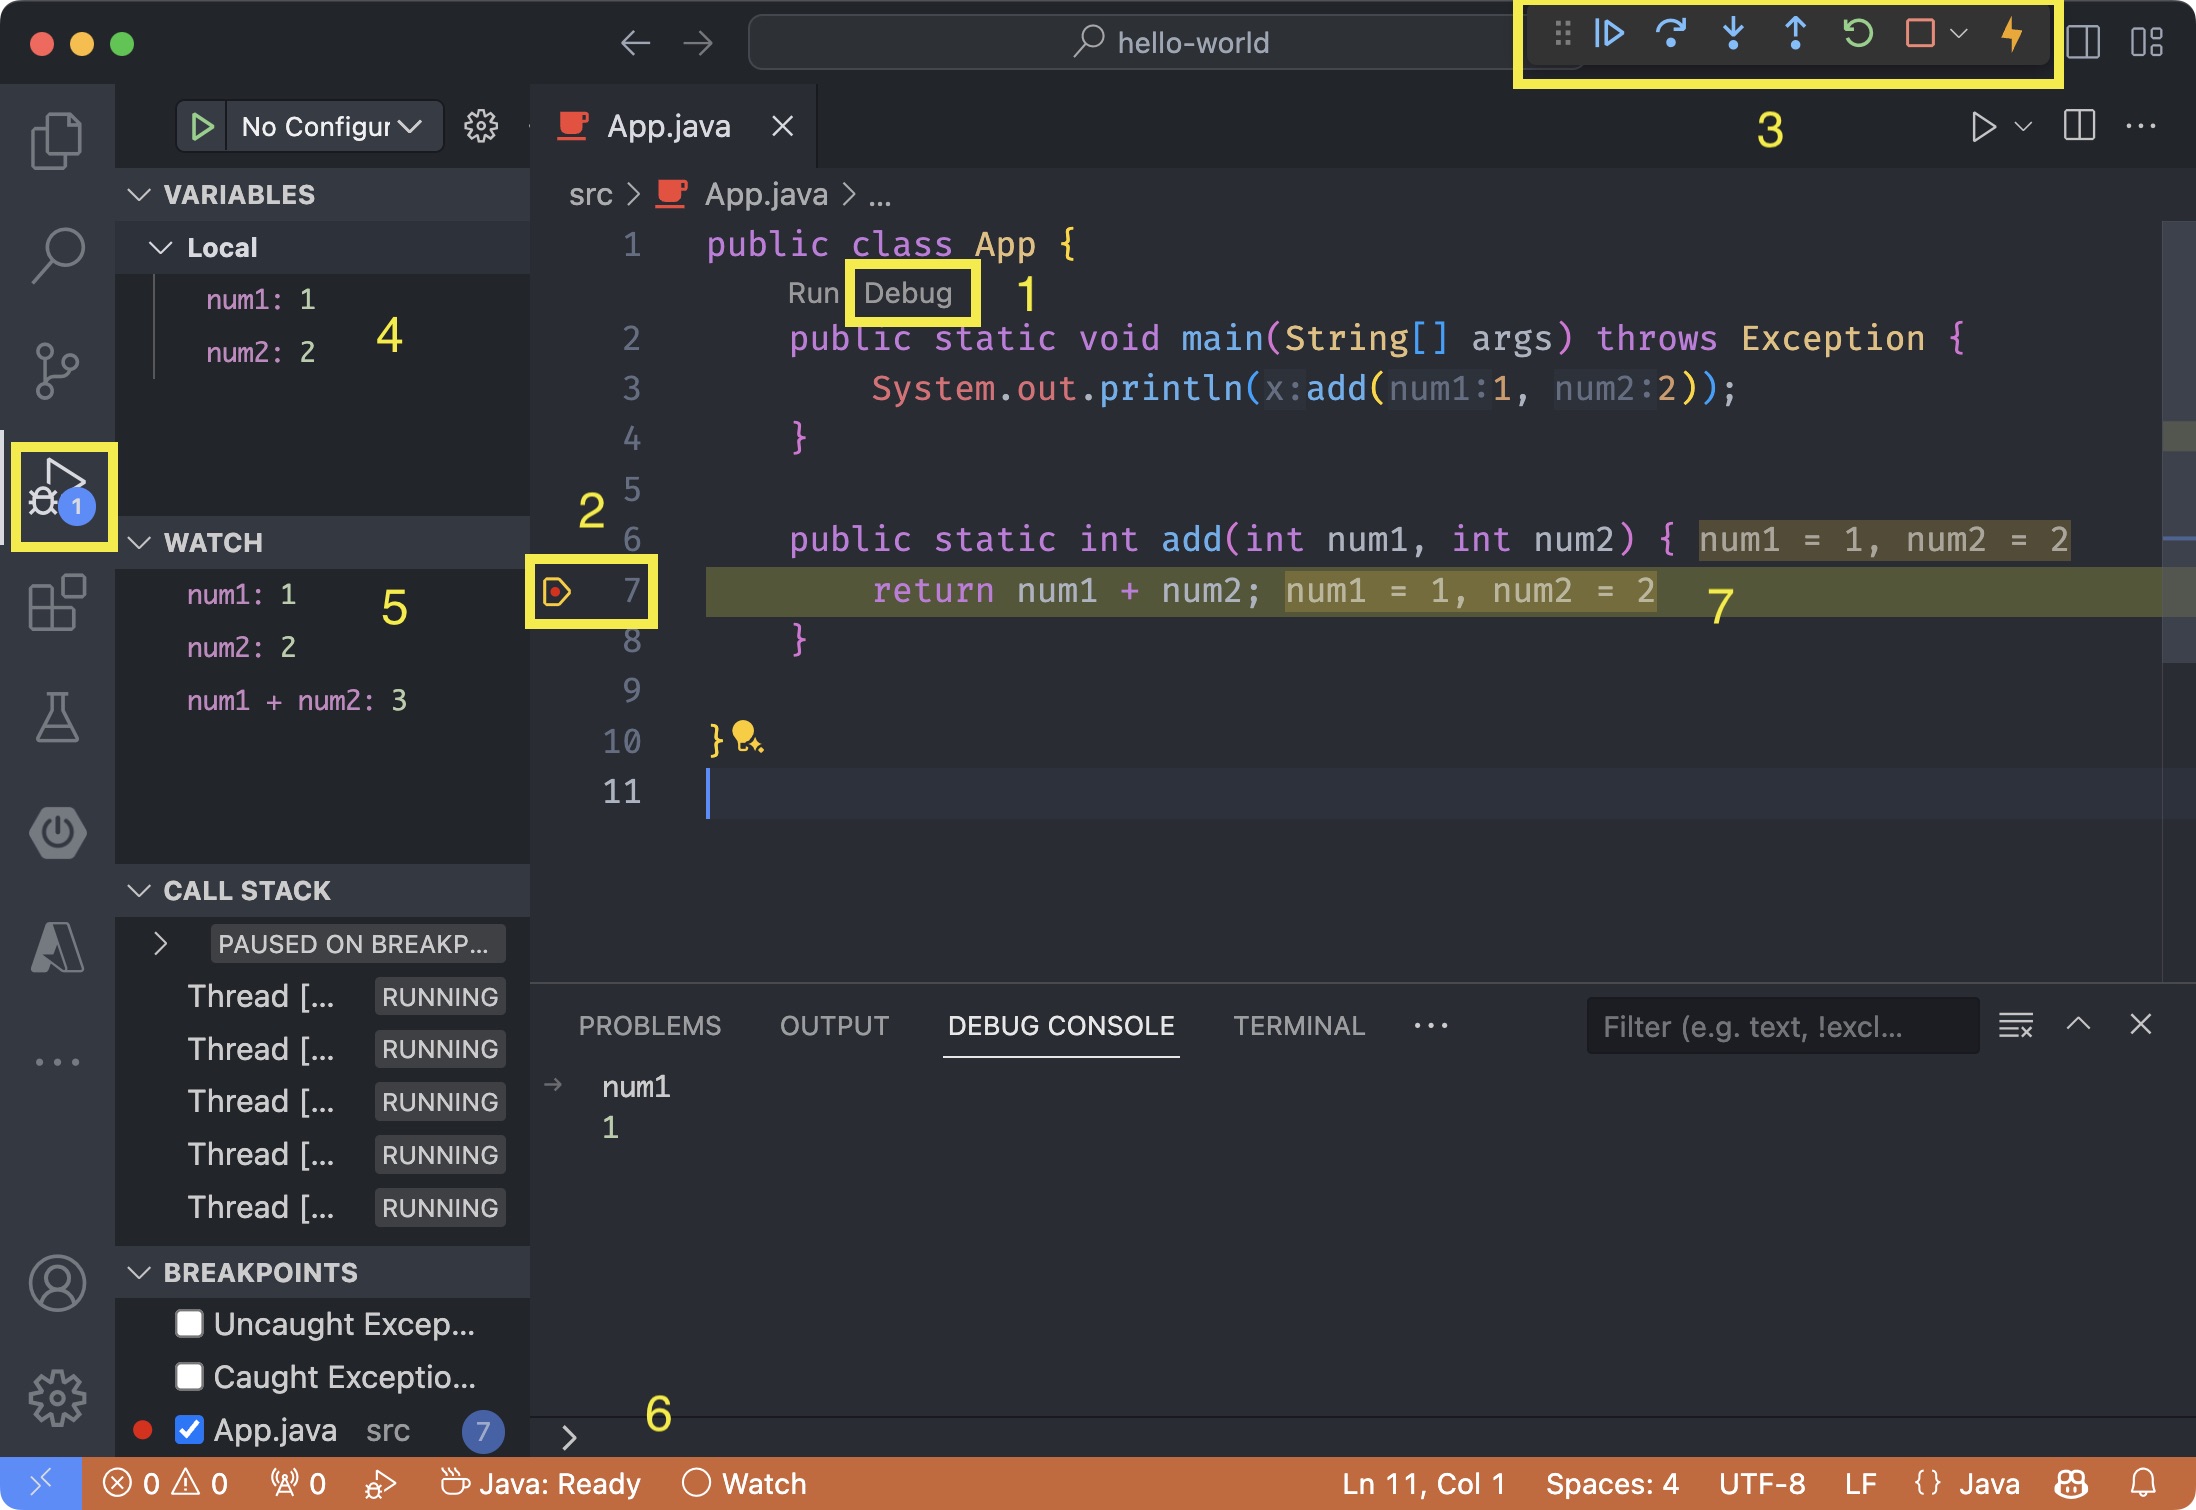
- 1: Run your project in Debug mode to start debugging - make sure to open the “Run de Debug” view from your sidebar;
- 2: Add breakpoints to the lines of code you would like to stop the execution to check for more details;
- 3: You can resume the program, step into, step over, restart, and stop the execution (similar to Eclipse options);
- 4: You can see local variables and global variables;
- 5: You can also add what variables or expressions to watch;
- 6: It’s also possible to type or paste variables or expressions into the Debug Console to check the results of an expression (similar to Watch mode);
- 7: VSCode will also show you the values of the variables and expressions, which is very helpful.
I find the experience very similar to Eclipse IDE, and it covers all the functionalities we need to debug Java applications.
Project Manager for Java
This extension provides additional Java project explorer features.

I find it very useful to create new packages and classes (and other Java file types) and manage dependencies for simple projects.
All three extensions we overviewed so far work well together with the Language Support for Java by Red Hat extension. We’ll review the other extensions later in this guide with more complex examples.
Java Platform Support extension by Oracle
The Java Platform Support extension was released by Oracle in 2023, and it’s an alternative to the extension by Red Hat. This extension creates projects based on Netbeans.
The biggest advantage of this extension is you get Java language support, debugger support, and project explorer support, meaning it’s a three-in-one extension if we were to compare it with the Red Hat extensions.
Let’s create a new project. Access the Command Pallette, search by java new and select Java: New Project:
Select Maven or Gradle, according to your preference:

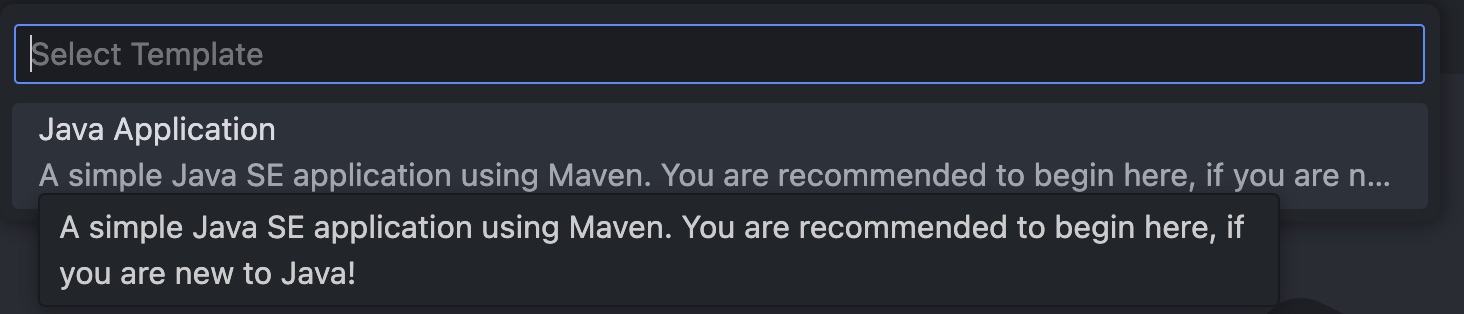
Select Java Application:
Enter the full path where your application will be created, including the name of the project:

Enter the name of the default package:

And this will be the result:
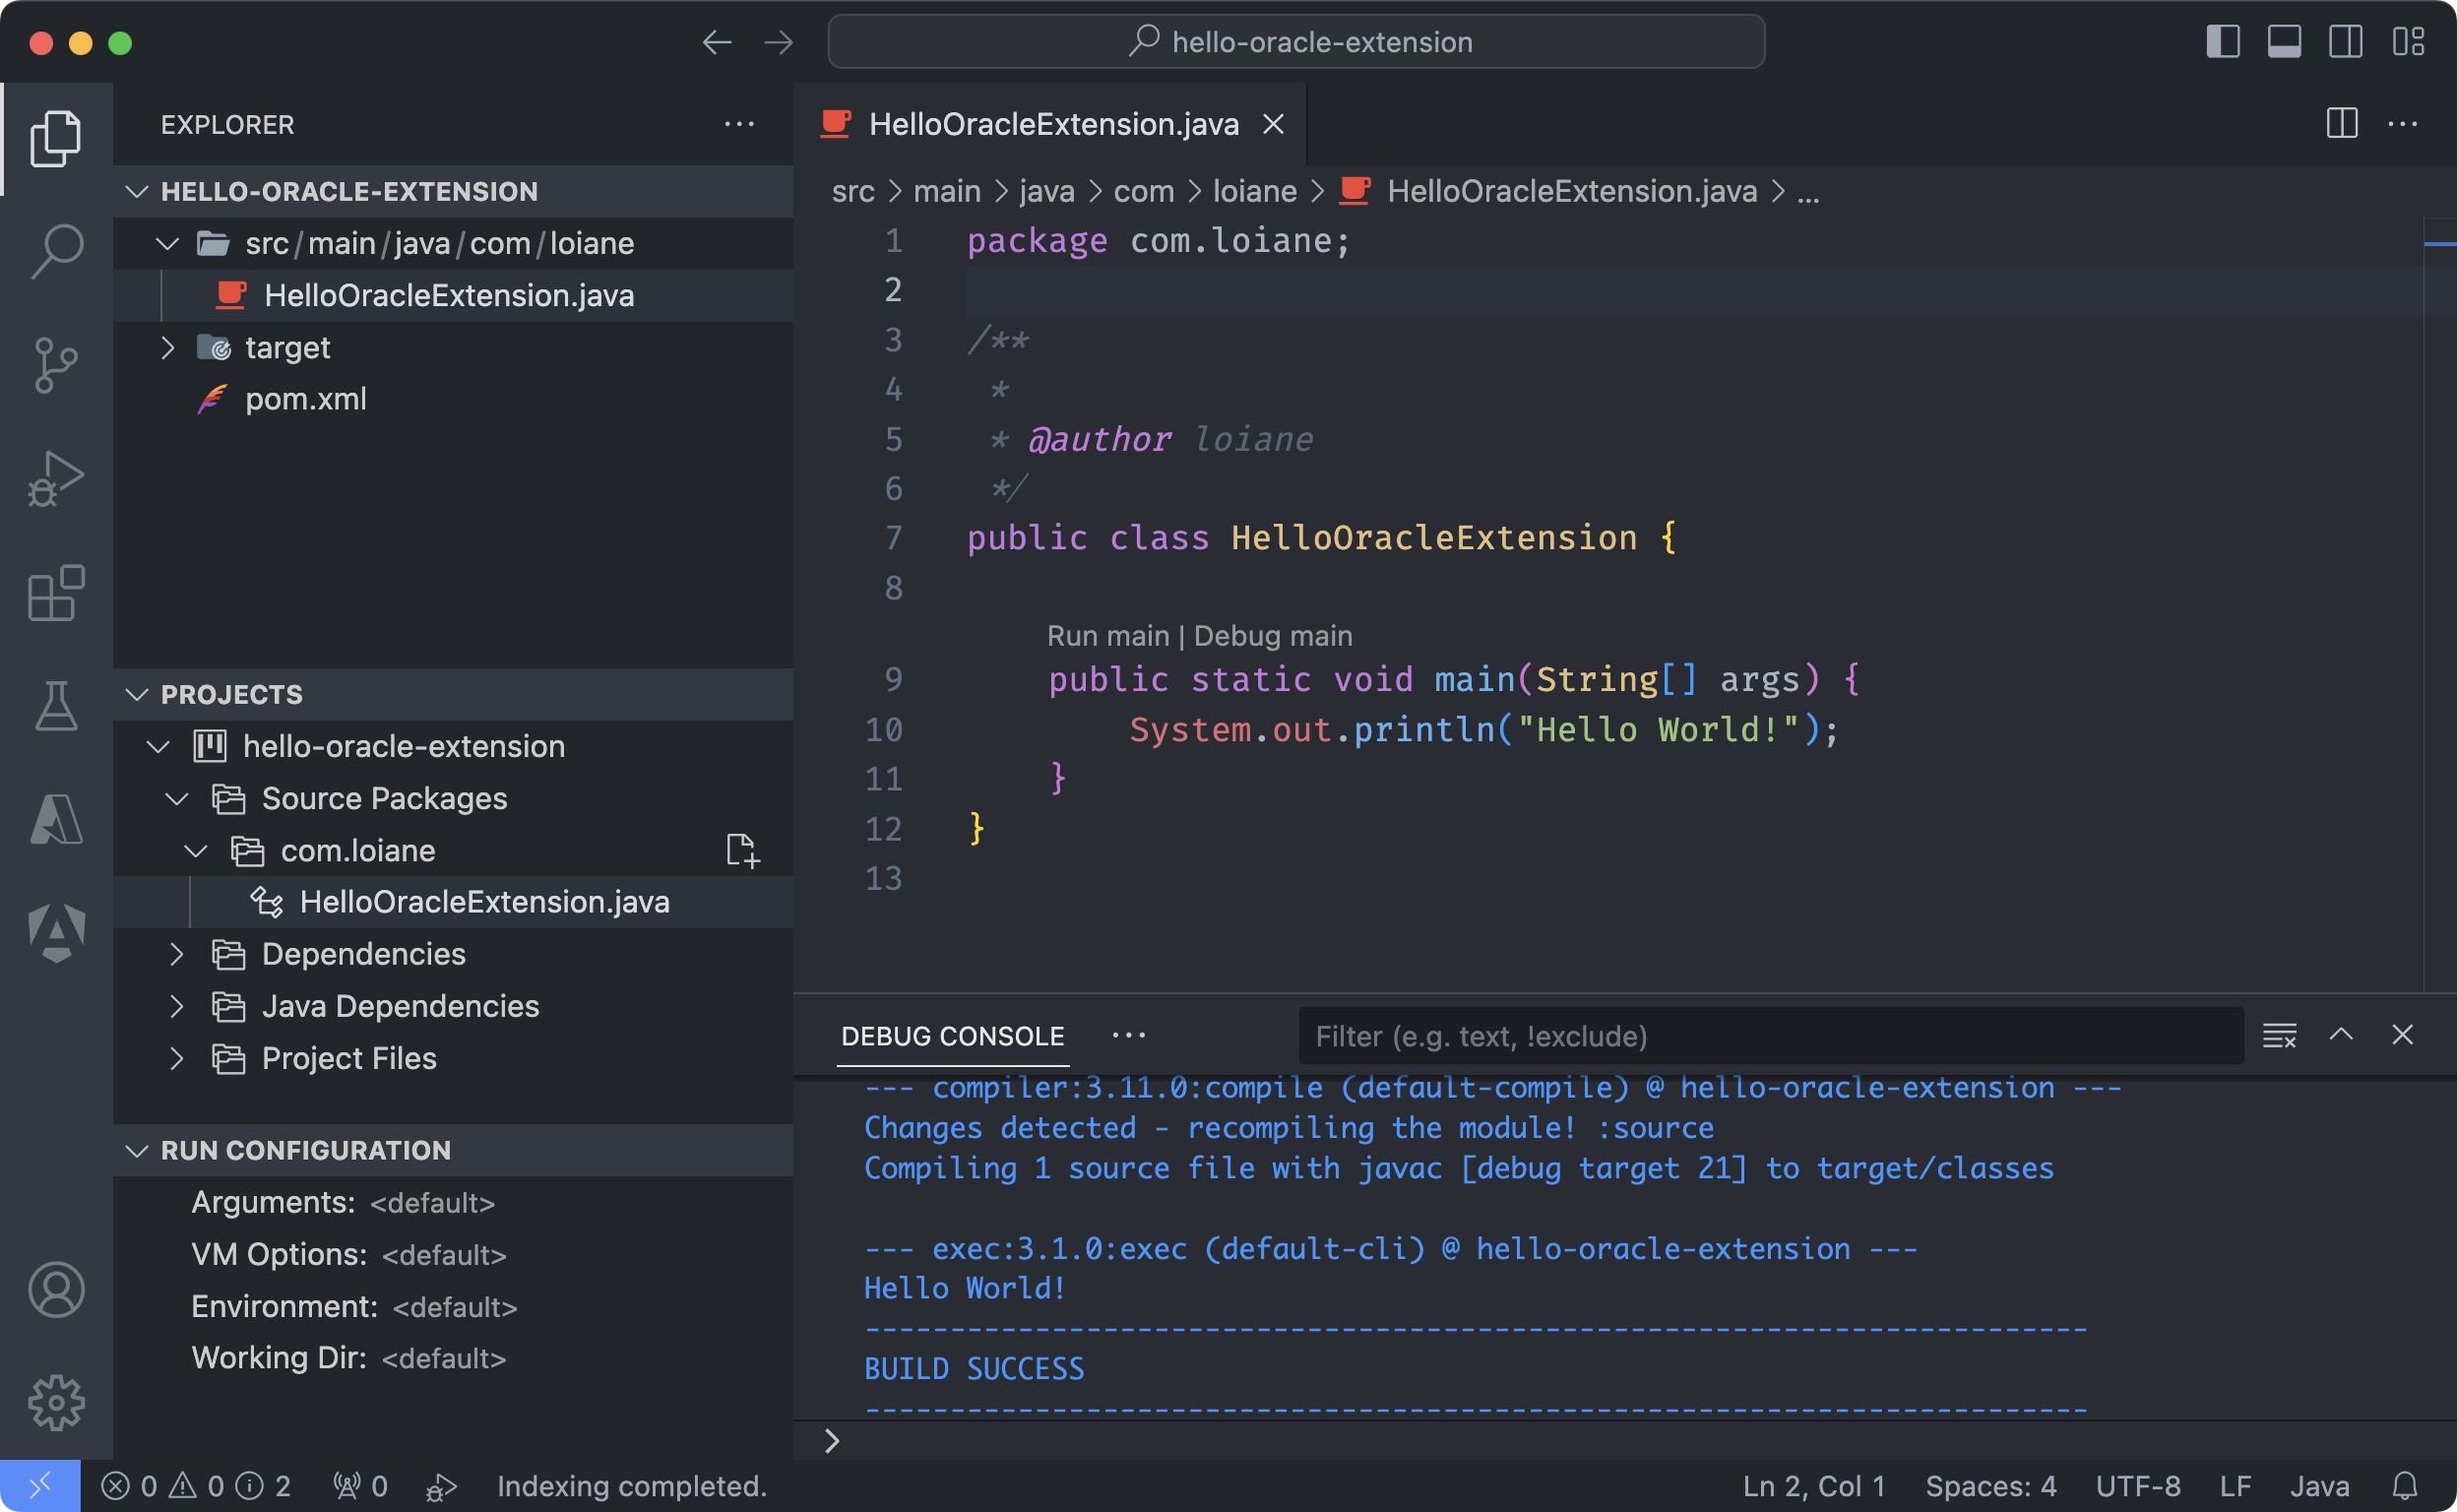
| We get the same “Run | Debug” links, but instead, it’s called “Run main | Debug main”. |
When we run the project, instead of getting the output in the Terminal, we get it in the Debug Terminal.
We also get a project explorer. However, we get a Run Configuration view as well, where we can pass environment variables and set other parameters.
The debugger experience is also very similar and it has all the functionalities we might need.
Oracle published this deep dive overview highlighting all the features included: https://youtu.be/3NSdlU22C0Q.
At the end of the day, it’s a matter of personal preference.
Working with Spring Framework
VSCode also supports Spring Boot projects by installing the Spring Boot Extension Pack.
Once the extension pack is installed, we can create a new project. We get the exact same support as https://start.spring.io/ - with the exception of the Explore option only available on the web version.
Personally, from all IDEs that are free, this is my favorite support for Spring projects.
To get started, once again, open the Command Pallete and search by spring. You can select between Maven or Gradle projects:

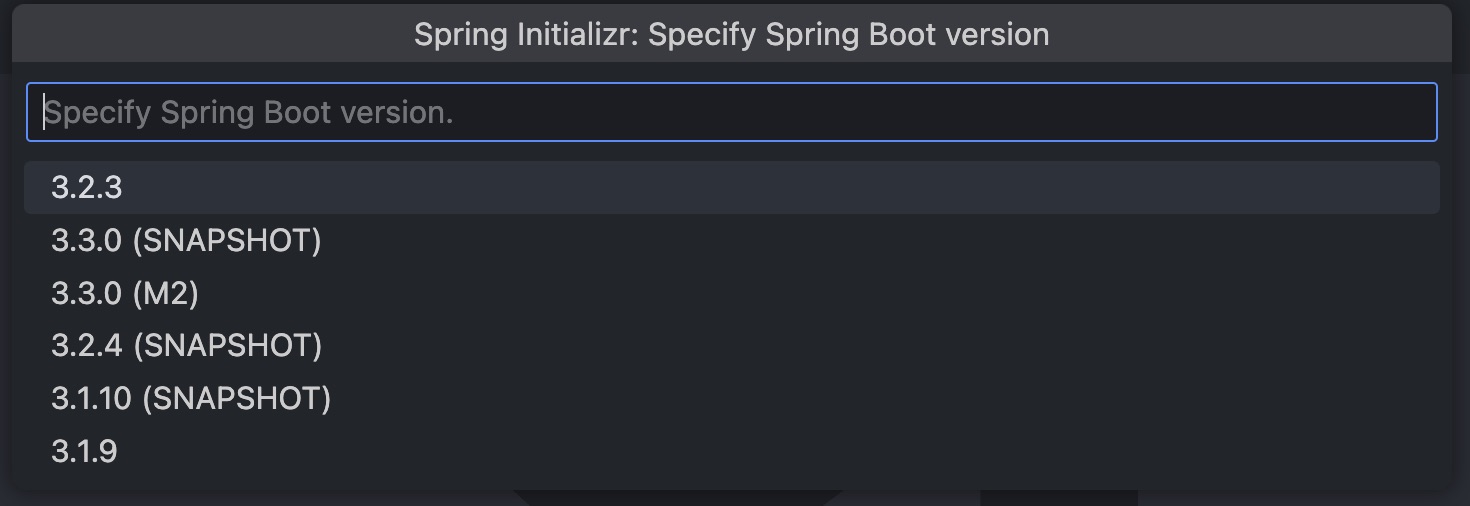
Select the desired Spring Boot version:
Enter the package name (we can set a default value):

Enter the name of the project (we can set a default value):

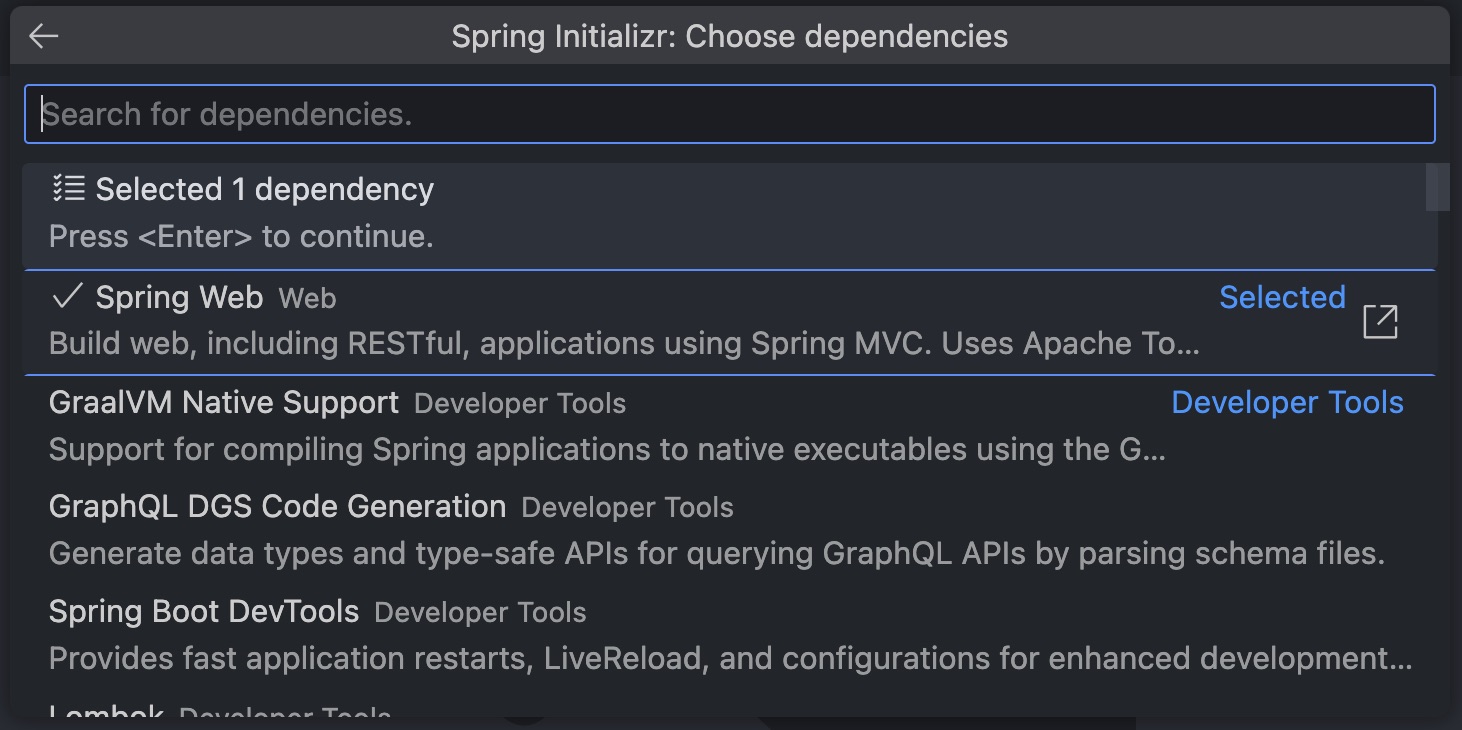
And select all dependencies needed. Don’t worry if you miss any dependency. We can modify this at any time:
Spring Dashboard
To run or debug a Spring project, we have a few different options:
- 1: Use the Spring Dashboard and click on the Play icon to start the project.
- 2: Open the main class and click on Run or Debug.
- 3: Click on the Play icon we get by opening the project in VSCode.
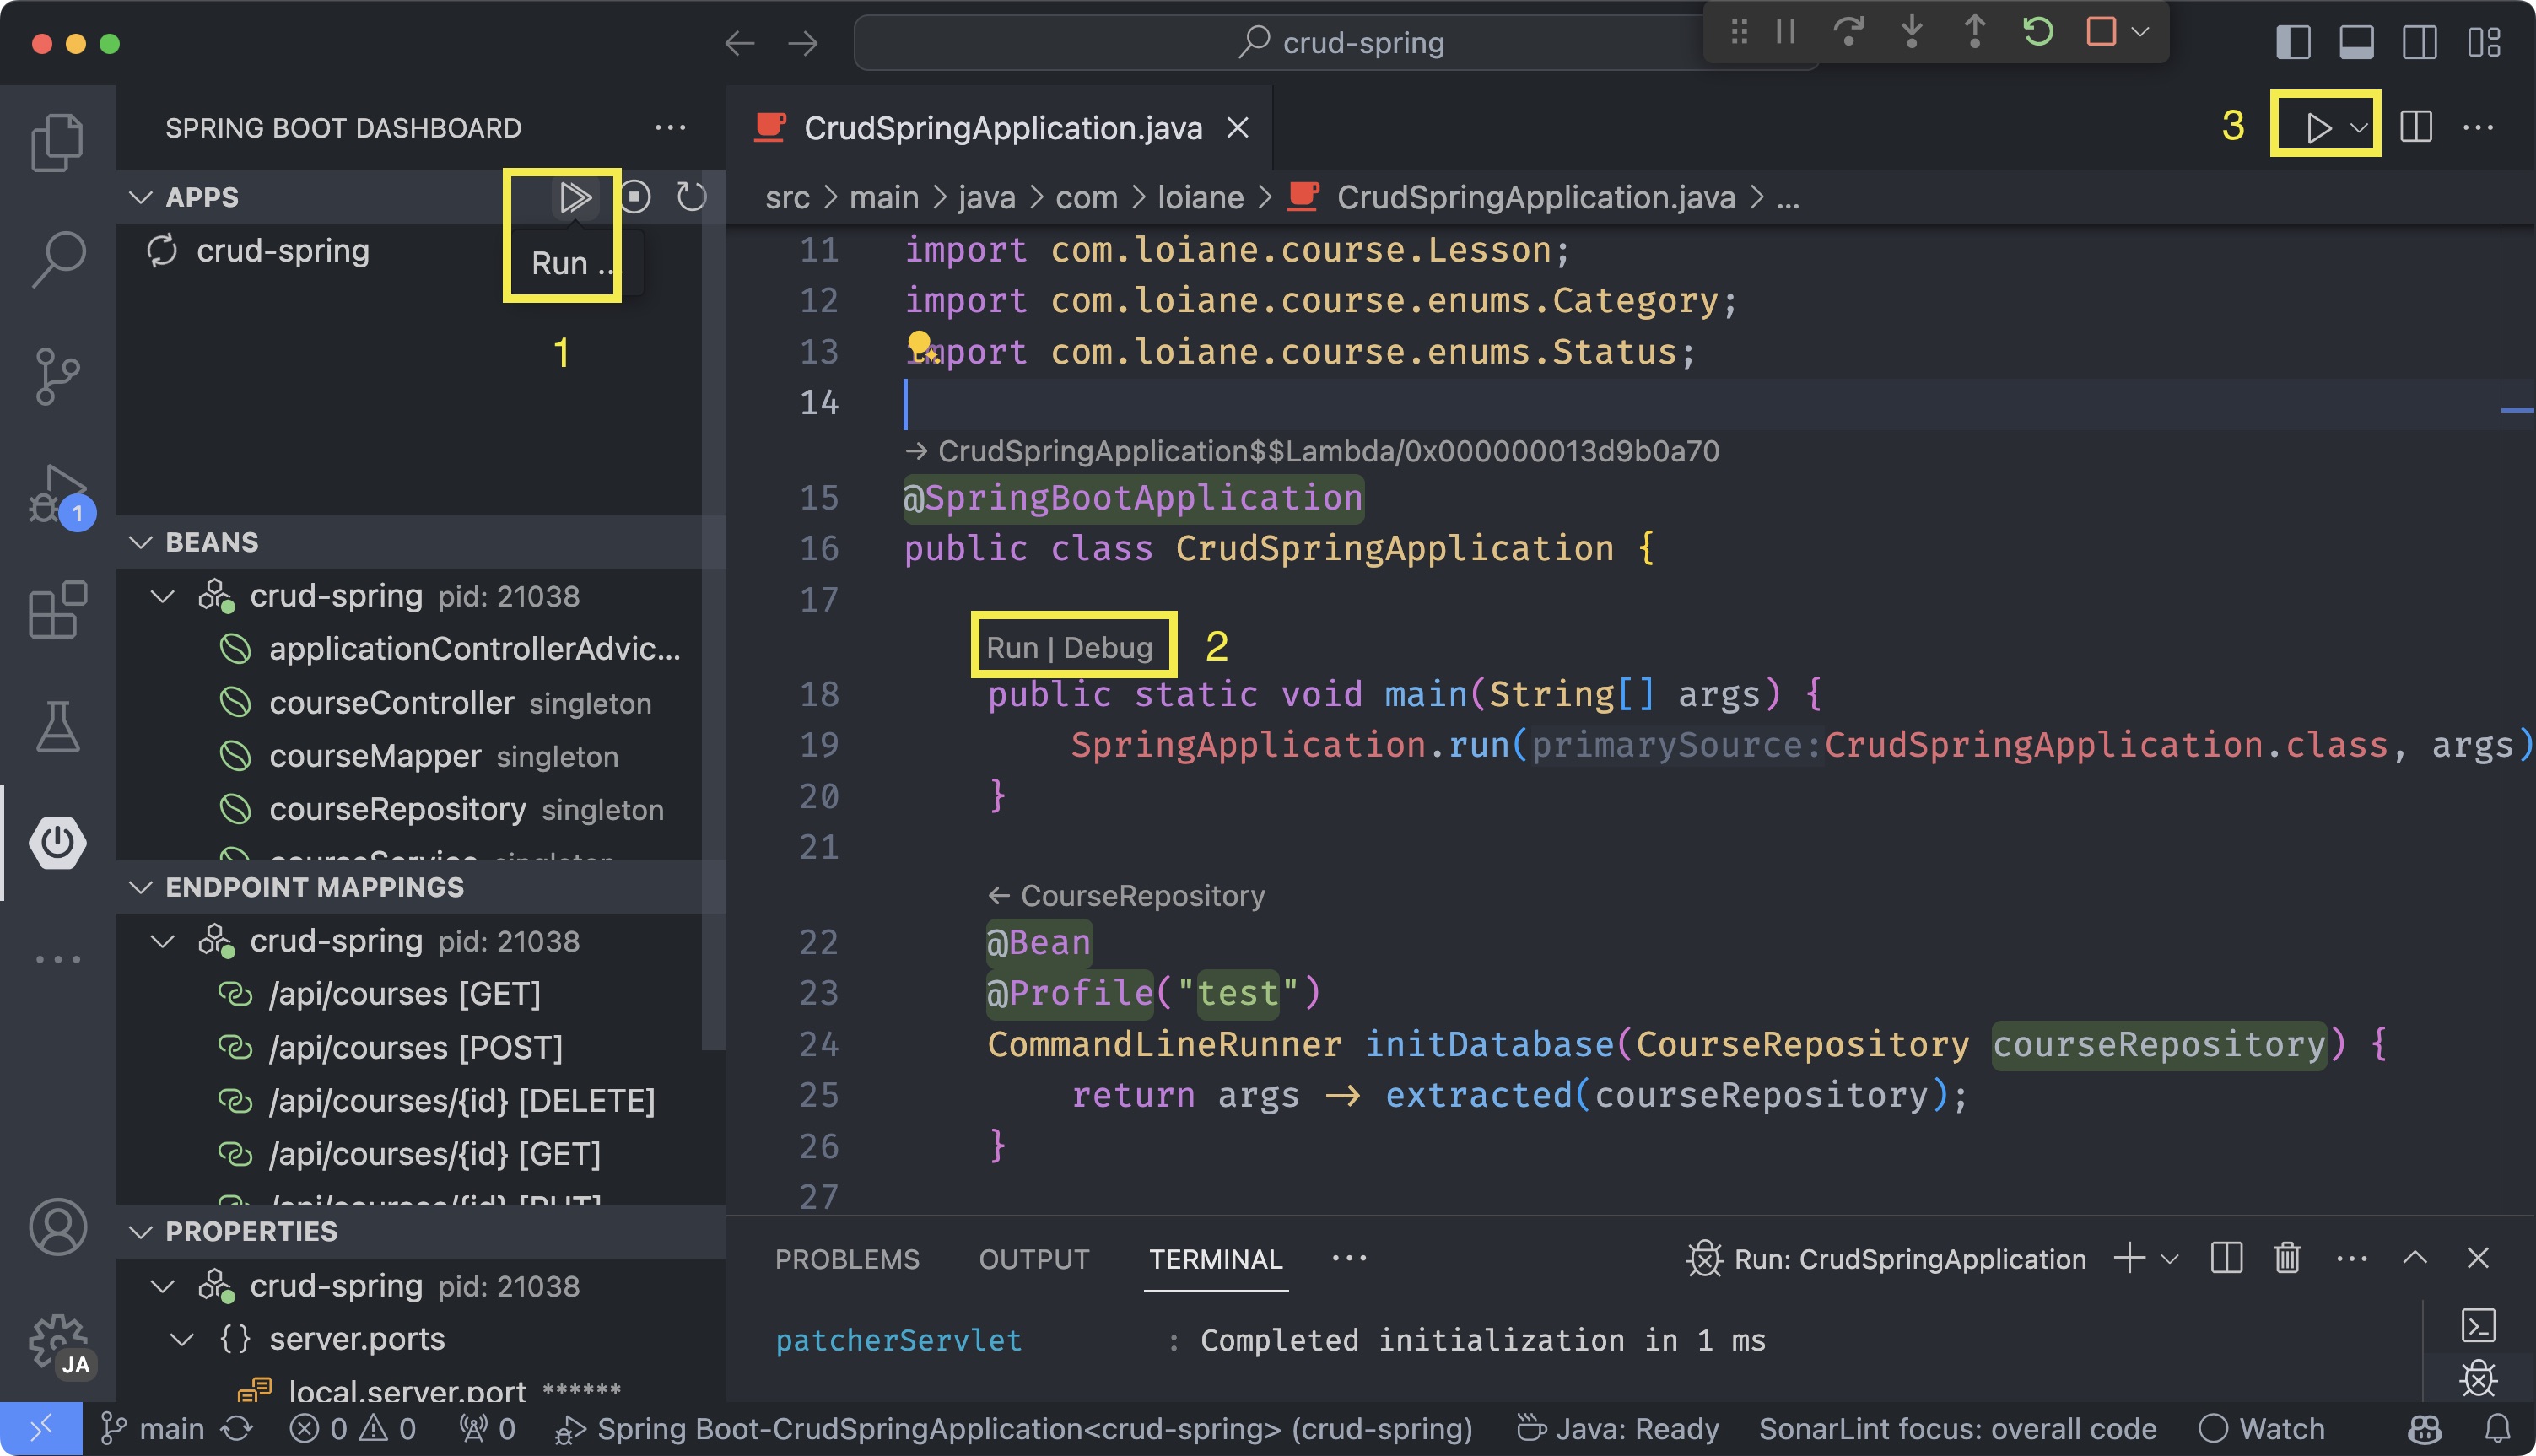
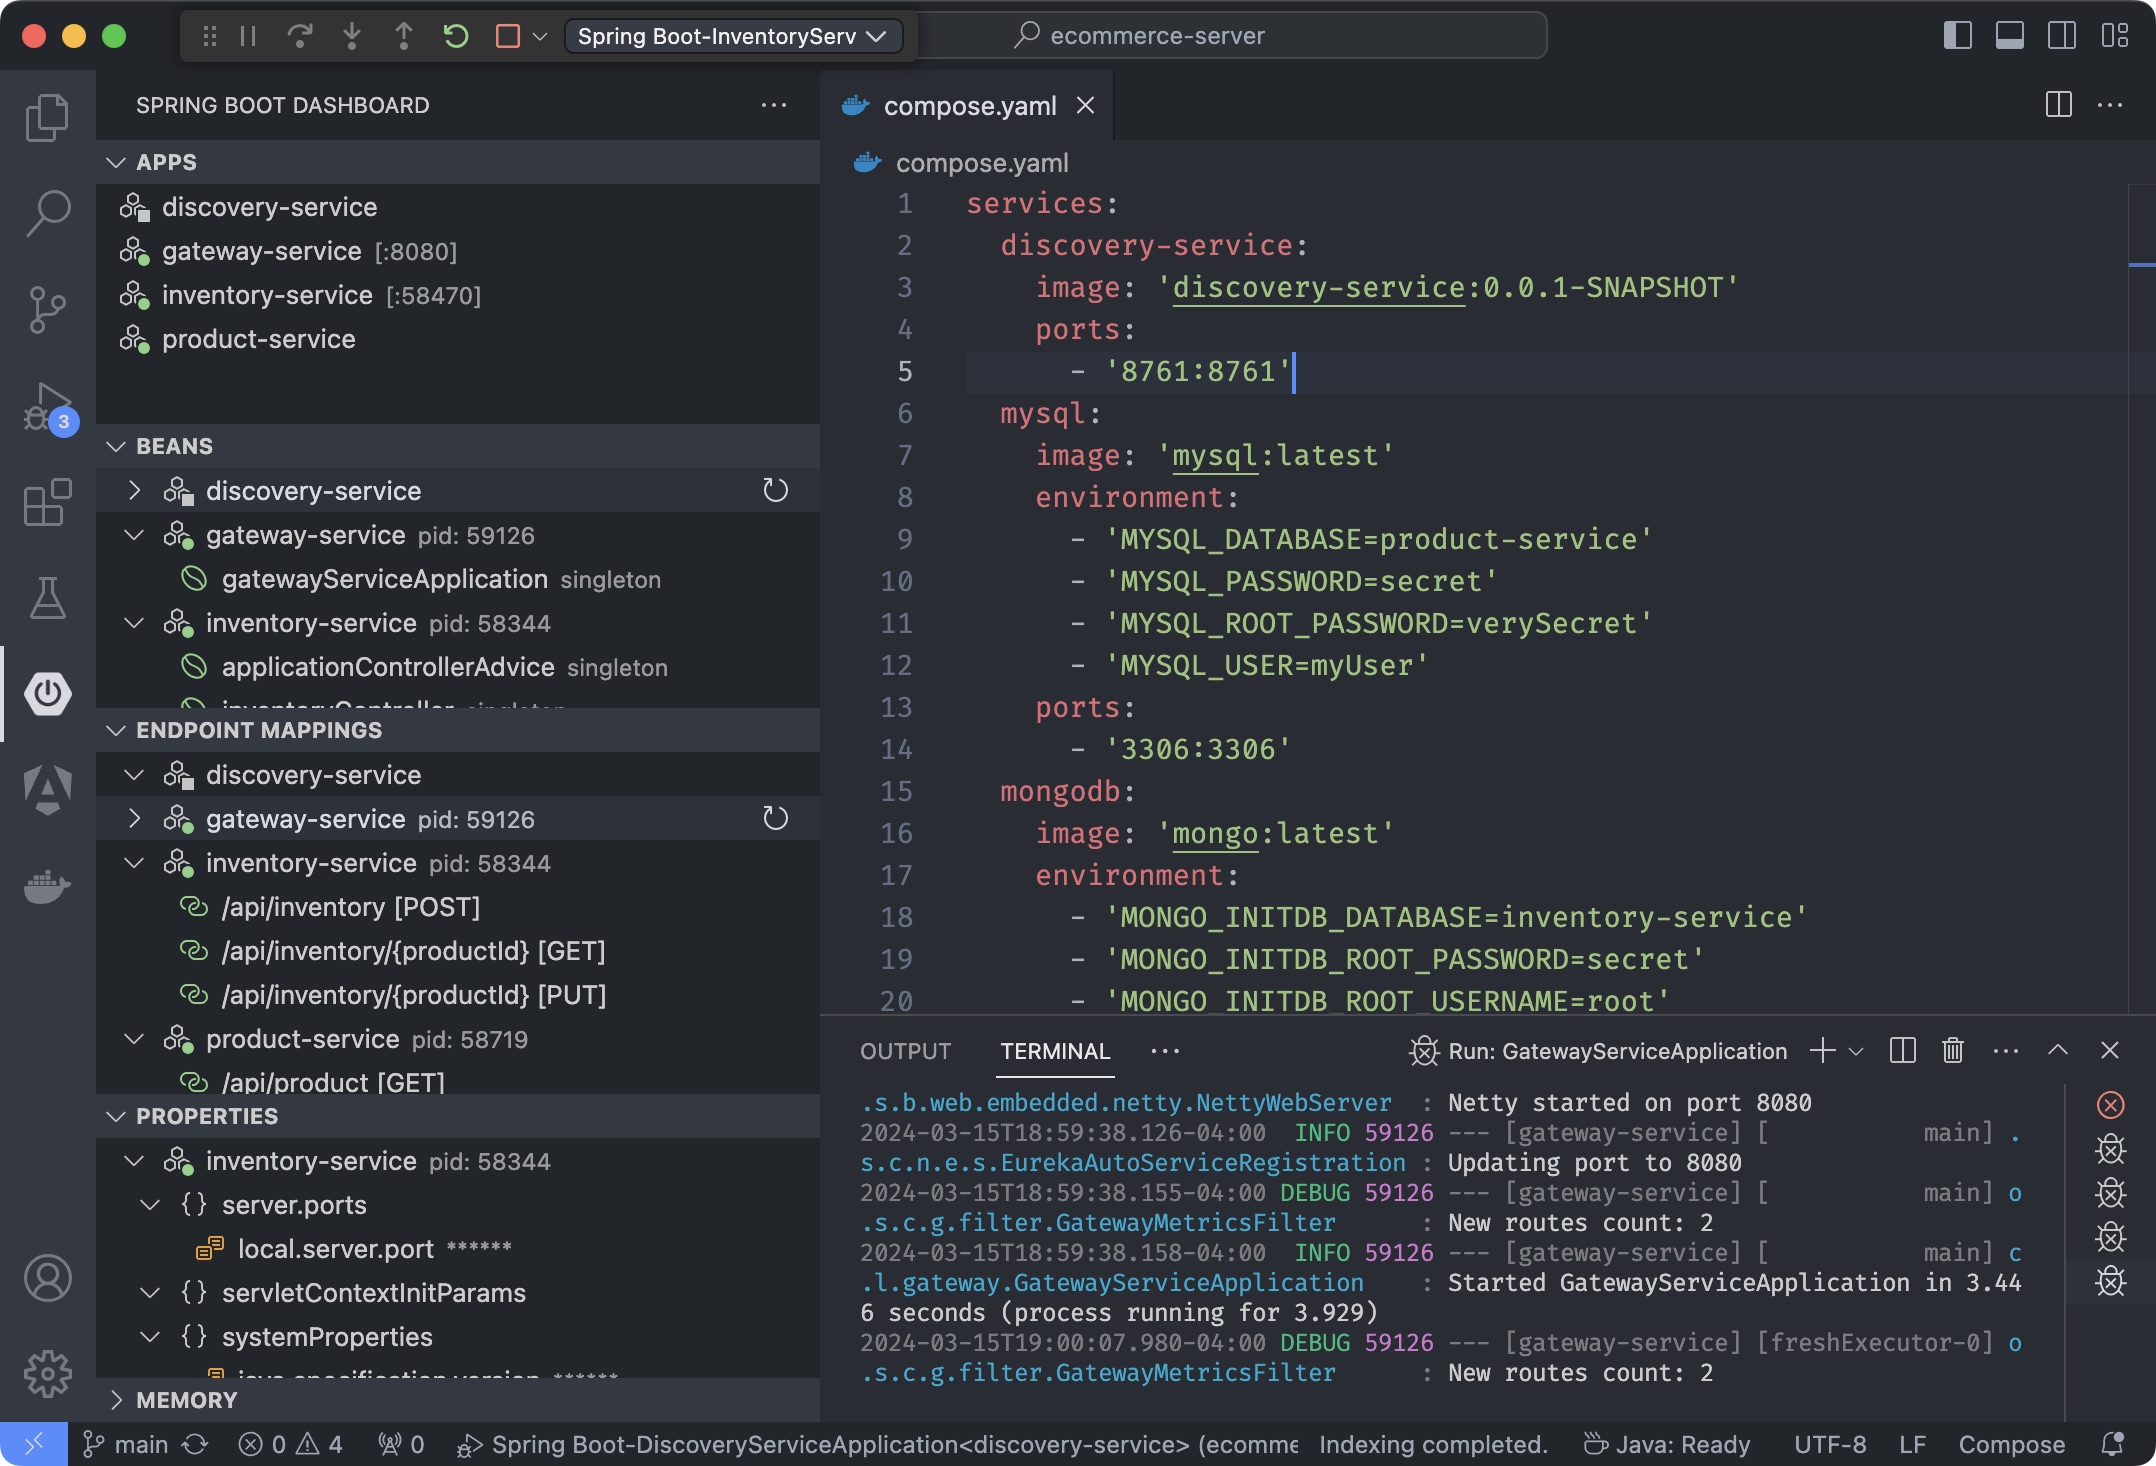
The dashboard is very helpful and provides meaningful information:
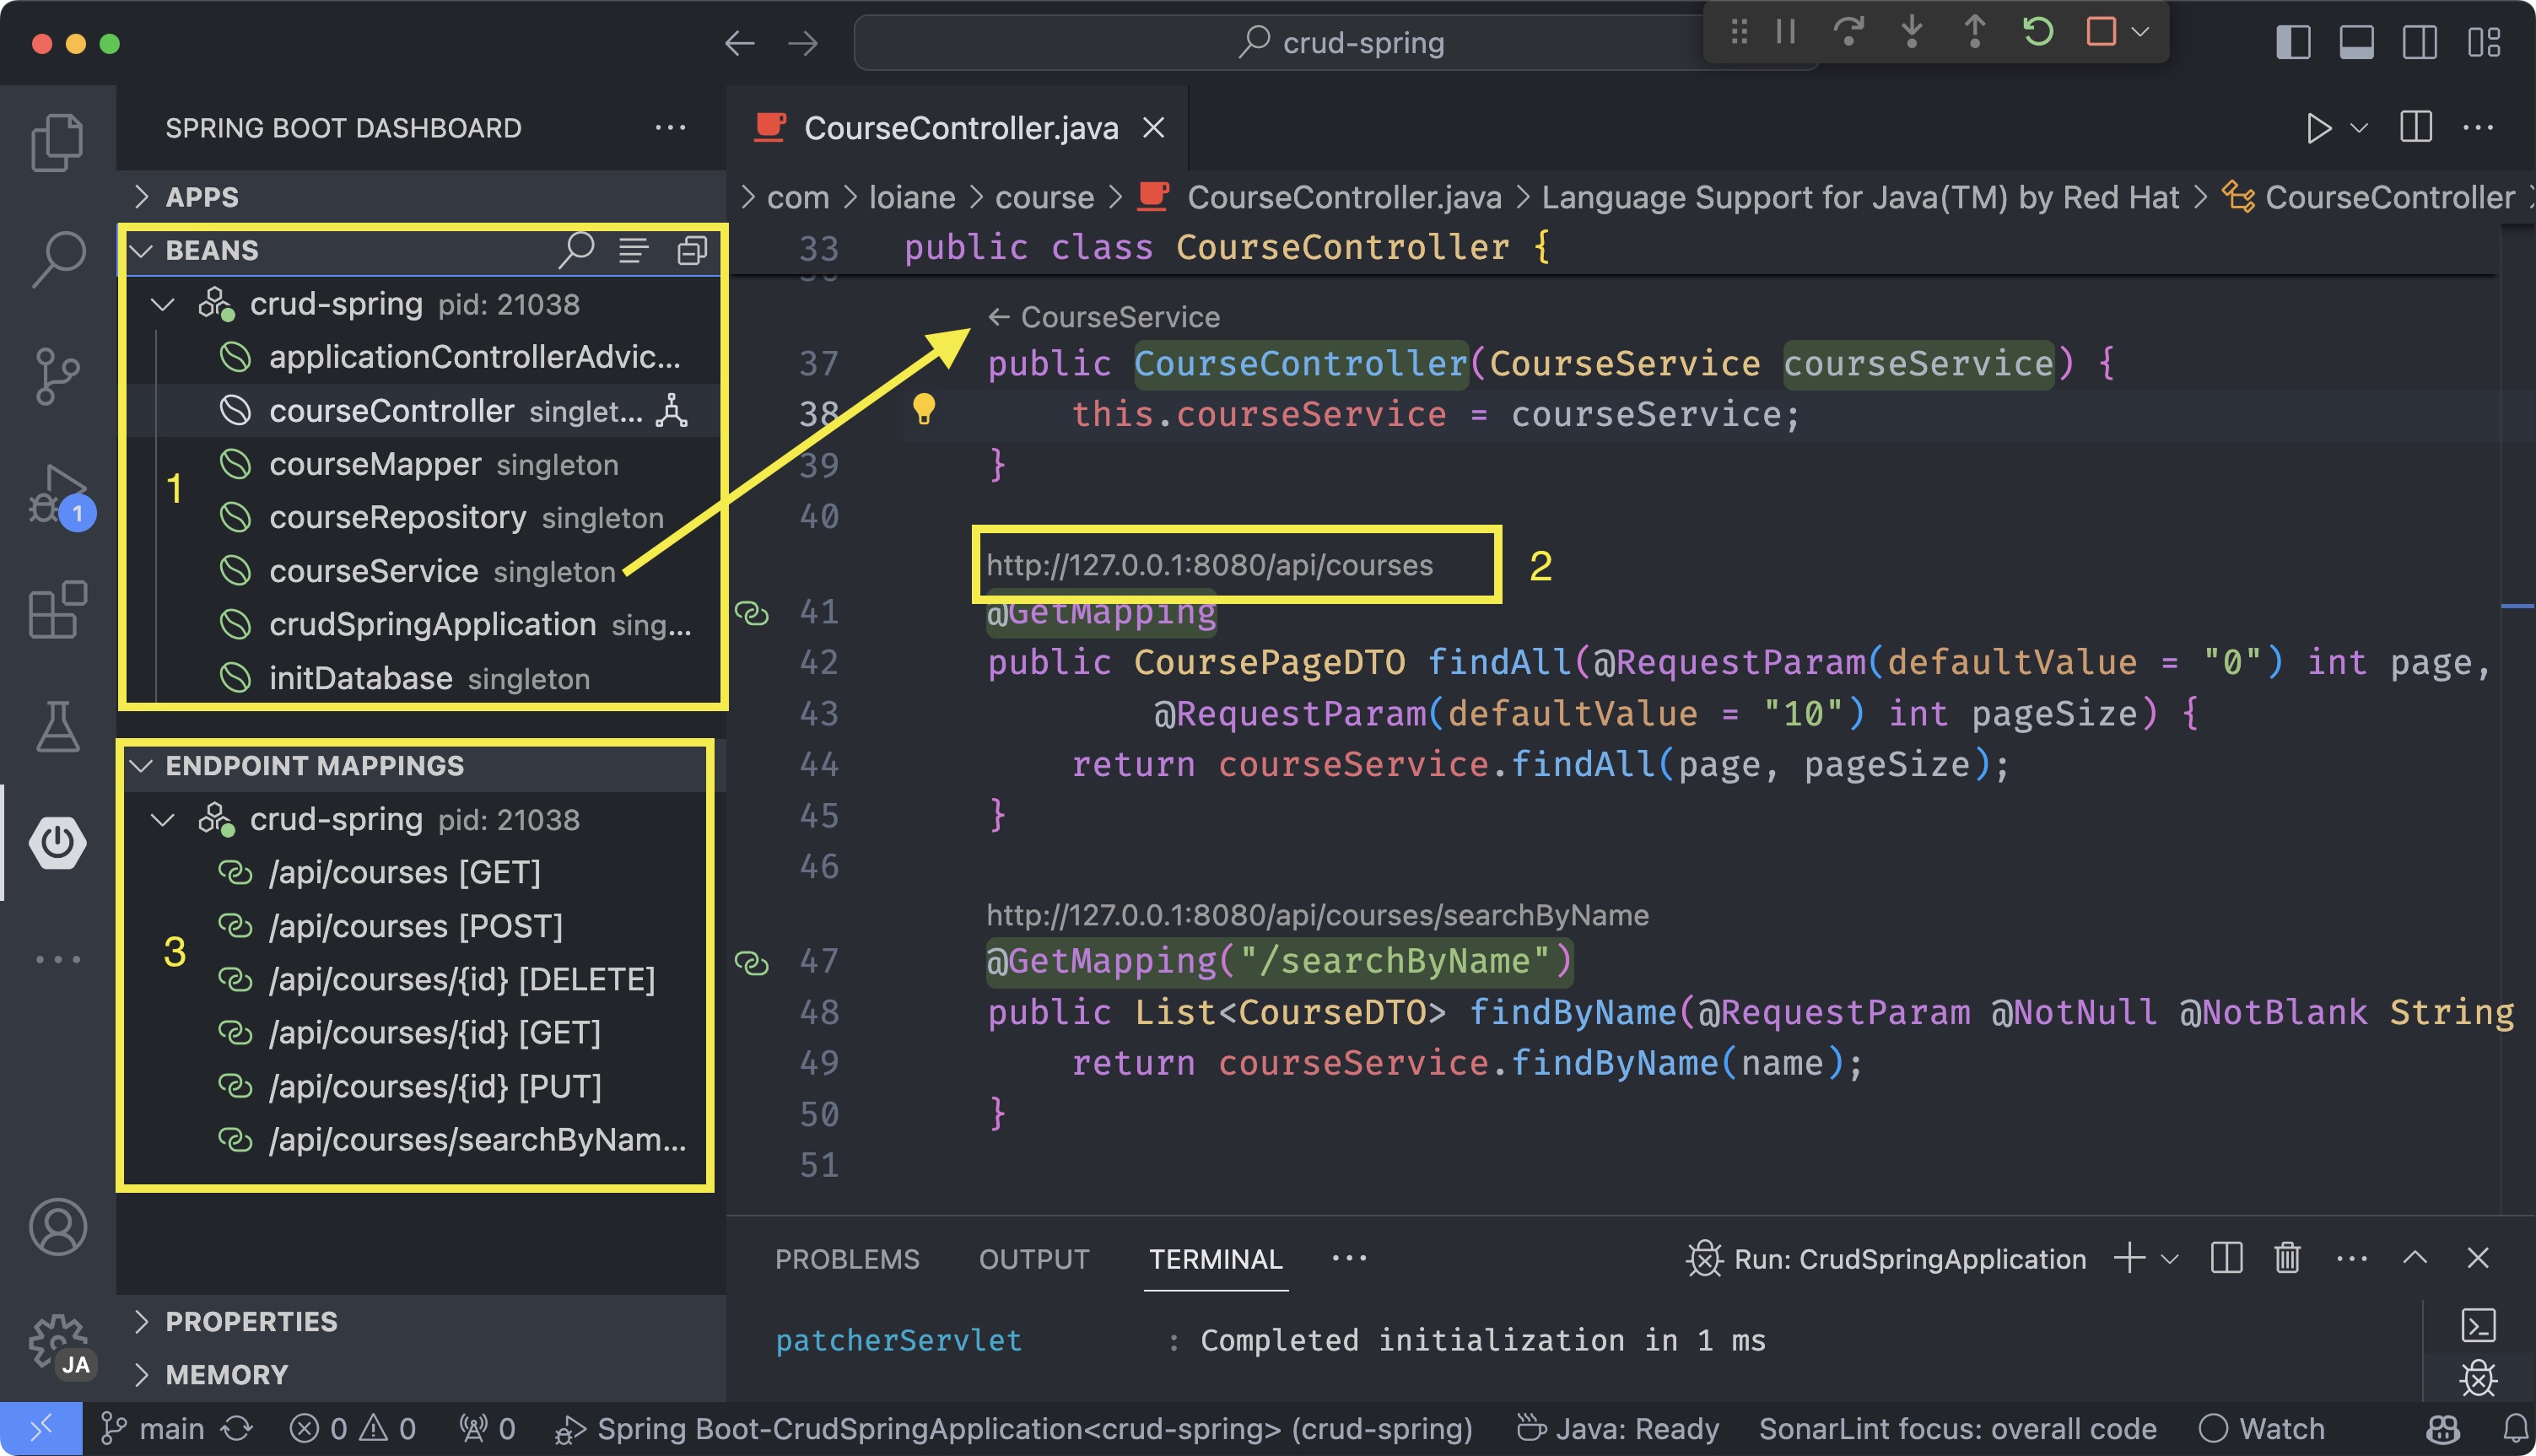
- 1: It lists all the Beans created, and in each class, you can also check what Beans were injected.
- 2: Above each endpoint in the Controllers, it will add a link so you can click on it and open it in the browser - this is very helpful for GET requests.
- 3: And it also lists all endpoints, and if you hover the mouse, will also see a Globe icon you can use to open that link in the browser.
Testing REST APIs
When it comes to testing the endpoints of our project, we can achieve a similar feature of other IDEs by installing the REST Client extension.
This extension allows us to create a .http file and add sample requests to our API (similar to Postman). For example, I like to create a file named api.http with the requests to test my endpoints:
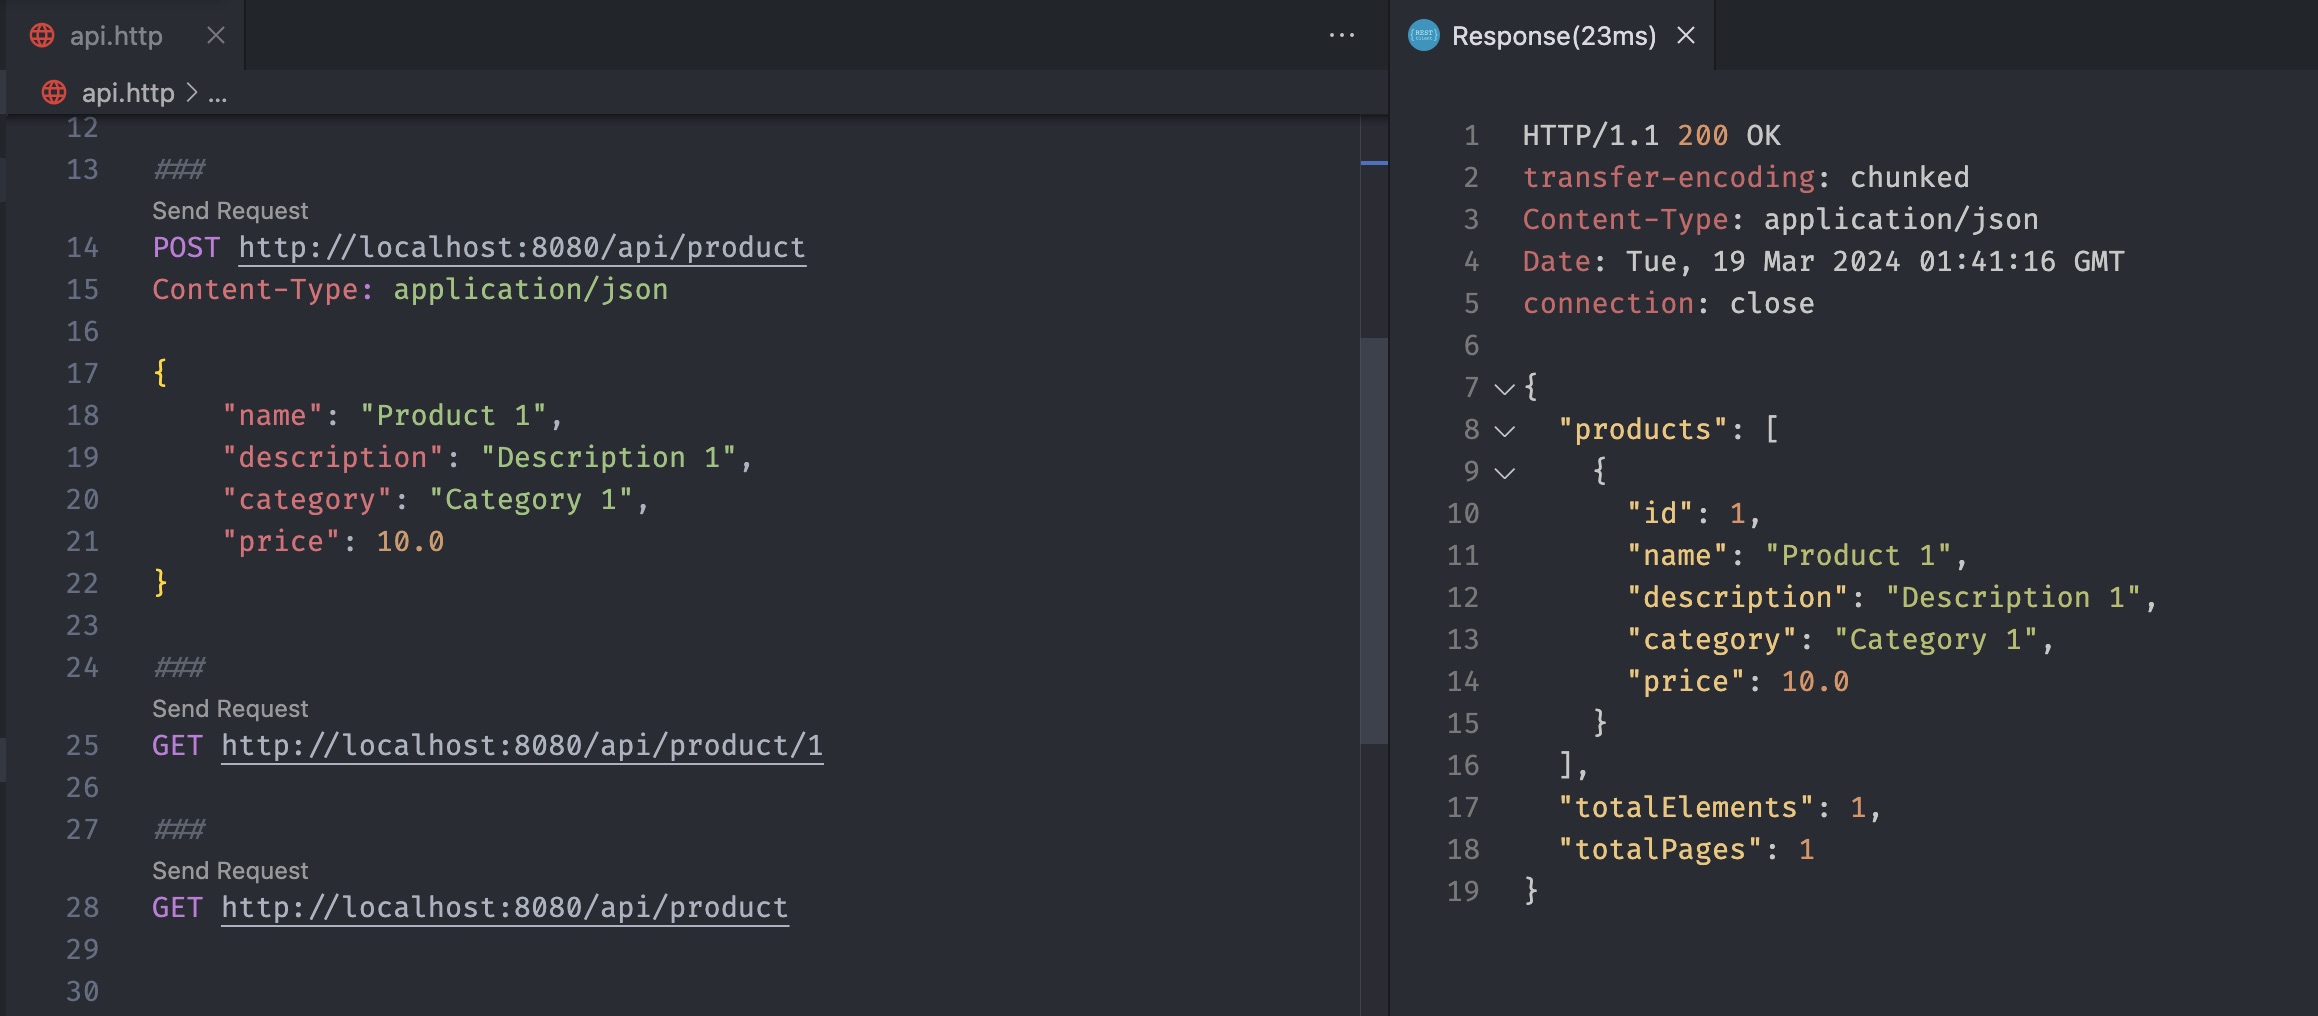
You can commit this file to the repository and everyone working on the project can use it locally, as long as they have the extension installed.
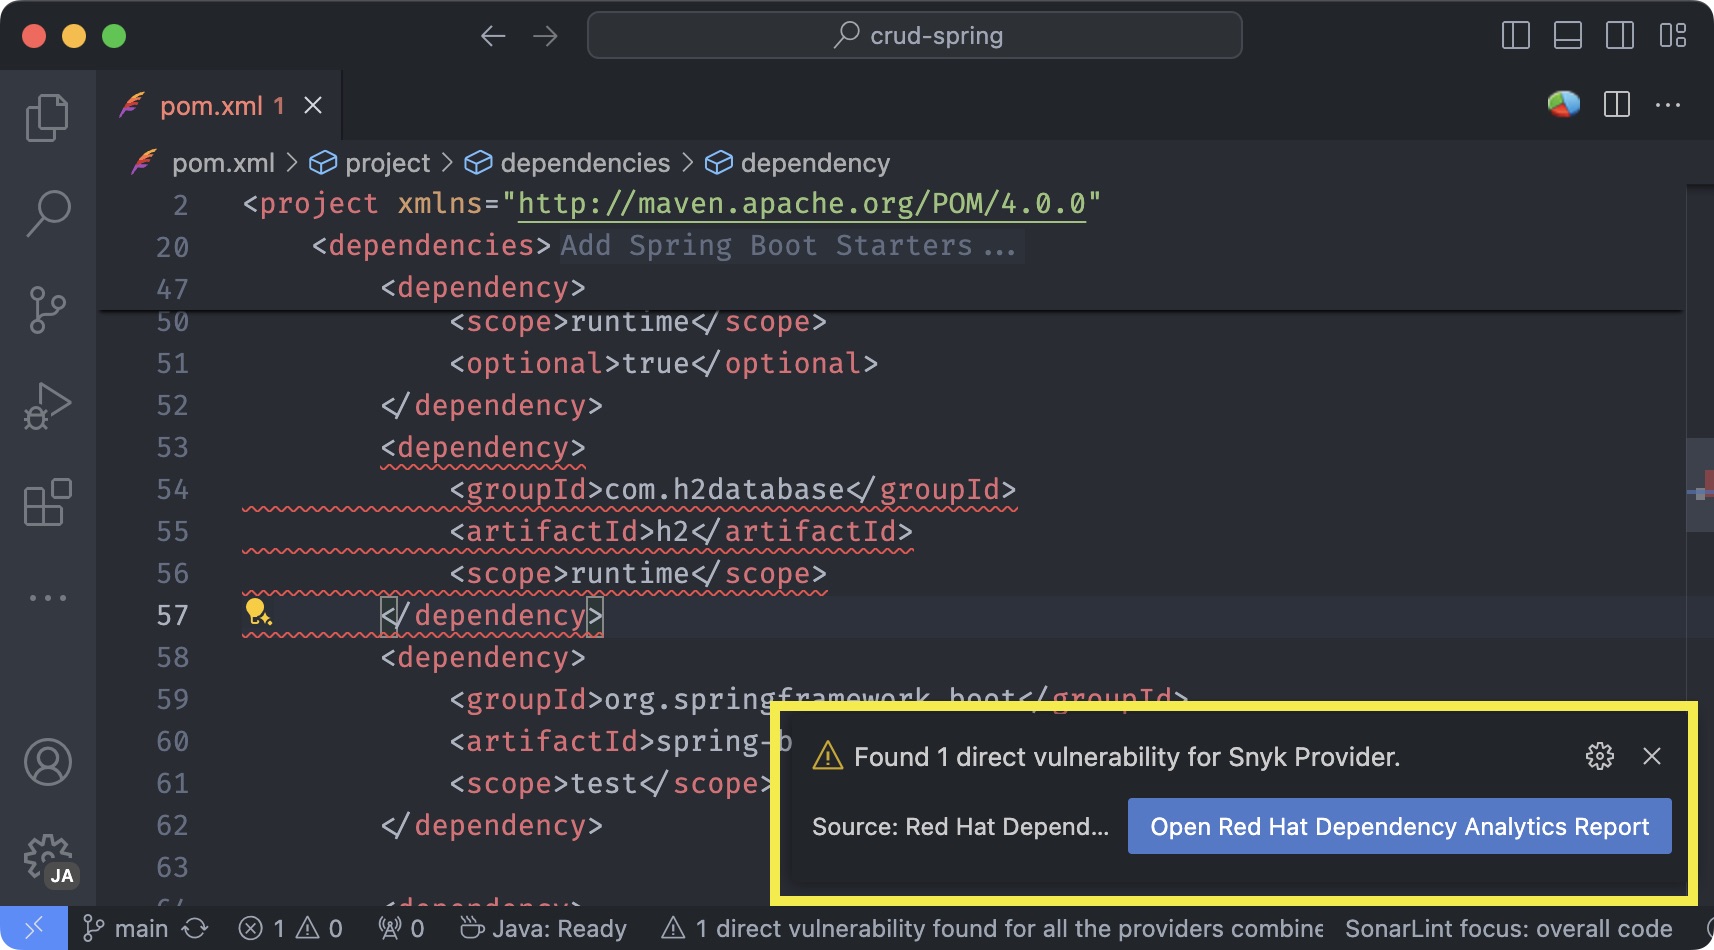
Modifying pom.xml - Spring starters
One of my favorite features of the Spring extension pack is to be able to add dependencies to the pom.xml directly from VSCode.
If you open the pom/xml file and navigate to the dependencies, you will see a link that will allow you to add new starter packages to the project:
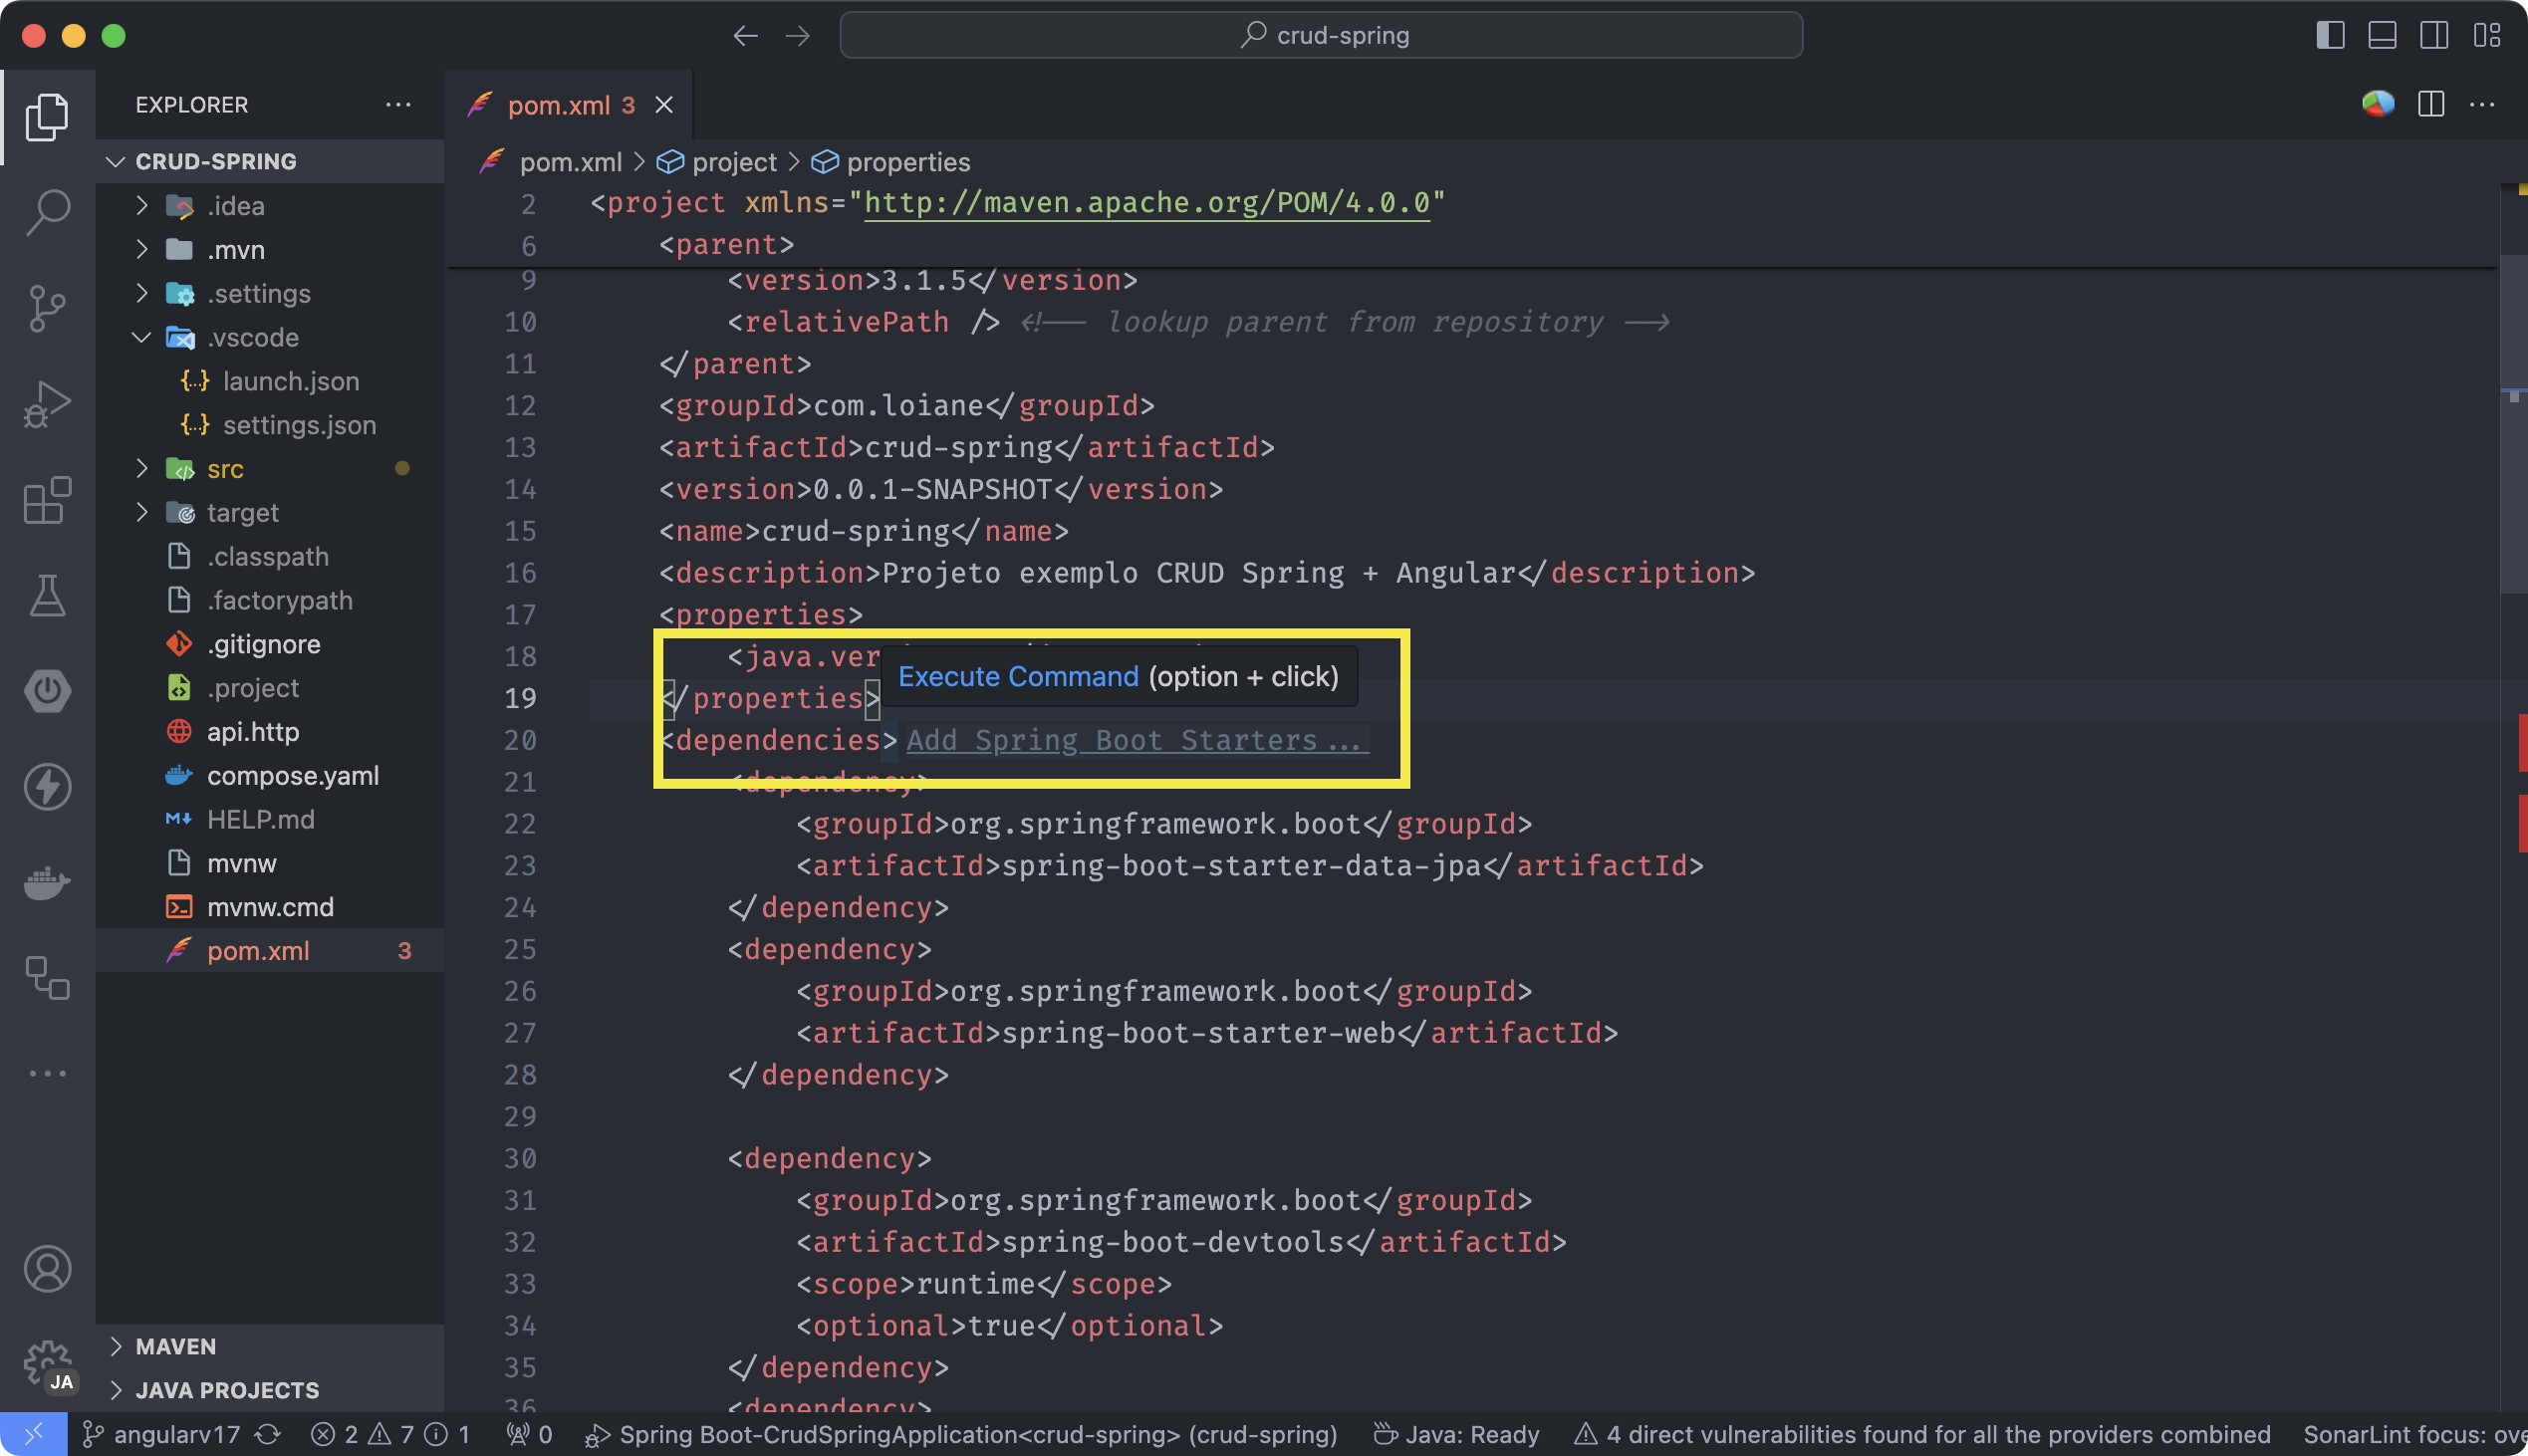
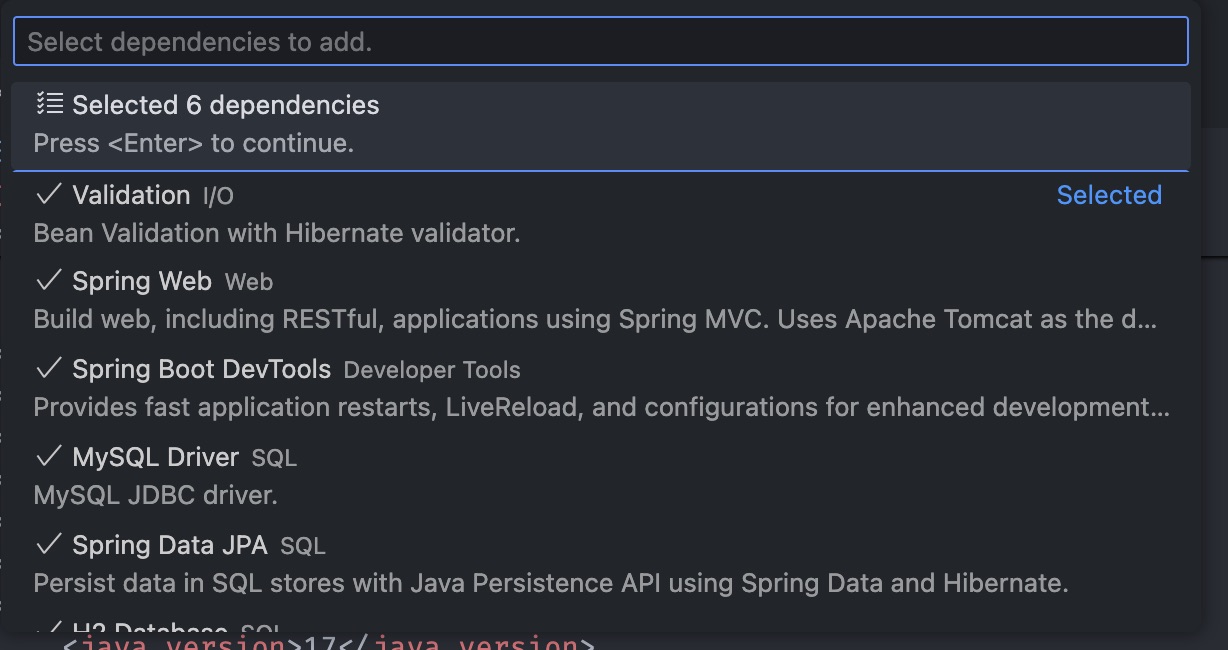
It will open the dependencies list and you can select additional dependencies or remove existing one. You can also modify the dependencies by right-clicking on the pom.xml file, and selecting Add Starters…. A third alternative is by using the Command Pallete.
You will get a notification asking to confirm to add the new dependency.
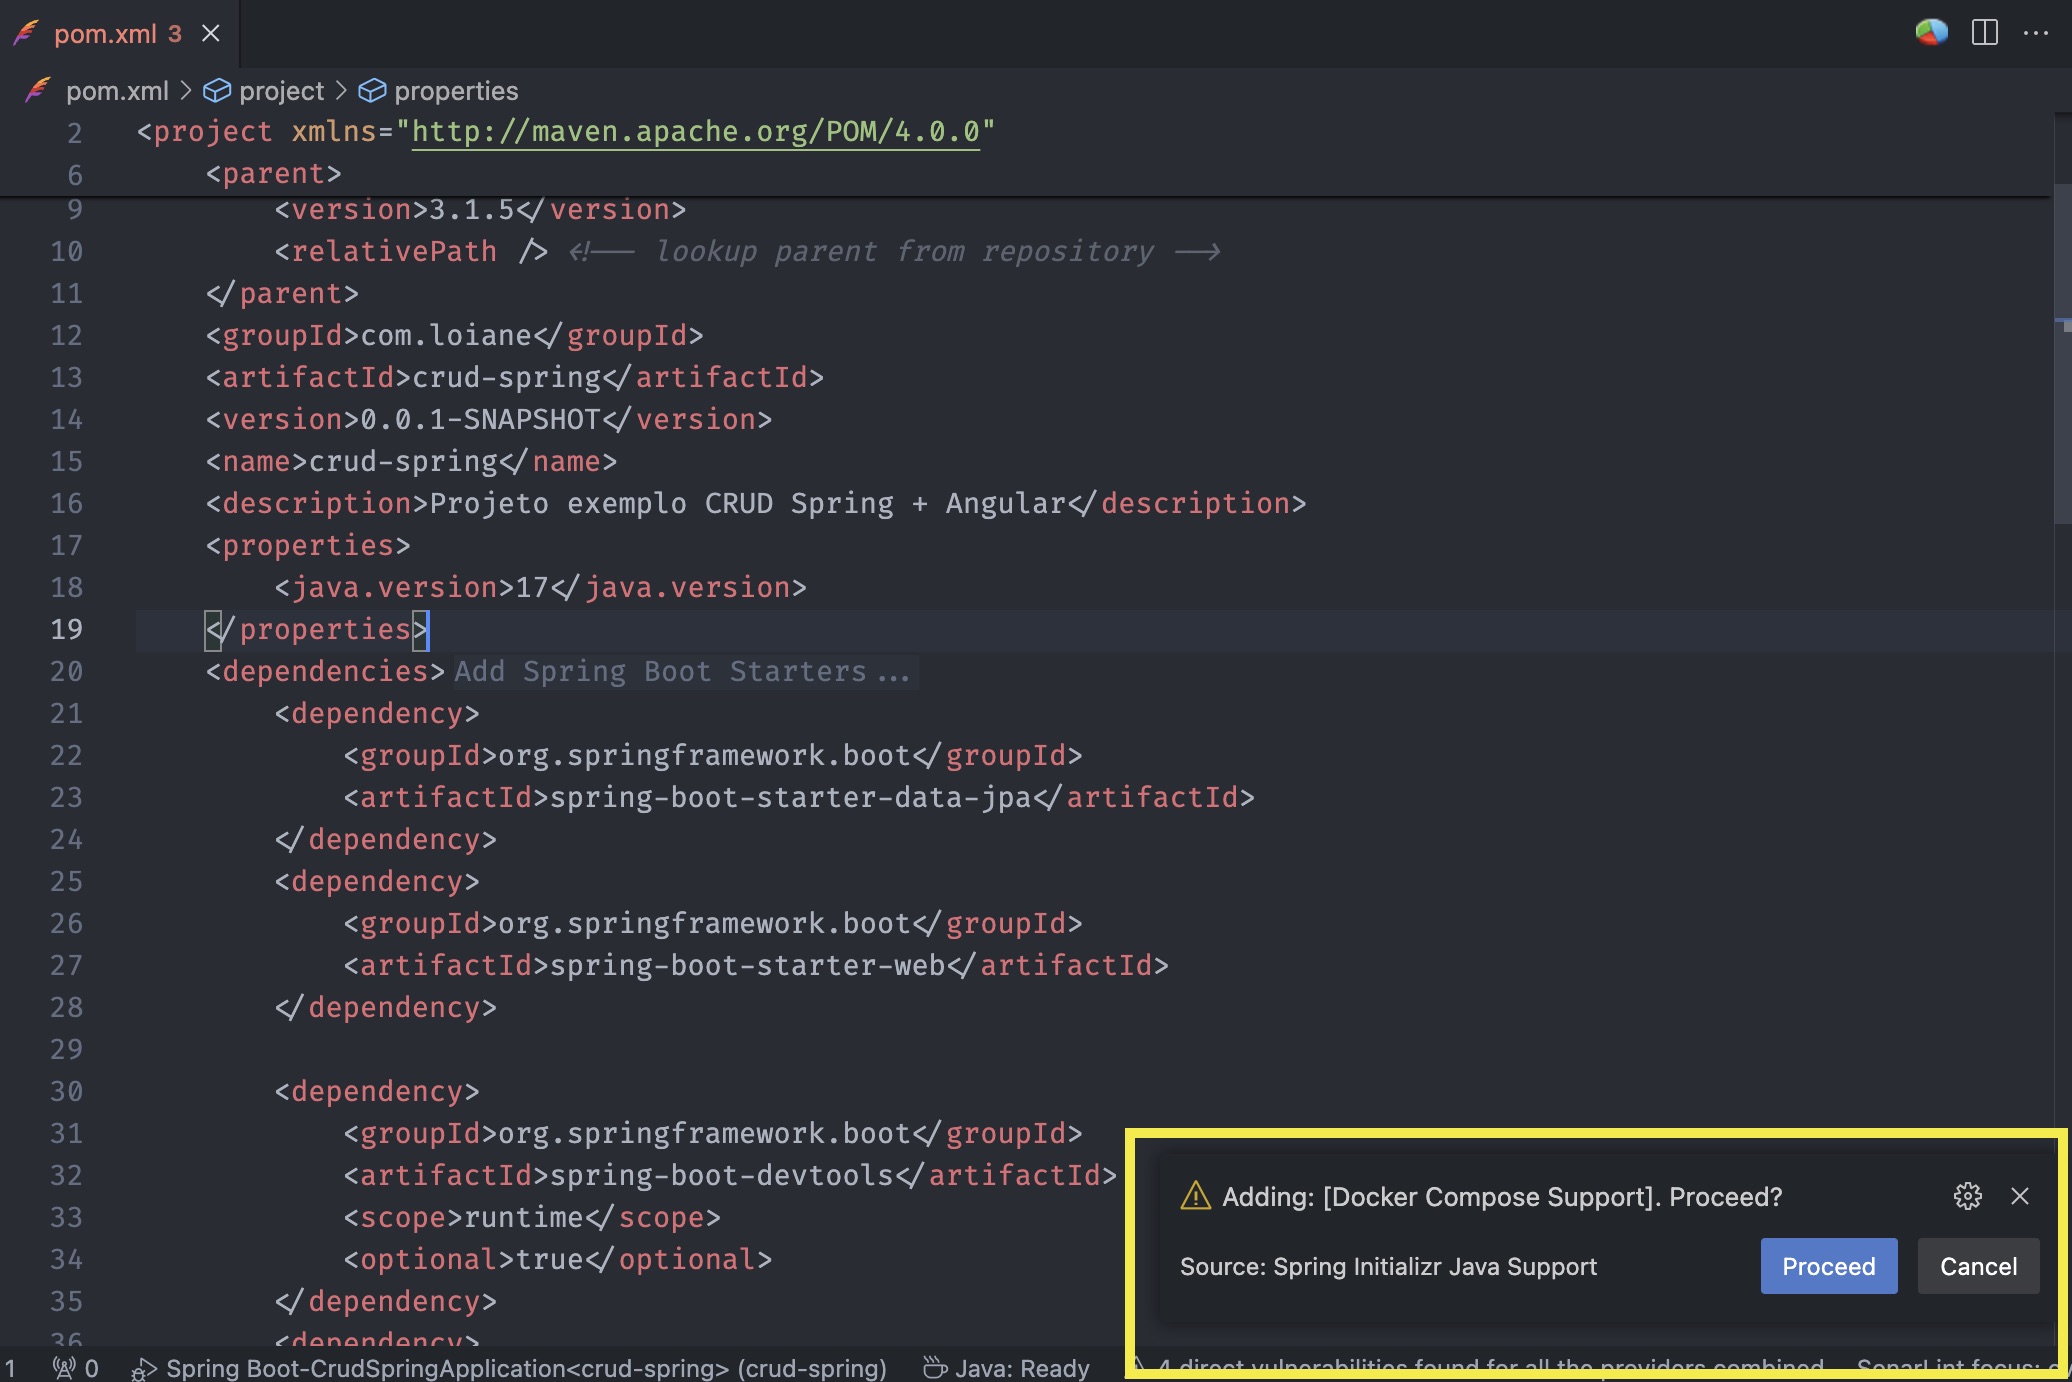
In this example, we’ve selected the Docker Compose support. If you select this dependency when creating a new Spring project, it will also add a docker.compose file, however, this option does not add nor modify additional files, it will only update the pom.xml file.
Fullstack projects
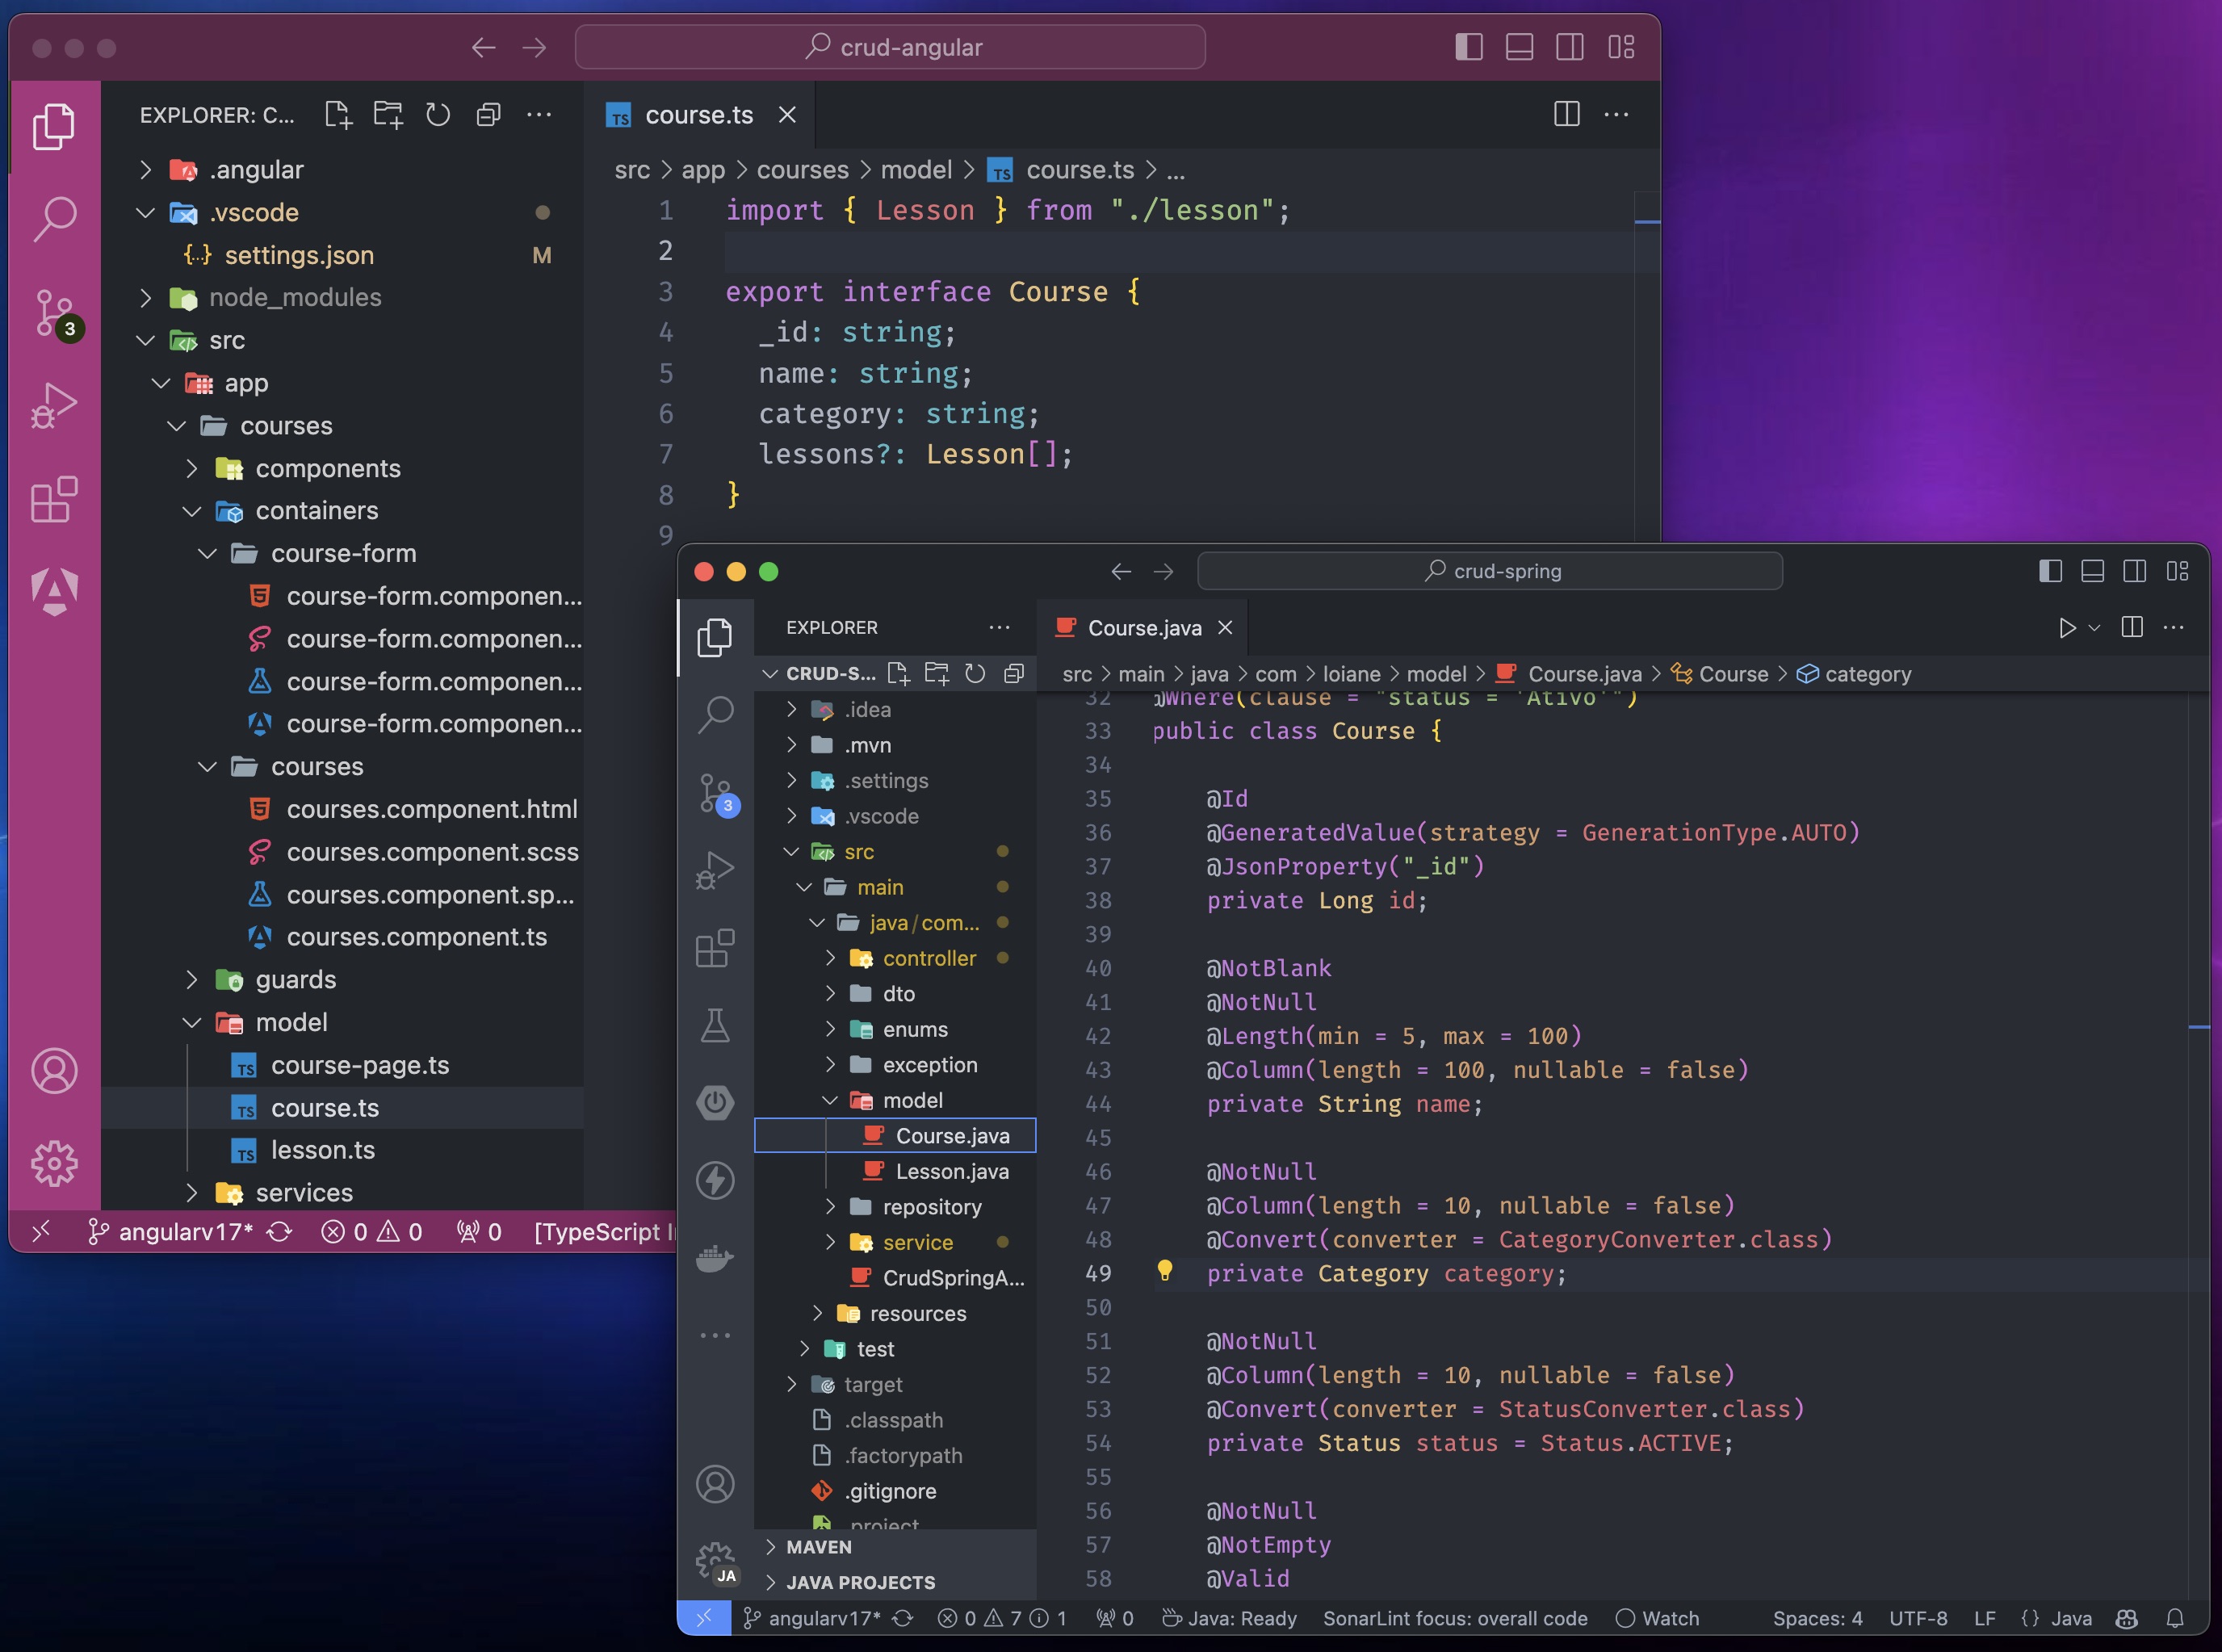
For full-stack projects where you’re juggling a Spring API (or multiple services!) alongside a front-end, VSCode shines. It eliminates the hassle of memorizing different shortcuts across IDEs. You can seamlessly switch between projects while keeping all the relevant services open simultaneously:
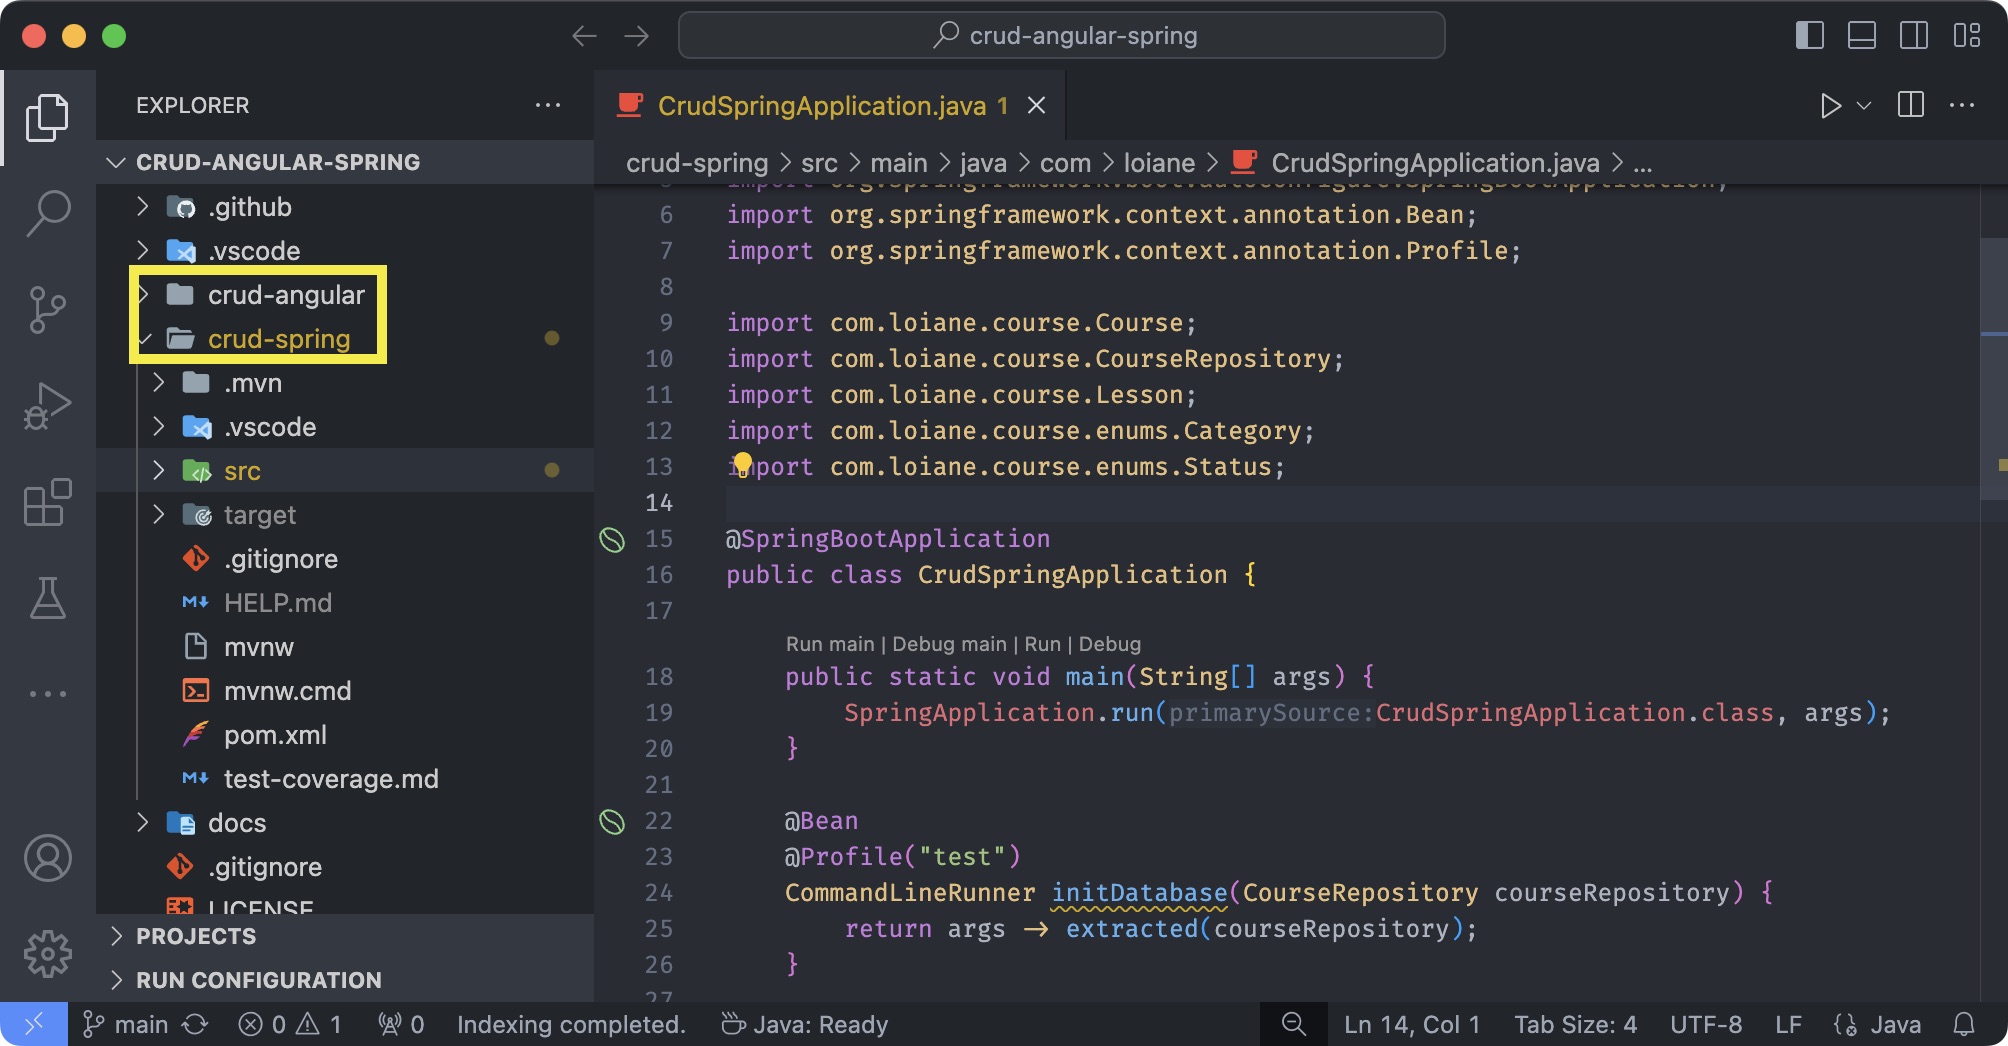
You still get the same support, and in addition, can have your front-end extensions also installed.
If you prefer to have different windows opened (one for front-end, and another one for back-end), you can use different Profiles that will enable only the extensions you need:
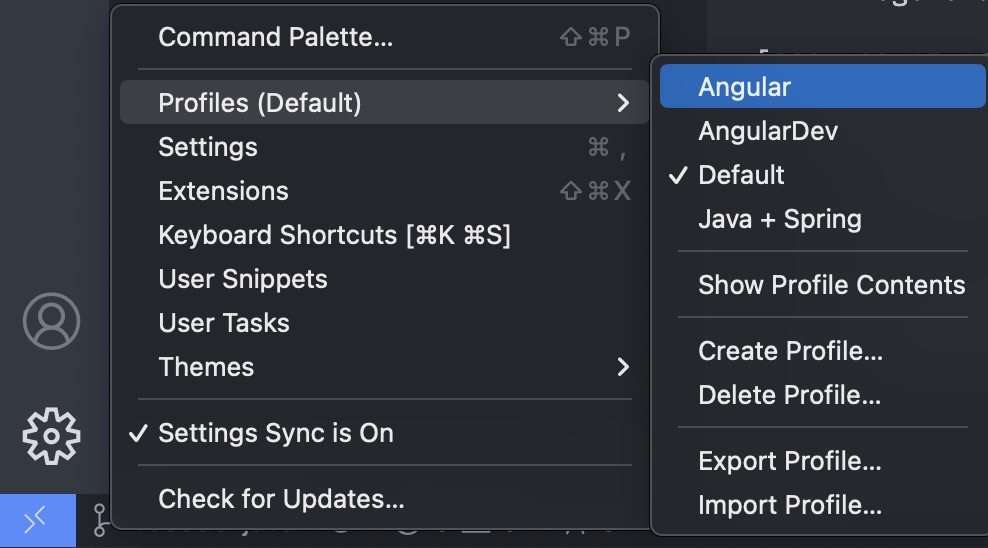
I also like to use the Peacock extension and set different colors so I can easily differentiate which project I’m working on.
Microservices support
VSCode’s Spring extension pack truly excels when working with microservices architectures. If you frequently work with multiple services, you’ll appreciate the ease and speed it brings to your workflow – this is what ultimately won me over for Java development.
Adding new services to an existing microservices solution becomes incredibly streamlined. The process mirrors the simplicity and speed of using Spring Initializr directly.
The Spring Dashboard makes it really simple to handle multiple microservices:
Docker
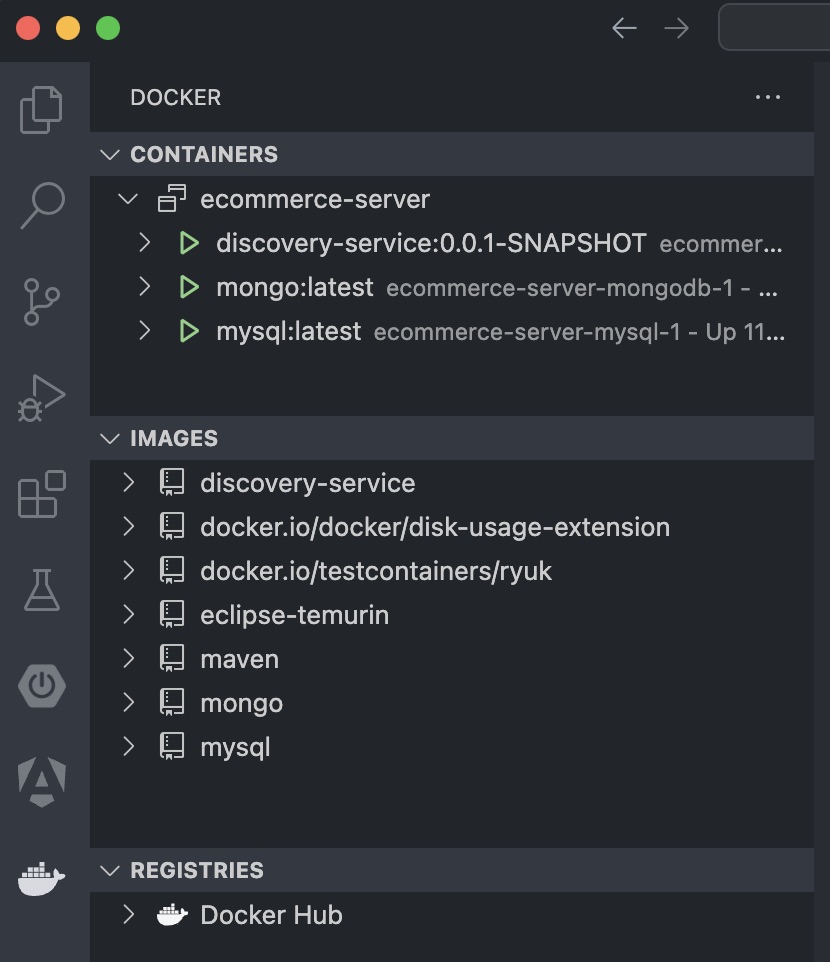
We cannot cover modern development without covering Docker. And of course, there is also an extension Docker for this.
We can manage images, push images to the registry, check images and container logs, and much more. I like this view as I don’t have to leave the editor to review if an image is running successfully - all I have to do is remember to start the Docker service!
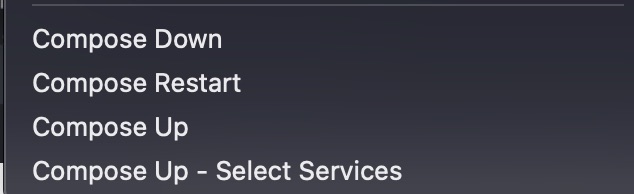
Another cool feature is the docker-compose support. I enjoy this premium feature in other IDEs, and it’s great we can get similar support for free in VSCode. But instead of opening the file and clicking on the icon to do a compose up, we need to right-click on the docker.compose file and select the options below:
Testing and Testing Coverage
When we install the Test Runner for Java extension or the Java Platform Support extension we get test support for Java projects. We have access to a Test View where we can see all the test cases we have written for the project, being unit tests or integration tests.
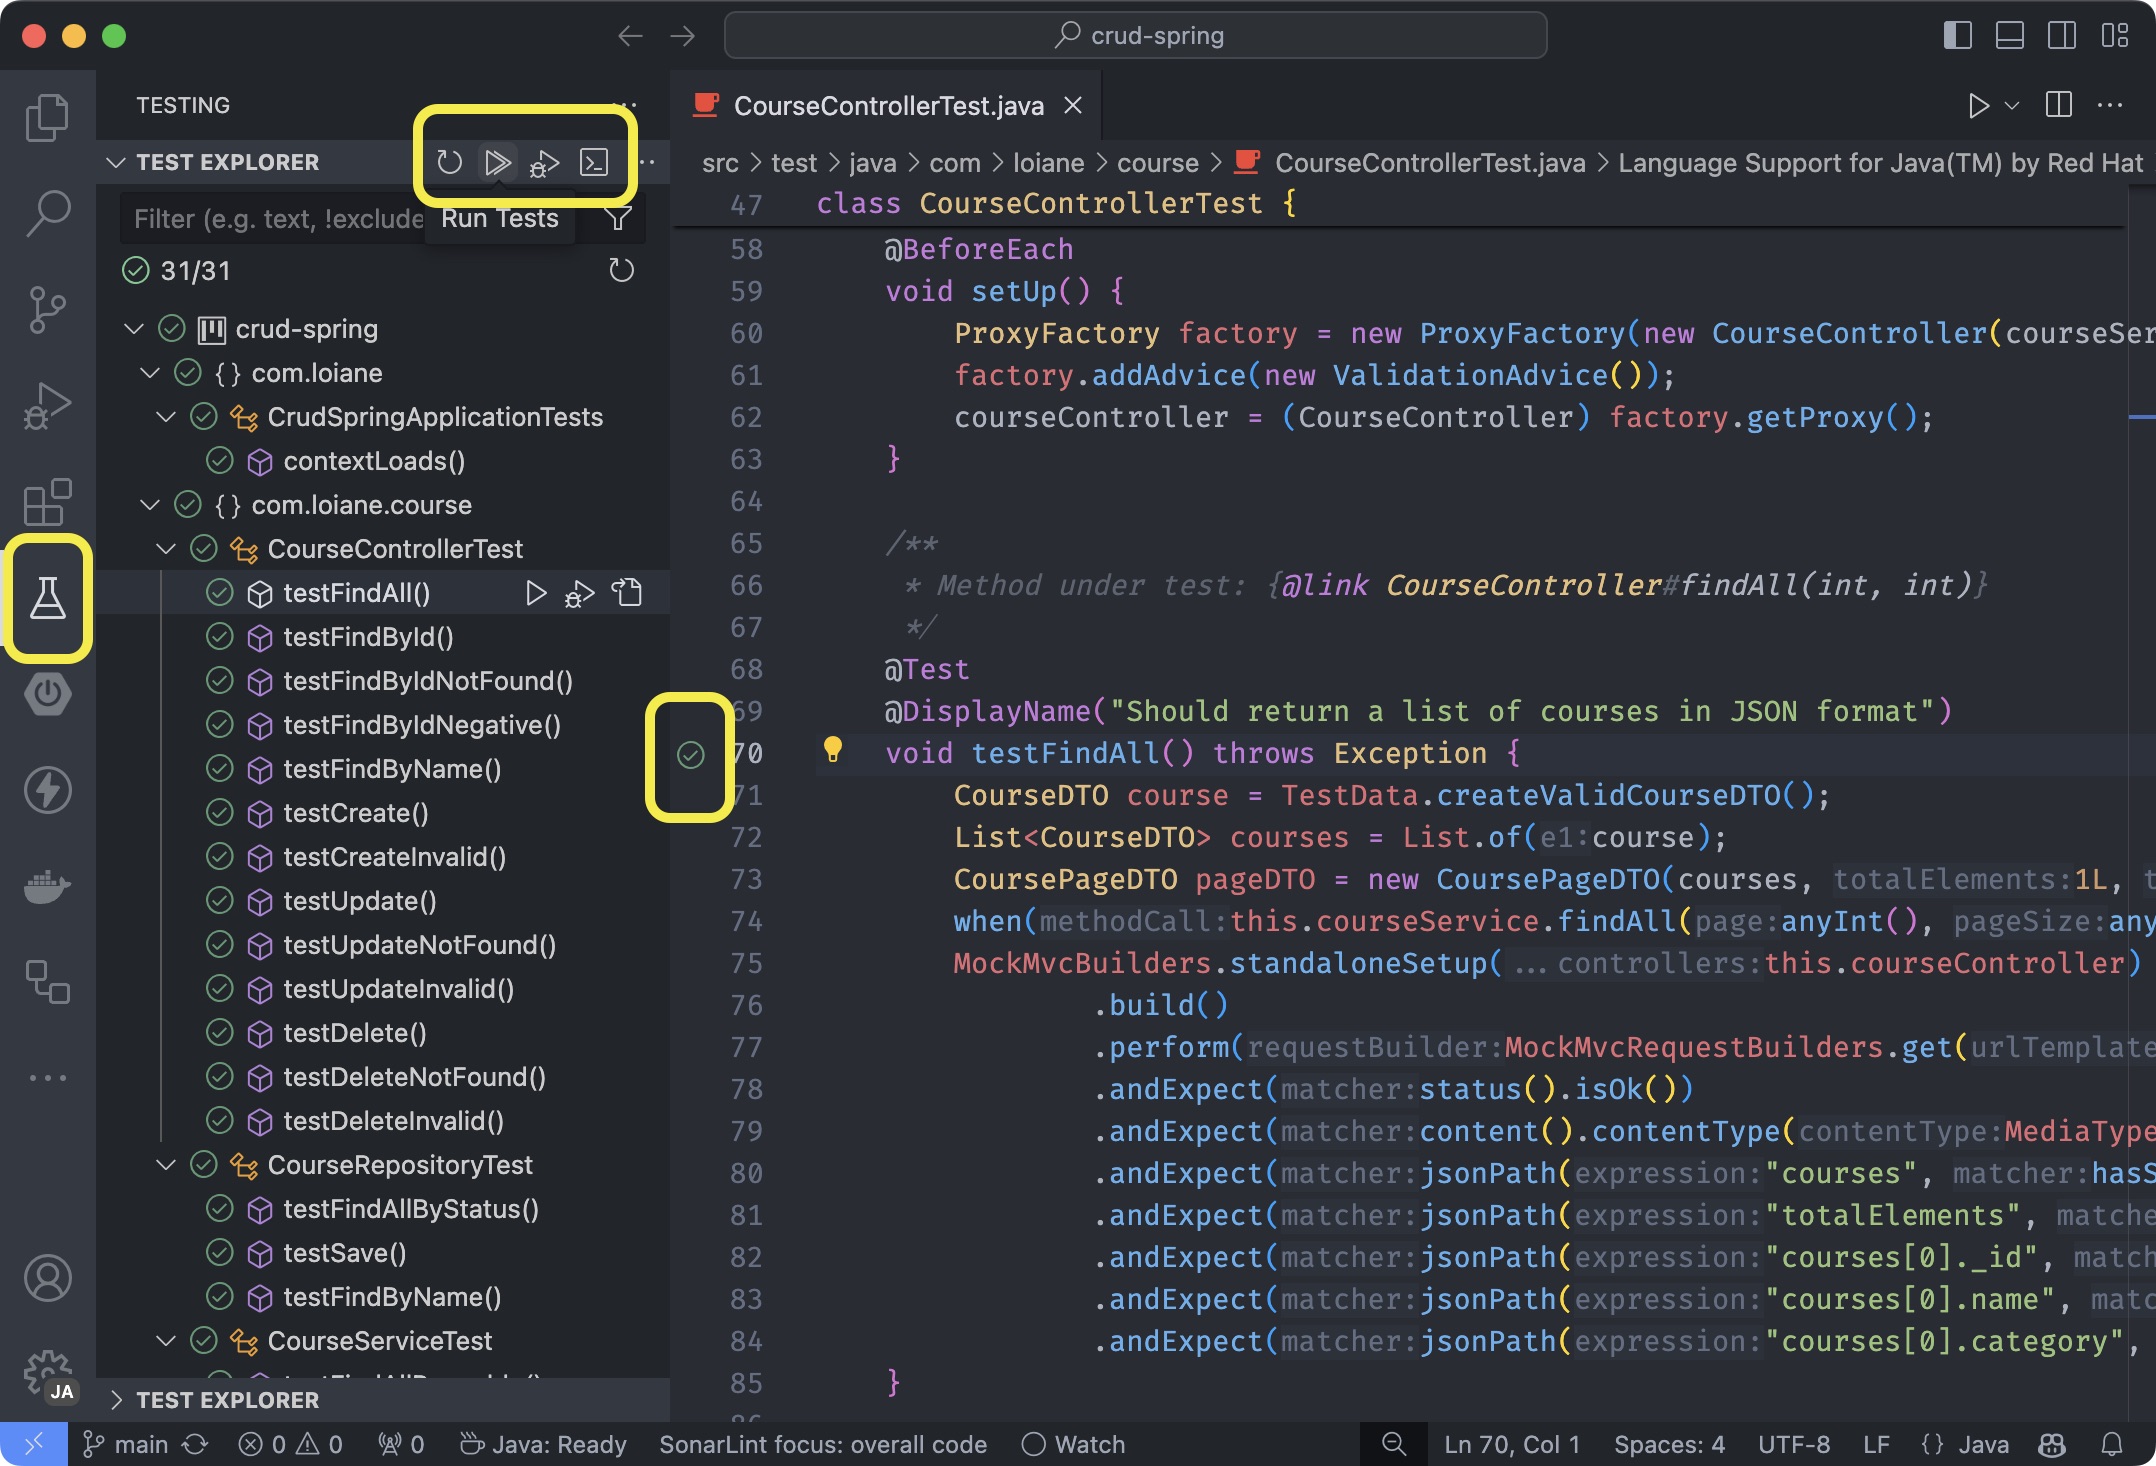
What I like about this support is we can easily run all the test cases by clicking on the Play icon. We can check logs for any failed test cases. There is also one icon where we can go directly to the source code of the test.
When we open a test file, we can also run all the test cases present in that class or execute each test case individually (this is very helpful if using TDD - Test Driven Development.).
Other Useful Extensions
These are the most useful extensions I use when working with Java projects. If you would like to use the same extensions, I have created an extension pack with all the extensions I find useful for Java + Spring development:
📦 Java + Spring Extension Pack
Let’s check some additional extensions that are also very useful.
Snyk, Checkmarx and Sonarlint
Maintaining our code secure and the dependencies up to date is part of the basic maintenance we need to do for our projects. Below is the list of recommended plugins and their description:
- Snyk Security: the Snyk Visual Studio Code plugin scans and provides analysis of your code, including open-source dependencies and infrastructure as code configurations. Download the plugin at any time free of charge and use it with any Snyk account. Scan your code early in the development lifecycle to help you pass security reviews and avoid costly fixes later in the development cycle.
-
Checkmarx: Checkmarx continues to spearhead the shift-left approach to AppSec by bringing our powerful AppSec tools into your IDE. This empowers developers to identify vulnerabilities and remediate them as they code. The Checkmarx Visual Studio Code plugin integrates seamlessly into your IDE, identifying vulnerabilities in your proprietary code, open-source dependencies, and IaC files. The plugin offers actionable remediation insights in real time.
-
SonarLint: SonarLint by Sonar is a free IDE extension that empowers you to fix coding issues before they exist. More than a linter, SonarLint detects and highlights issues that can lead to bugs, vulnerabilities, and code smells as you create your code. It offers clear remediation guidance and educational help, so you can fix issues before the code is committed. Out of the box, SonarLint in VS Code supports analysis of JS/TS, Python, PHP, Java, C, C++, C#, Go, and IaC code locally in your IDE.

- Checkstyle for Java: Check your Java code format and fix it! (this is very similar to the well known Eclipse plugin).
MongoDB
MongoDB for VS Code makes it easy to work with your data in MongoDB directly from your VS Code environment. MongoDB for VS Code is the perfect companion for MongoDB Atlas, but you can also use it with your self-managed MongoDB instances.

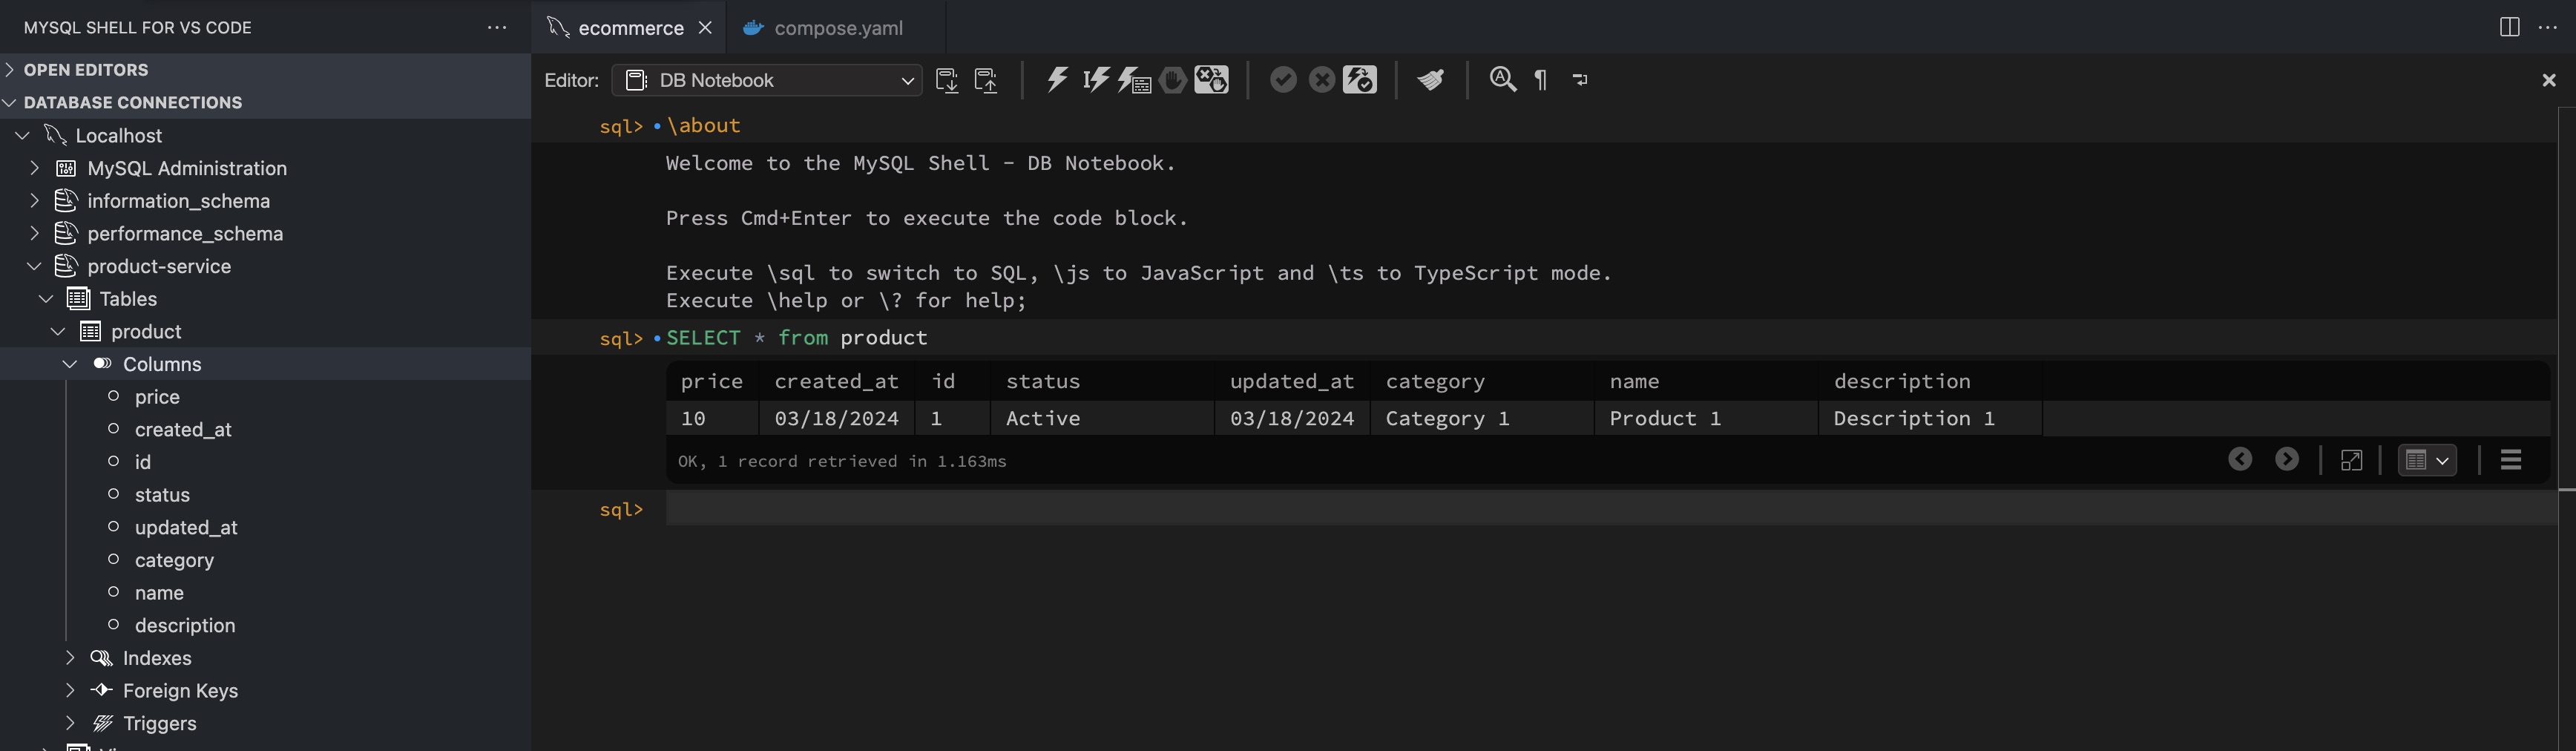
MySQL
MySQL Shell for VS Code: This extension enables interactive editing and execution of SQL for MySQL Databases and the MySQL HeatWave Service. It integrates the MySQL Shell directly into VS Code development workflows.
Summary
VSCode offers a vast library of extensions to tailor your development environment, including excellent support for cloud providers. Its robust set of free, premium-quality features and intuitive interface make it a compelling choice. The transition to VSCode is surprisingly smooth!
If you’re not using it yet, I strongly encourage you to give it a try. If you discover any must-have extensions, please share them in the comments – I’m always eager to explore new tools.
Happy coding!