
Angular: Hide Navbar Menu from Login page
In this article we will learn two approaches to hide the Navbar Menu when displaying the Login page in Angular projects.
Update December 2017: code updated to Angular v5 and Material v5.
Update May 2018: code updated to Angular v6. Stackblitz link also available at the end of this article.
Contents
For both examples in this tutorial we will use Angular Material as our UI library. I’ve covered how to setup an Angular project with Angular Material in this post.
Example 1: Using *ngIf to “hide” the NavBar
In this first example we will have only one page layout and we will verify if the user is logged in and use *ngIf to verify if the application should display the navigation bar or not. This is the most common example we find when searching for how to hide the navbar when displaying the login page.
So let’s start creating our first example with Angular CLI:
ng new angular-login-hide-navbar-ngif --routing --style=scss
For this example we will need to create some components, a module, a service, a route guard and a model interface:
ng g m app-material
ng g s auth/auth --module=app.module
ng g g auth/auth --module=app.module
ng g i auth/user
ng g c header -is
ng g c home -is -it
ng g c login
With the commands above all components and services will be created and the declarations and providers metadata of app.module.ts will also be updated.
Don’t forget to setup the CSS framework or UI library for your project as well!
The image below shows the project src folder for this first example and also for our second example. Both examples use basically the same components, however, the second example has two extra components.

The application shall display the navigation bar only when the user is logged in as demonstrated by the following screenshot:
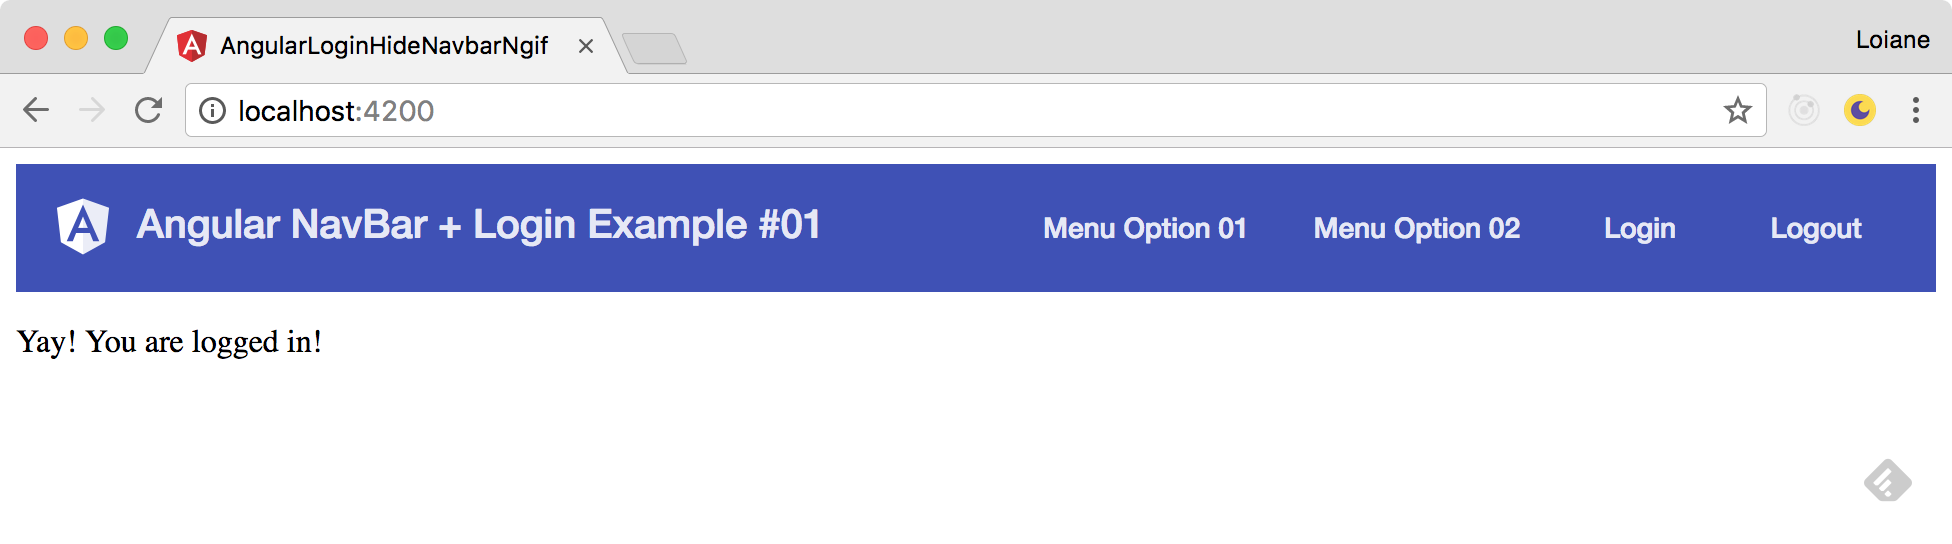
The toolbar from the screenshot above is displaying both Login and Logout buttons. But we’ll get there to fix this later.
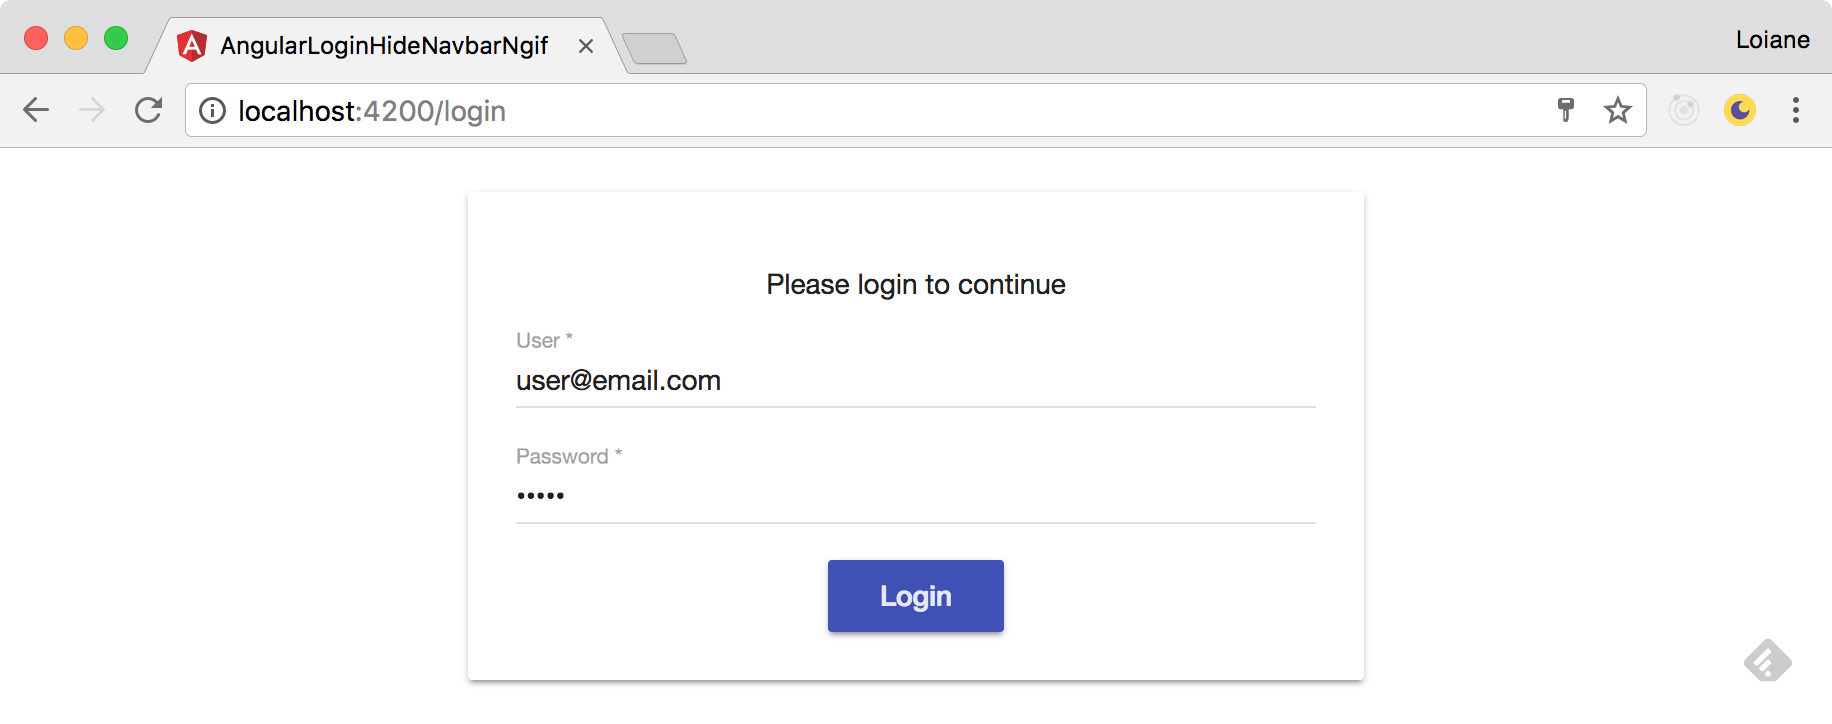
If the user is not logged in, the application shall display the login page without the navigation bar as demonstrated below:
Ok, we have our requirenments, let’s start coding!
The app-material module
To develop this simple application, we will need some UI components. Since we are using Angular Material, we will need the following Material modules to be imported by our application:
import { NgModule } from '@angular/core';

import { MatToolbarModule } from '@angular/material/toolbar';
import { MatCardModule } from '@angular/material/card';
import { MatButtonModule } from '@angular/material/button';
import { MatInputModule } from '@angular/material/input';
import { MatFormFieldModule } from '@angular/material/form-field';

@NgModule({
  exports: [
    MatToolbarModule,
    MatCardModule,
    MatInputModule,
    MatFormFieldModule,
    MatButtonModule
  ]
})
export class AppMaterialModule {}
We cannot forget to update our app.module.ts and import AppMaterialModule.
In your application, import the
AppMaterialModulein all modules that your components belongs to. Since this is a very small project, we only have one module with components which is the app.module.
Since we imported MatInputModule, this means we will work with forms. So we also need to import ReactiveFormsModule (or FormsModule if you prefer to work with template driven forms):
import { BrowserAnimationsModule } from '@angular/platform-browser/animations';
import { ReactiveFormsModule } from '@angular/forms';

import { AppMaterialModule } from './app-material/app-material.module';

@NgModule({
  // ...
  imports: [
    // ...
    ReactiveFormsModule,
    BrowserAnimationsModule,
    AppMaterialModule
  ],
  // ...
})
export class AppModule { }
Creating the Login component
The code for the login.component.ts is presented below:
import { Component, OnInit } from '@angular/core';
import { FormGroup, FormBuilder, Validators } from '@angular/forms';
import { AuthService } from './../auth/auth.service';

@Component({
  selector: 'app-login',
  templateUrl: './login.component.html',
  styleUrls: ['./login.component.scss']
})
export class LoginComponent implements OnInit {
  form: FormGroup;                    // {1}
  private formSubmitAttempt: boolean; // {2}

  constructor(
    private fb: FormBuilder,         // {3}
    private authService: AuthService // {4}
  ) {}

  ngOnInit() {
    this.form = this.fb.group({     // {5}
      userName: ['', Validators.required],
      password: ['', Validators.required]
    });
  }

  isFieldInvalid(field: string) { // {6}
    return (
      (!this.form.get(field).valid && this.form.get(field).touched) ||
      (this.form.get(field).untouched && this.formSubmitAttempt)
    );
  }

  onSubmit() {
    if (this.form.valid) {
      this.authService.login(this.form.value); // {7}
    }
    this.formSubmitAttempt = true;             // {8}
  }
}
Our login screen is going to be a simple form with two fields: user name and password and they are both required ({5}). So first we need to declare a form variable ({1}). I like to use the FormBuilder instead of instantiating each FormGroup and FormControl, so in this case we also need to inject it in our component’s contructor ({3}).
Since we are in the constructor, when the user clicks on the login button and the form is valid, we will submit its values ({7}) to the AuthService that will be responsible for the login logic. So we also need to inject it in the component’s contructor ({4}). This service was declared as provider in the app.module when we used the ng g s auth/auth --module command.
To display some validation error messages in our form, we’ll verify if the field is invalid or has been touched (received focus) ({6}). We’ll also be using the submit attempt flag approach ({2} and {8}).
To learn more about the submit attempt flag approach you can read this tutorial.
Our form will use some custom CSS styles as well:
mat-card {
  max-width: 400px;
  margin: 2em auto;
  text-align: center;
}
.signin-content {
  padding: 60px 1rem;
}
.full-width-input {
  width: 100%;
}
And now that we have the Angular form in place, let’s take a look at the login template built with Angular Material:
<div class="signin-content">
  <mat-card>
    <mat-card-content>
      <form [formGroup]="form" (ngSubmit)="onSubmit()">
        <p>Please login to continue</p>
        <mat-form-field class="full-width-input">
          <input matInput placeholder="User" formControlName="userName" required>
          <mat-error *ngIf="isFieldInvalid('userName')">
            Please inform your user name
          </mat-error>
        </mat-form-field>
        <mat-form-field class="full-width-input">
          <input matInput type="password" placeholder="Password" formControlName="password" required>
          <mat-error *ngIf="isFieldInvalid('userName')">
            Please inform your password
          </mat-error>
        </mat-form-field>
        <button mat-raised-button color="primary">Login</button>
      </form>
    </mat-card-content>
  </mat-card>
</div>
Our login widget is a Material card with maximum width of 400 pixels, with two required form fields and a login button.
Creating the Home component
Our Home component is going to be very simple. Just a message confirming the user is logged in:
import { Component } from '@angular/core';

@Component({
  selector: 'app-home',
  template: '<p>Yay! You are logged in!</p>',
  styles: []
})
export class HomeComponent {}
Creating the AuthService
For the purpose of this example, we will not integrate the service with any backend API.
import { Injectable } from '@angular/core';
import { Router } from '@angular/router';
import { BehaviorSubject } from 'rxjs';
import { User } from './user';

@Injectable()
export class AuthService {
  private loggedIn = new BehaviorSubject<boolean>(false); // {1}

  get isLoggedIn() {
    return this.loggedIn.asObservable(); // {2}
  }

  constructor(
    private router: Router
  ) {}

  login(user: User){
    if (user.userName !== '' && user.password !== '' ) { // {3}
      this.loggedIn.next(true);
      this.router.navigate(['/']);
    }
  }

  logout() {                            // {4}
    this.loggedIn.next(false);
    this.router.navigate(['/login']);
  }
}
To control if the user is logged in or not, we will use a BehaviorSubject ({1}). We will also create a getter to expose only the get method publicly ({2}) as also expose the Subject as an Observable. The BehaviorSubject keeps the latest value cached (in our case when the service is created the initial value is going to be false). So when an Observer subscribes to the isLoggedIn(), the cached valued is going to be emitted right away.
When the user clicks on the login button from the form, the login method is going to be called receiving the form values. Our validation is very simple: we are only checking if the values are not empty (of course the best behavior here is to submit the values to a server and maybe also use JWT). If we received a userName and a password ({3}), then we authenticate the user. This means we need to emit that the user is now logged in and also redirect the routing to the HomeComponent.
And in case the user logs out of the application ({3}4, we will emit that the user is no longer logged in and also redirect to the login page.
The User interface matches the FormControl names from our LoginComponent form:
export interface User {
  userName: string;
  password: string;
}
Configuring the Router and the AuthGuard
These will be the routes we will use in this example:
const routes: Routes = [
  { path: '', component: HomeComponent, canActivate: [AuthGuard] },
  { path: 'login', component: LoginComponent }
];
Now let’s take a look the auth/auth.guard:
import { Injectable } from '@angular/core';
import {
  ActivatedRouteSnapshot,
  CanActivate,
  Router,
  RouterStateSnapshot } from '@angular/router';
import { Observable } from 'rxjs';
import { map, take } from 'rxjs/operators';

import { AuthService } from './auth.service';

@Injectable()
export class AuthGuard implements CanActivate {
  constructor(
    private authService: AuthService,
    private router: Router
  ) {}

  canActivate(
    next: ActivatedRouteSnapshot,
    state: RouterStateSnapshot
  ): Observable<boolean> {
    return this.authService.isLoggedIn         // {1}
      .pipe(
        take(1),                              // {2}
        map((isLoggedIn: boolean) => {         // {3}
          if (!isLoggedIn){
            this.router.navigate(['/login']);  // {4}
            return false;
          }
          return true;
        });
      )
  }
}
First we are going to retrieve the isLoggedIn ({1}) getter from the AuthService, which is an Observable. Since we are only interested in checking the value from the Observalbe a single time (if the user is logged in or not), we will use the take operator ({2}). We will verify the value emitted by the BehaviorSubject ({3}) and if not logged in we will navigate to the login screen ({4}) and return false. The AuthGuard will return true in case the user is logged in, meaning the user can access the route (path: ‘’) which renders the HomeComponent.
Updating the AppComponent
For this example, we AppComponent will be our main component:
import { Component } from '@angular/core';

@Component({
  selector: 'app-root',
  template: `
    <app-header></app-header>
    <router-outlet></router-outlet>
  `,
  styles: []
})
export class AppComponent {}
It will display the app-header which is our navigation bar and the component according to the routing config.
Creating the Navigation Bar
Let’s start creating the navigation bar with the simplest template:
<mat-toolbar color="primary">
  <span>
    <img src="assets/img/angular_whiteTransparent.svg" class="angular-logo">
    Angular NavBar + Login Example #01
  </span>
  <span class="fill-remaining-space"></span>
  <button mat-button>Menu Option 01</button>
  <button mat-button>Menu Option 02</button>
  <button mat-button routerLink="login">Login</button>
  <button mat-button (click)="onLogout()">Logout</button>
</mat-toolbar>
Our navbar has a title, two menu options (just to look prettier) and a Login + Logout buttons.
If try to execute the application now (ng serve) and access the /login route we will have the following result:
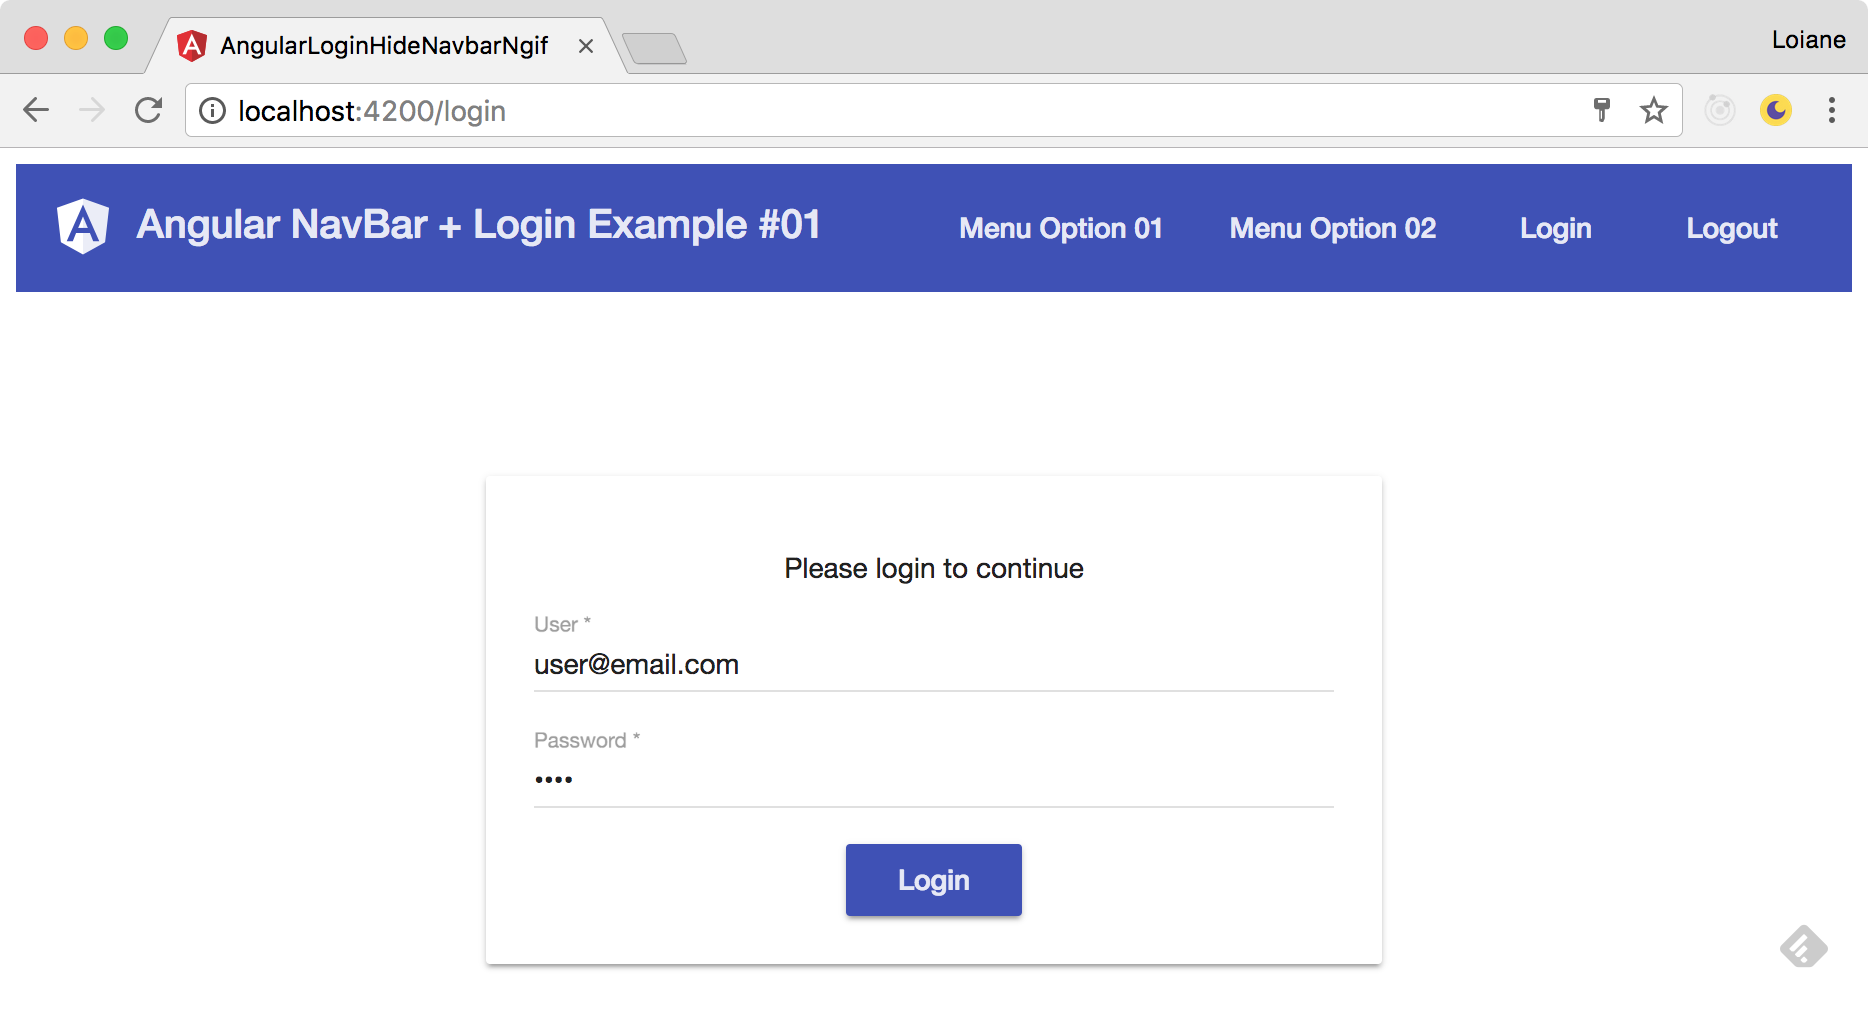
We still need to hide the navigation bar.
So let’s implement the required logic in the header.component:
import { Observable } from 'rxjs/Observable';
import { AuthService } from './../auth/auth.service';
import { Component, OnInit } from '@angular/core';

@Component({
  selector: 'app-header',
  templateUrl: './header.component.html',
  styles: [
    `.angular-logo {
        margin: 0 4px 3px 0;
        height: 35px;
        vertical-align: middle;
    }
    .fill-remaining-space {
      flex: 1 1 auto;
    }
    `
  ]
})
export class HeaderComponent implements OnInit {

  isLoggedIn$: Observable<boolean>;                  // {1}

  constructor(private authService: AuthService) { }

  ngOnInit() {
    this.isLoggedIn$ = this.authService.isLoggedIn; // {2}
  }

  onLogout(){
    this.authService.logout();                      // {3}
  }
}
First, we will declare an Observable ({1}) to receive the value emitted from the AuthService ({2}). We are using $ at the end of the Observable identifier. This helps us while reading the code to identify which variables are Observables or not.
We will not subscribe to the Observable in the HeaderComponent TypeScript code. We will only store the Observable reference (
{2}). We will use theasyncpipe in the HTML template to subscribe/unsubscribe to/from the Observable automatically. This is considered a best practice by the Angular/RxJS community.
And at last, when the user clicks on the logout we will call the logout method ({3}) from the AuthService.
So now let’s back to the HTML template and use *ngIf to display the navbar or not:
<mat-toolbar color="primary" *ngIf="isLoggedIn$ | async">
The code above is enough to display or not the navbar.
The *ngIf does not show or hide the DOM element, it creates (show) or destroys it. We could also use the hidden HTML property, but in this case, if the user does not have access to the application, it is better to not create the DOM Element for security purposes instead of only hiding it.
Just for the purpose of this example, suppose we also want to verify if the user is logged in and display the Logout button:
<button mat-button (click)="onLogout()" *ngIf="isLoggedIn$ | async">Logout</button>
Note that the expression is the same as used in the navbar. We are subscribing to the isLoggedIn$ twice. We can write a better code and only subscribe once by using the as alias introduced in Angular v4.0 enhanced *ngIf and *ngFor:
<mat-toolbar color="primary" *ngIf="isLoggedIn$ | async as isLoggedIn">
  <!-- more HTML template code -->
  <button mat-button (click)="onLogout()" *ngIf="isLoggedIn">Logout</button>
</mat-toolbar>
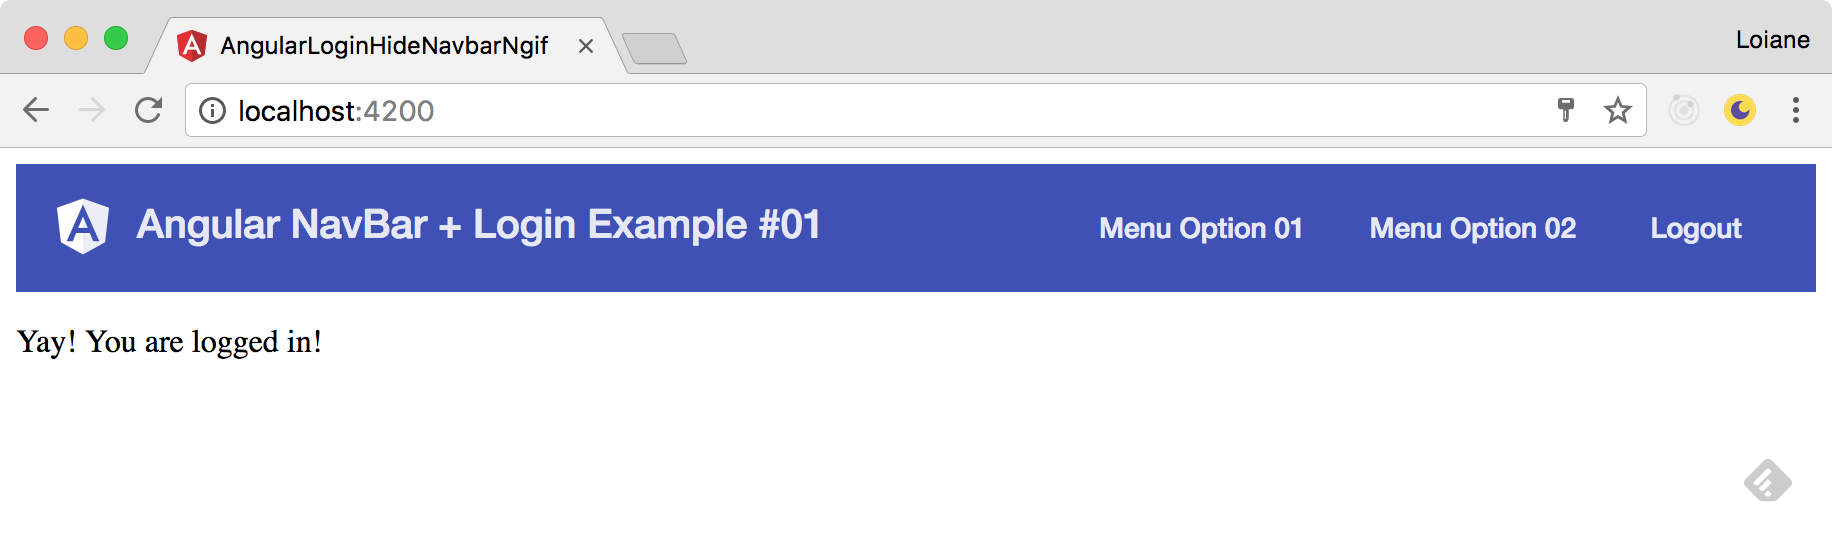
The code above means we are subscribing to the isLoggedIn$ and storing its value in the isLoggedIn local template variable. Then we can use this variable in other parts of the template such as the Logout button!
Now we have the expected behavior for our example:
Example 2: Using different layouts and routing config
For the second example the code is basically the same as the example 1, but with a few changes. Instead of using *ngIf to hide the navbar, we are going to use different page layouts with child routes. All the control will be in the routing config.
The first change is regarding the home.component. We do not need the conditional *ngIf="isLoggedIn$ | async as isLoggedIn" to “hide” the navbar.
We also need to create two new components:
ng g c layouts/home-layout -is -it
ng g c layouts/login-layout -is -it
Creating the HomeLayout page
For the HomeLayout, we want to display the navbar, so our component will have the following code:
import { Component } from '@angular/core';

@Component({
  selector: 'app-home-layout',
  template: `
    <app-header></app-header>
    <router-outlet></router-outlet>
  `,
  styles: []
})
export class HomeLayoutComponent {}
Creating the LoginLayout page
For the LoginLayout, we do not want to display the navbar, so our component will have the following code:
```jsimport { Component, OnInit } from ‘@angular/core’;
@Component({ selector: ‘app-login-layout’, template: `
The component only has the `router-outlet` to display the LoginComponent.

### Configuring the routes and child routes

Our routing config will be different from the first example:

```js
const routes: Routes = [
  {
    path: '',                       // {1}
    component: HomeLayoutComponent,
    canActivate: [AuthGuard],       // {2}
    children: [
      {
        path: '',
        component: HomeComponent   // {3}
      }
    ]
  },
  {
    path: '',
    component: LoginLayoutComponent, // {4}
    children: [
      {
        path: 'login',
        component: LoginComponent   // {5}
      }
    ]
  }
];
When we try to access "htpp://localhost:4200/", Angular will evaluate the route paths. The first part of the path for the first route configured is "" ({1}), so let’s continue evaluating the second part which is also "" ({2}), so we have a match! But the guard ({3}) still need to verify if the user can access the HomeLayoutComponent (if user is logged in). If the user is logged in, then the access is granted and the user will see the HomeLayoutComponent (the navbar along with the HomeComponent being rendered in the router-outlet), otherwise it is redirected to "htpp://localhost:4200/login".
So suppose we are trying to access "htpp://localhost:4200/login". Angular will evaluate the route path again. The first part of the path for the first route configured is "" ({1}), so let’s continue evaluating the second part which is "login", so we do not have a match with ({3}). We need to evaluate the next route configured. Let’s go again! The first part of the path for the first route configured is "" ({4} this time), so let’s continue evaluating the second part which is "login" and we have a match ({5}). In this case the LoginLayoutComponent is displayed. Since there is only a router-outlet in the HTML template, only the LoginComponent will be displayed.
And we have the same output as the example 1!
This approach where we control the layouts using the router configuration can be used in applications that have different page layouts such as a plain page, or a page with a header navbar, or a page with a sidebar (very used in admin layouts).
Source code + Stackblitz
Source code available on GitHub
References:
Happy coding!